I really enjoyed working on and mixing this song as before this, I never really knew what mixing was and what it involved doing. After getting an insight into this, I plan to use the things I learnt here on my electrical composition to add a better sense of professionalism to my work and so it sounds much more refined. This is what the final piece sounds like:
https://soundcloud.com/abigail-swift-4/the-umbrellas-mix
After downloading the stems and importing them into Logic, the first thing I did was sort out similar instruments into colours. I did this by pressing ALT+C on the keyboard and picking any colour. I grouped all the drums together in pink as this makes it easy for me to tell which tracks are drums, and then I just put some random colours on the other instruments. I did this first as it improves your workflow so much as you can tell straight away what track you are working with.
After assigning the colours to tracks, we went through each one and cleaned up the sound by creating regions out of them. We did this by moving the edge of the tracks inward, using the marquee tool and splitting the track at the playline. All of these things account to a much purer song as it gets rid of areas where microphones were picking up studio ambience like talking or shuffling around or noise from other instruments.
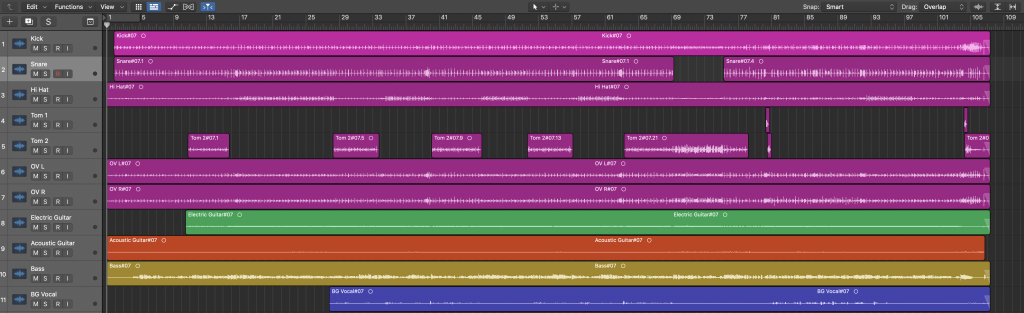
To ensure the tracks were moving smooth and swiftly, I added fade-outs. A fade is when the music slowly gets quieter until it eventually goes into nothing (vice-versa) and this is important in production as it stops any other noise at the end or the start of a region from spilling into it by accident. I added these fades by putting a number in m/s into the fade-out tab on the track and listening to it in solo to make sure it was perfect. It also adds a triangle shape on the region to show the fade and how long it lasts. This is what the song looked like when all of these things were done:
After this, we eventually got to making the raw recordings sound professional by putting EQ on every instrument. An EQ is an effect used on almost everything in music; it allows you to boost or lower certain frequencies depending on the instrument and the sound you prefer. For example, you might want to boost the higher frequencies on a hi-hat and drop the low ones, and boost the lower frequencies on a bass guitar and drop the higher ones. This is my EQ of the bass drum in the song. As you can see, I boosted the lower frequencies (around 20 to 200 Hertz) to make the bass sound more punchy and weighty:

After cleaning the tracks and putting EQ on them all, I moved to the mixing panel to start to finalise my work. The mixing desk is important as it allows you to easily change the panning, volumes and effects from one place. I first sorted the panning. Panning is moving the noise of an instrument from one stereo speaker to another as a whole or having noise be slightly louder out of one speaker than the other. I panned the drum kit as if it was an actual kit; the hi-hat was panned the most left, whilst the low tom was panned the most right. I then panned the other instruments. After this, I worked on the volumes. I set everything to silent then moved up the sliders until I thought they were loud enough in the mix. Looking back on the finished product, I could have made the vocals slightly louder as they couldn’t be heard much over the other instrumentation.
Even more importantly, you can make a bus from this panel. A bus is a place where you can group similar instruments, for example, a drum kit or harmonising vocals, into one place. This makes it easier to sort out volumes or add effects onto a whole drum kit without having to do it one by one for example. I did this in my work by making an effect bus to which I added reverb to the drum kit to make it sound more natural echoey feeling. I then created a bus for the electric guitar, acoustic guitar and bass guitar so I could fine-tune the dynamics of these instruments. Finally, I put the vocals into its own bus and created another effect with auto-tune on it. I added a small amount of auto-tune to vocals as it removes any instances where the vocalist might be singing slightly sharp or flat. After doing all of this, this is that the final piece looked like, including the mixing panel:
