Side Chaining
Sidechaining is a very common production technique that allows the producer to use the output of a track to manipulate and alter the compression of another. It is common to see sidechaining on a bassline; the kick drum will act as the alter, and when the kick is played, the compression of the bassline will come down and go back up after the kick ends. So in more basic terms, the bass drum will stay the same volume throughout the whole track, but the bass line will lower in volume so the kick can come through in the mix more. However, you can also use this technique on different instruments like the chords or melody with the kick drum again acting as an alter to get new and unique sounds and rhythms in your music.
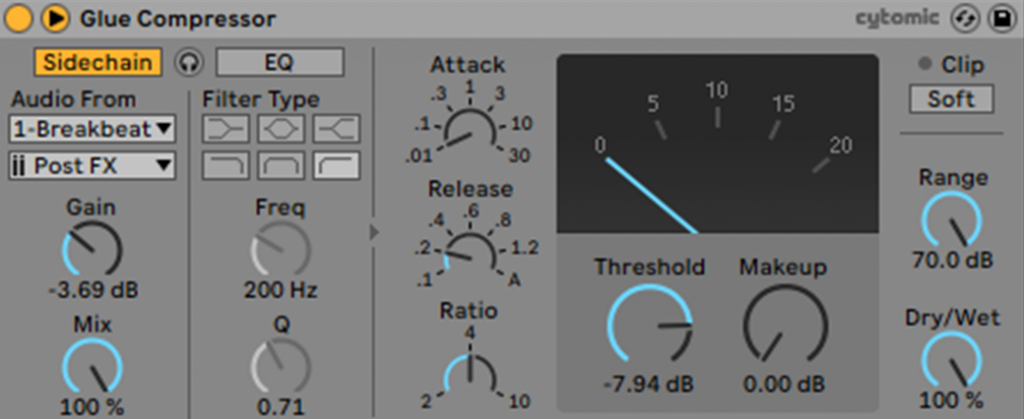
To make a sidechain, you can use Ableton’s own glue compressor. First, you want to add the desired effects to your instrument until you are happy with its sound. Then, add the glue compressor to your effects rack on the bass and enable the sidechain button. In the ‘audio from’ section, pick your kick drum or whole drum audio track if you are using a sample. Adding a sidechain to your bass tracks gives the song much more texture and oomph from the lower frequencies. Overall, the sidechaining technique helps to add movement and makes the whole song seem more lively. However, it shouldn’t be used on everything; if you do put it on everything, the song can become too messy and the volumes will sound all over the place.
I added a sidechain compressor to both my played bass guitar track and my sub-bass track. I added it to the sub-bass track as this can sound too muddy if you don’t separate the kick and sub-bass from each other. In this case, I was using a sample so before taking the audio from this drum track, I made sure that the bass was prominent in the drum loop by adding an EQ and a drum buss, then upping the lower frequencies through these. I then took audio from the drum sample and adjusted the gain until you could hear the bass dropping and coming back when the kick hits. I then set the shortest attack to make it more punchy and set a faster release so there is quite a significant volume drop when the kick plays. This is what my sidechain compressor looks like on my bass guitar part:
Racks
Creating racks is a great way to speed up your production process and it can help hugely in the long run when producing a song. A rack is essentially a preset of effects that you can create and then save in an Ableton folder for later use. For example, if you created a great effects rack for some hi-hats with an EQ, compression and other effects like reverb or delay, you could save that rack so you can use the same effects again in a different song. You can change these effects or add/remove different effects from the preset as well. You can also stack racks on the same track. This is great if you have a nice reverb and delay effect rack, then wanted to add a compressor rack to that as well, but still keep the two separate from each other in the effects region. This also means that the compression would not affect the other rack, however, but this can come out with some interesting sounds!
To create a rack, you find the track you want to add effects to and add these effects. These might be EQ, compression, any other effects you want like reverb, chorus, amp. Once this is done, you can shift-click (on Windows), right-click and press ‘group’; this will put the effects chain in a group together. You can then go ahead and save this in Ableton as a new rack. From then on, you will have that effects chain to use where and when you want. To get different purposes out of these racks, you could put different things on the rack. For example, if you wanted the effects chain to act as a sidechain as well, you could add this effect at the end of the chain and save it as a sidechain with added effects.
This is one of the racks I created earlier. It’s for a bass part and the effects consist of an EQ, reverb and a sidechain compressor. I then saved this in my Ableton user library directory under presets – audio effects – audio effect rack so it is easy to find later. I also called the rack something useful and that describes what the rack is for; ‘bass sidechain effect rack’. Calling it something like ‘gggg’ or simply ‘sidechain’ would not be helpful as it does not directly tell you what is on the rack and what instrument it is for.

Making Leads
Making leads is an important part of sound design, especially when you are producing them for a song. A lead is an instrument that is quite prominent in the song and usually plays the melody of the piece, so this could be a guitar, piano, on in my case, a synthesiser (but these can still be used for other things like chords or backing melodies as well)! Using the wavetable on Ableton, you are able to produce your own distinct sounding synth which you can record into your song. You can also use the analogue synthesiser which has been made to replicate an actual analogue synthesiser. I haven’t used this yet as I have only tried wavetable, but I want to have a go at it in another project perhaps!
The great thing about designing your own synth is that it is very unique and you won’t hear that exact sound almost anywhere else, so you can be proud of your own creation as it is very distinctive. Also, the wavetable is very freeing, you can manipulate and change almost anything you can imagine with it, from the wave shape it uses to how many voices it has. The creative freedom that comes with the software means that you could spend hours designing the perfect synth, which could become a problem if you have a deadline like me! All in all, the synth is fairly easy to get to grips with and I will run through some of the features it has.
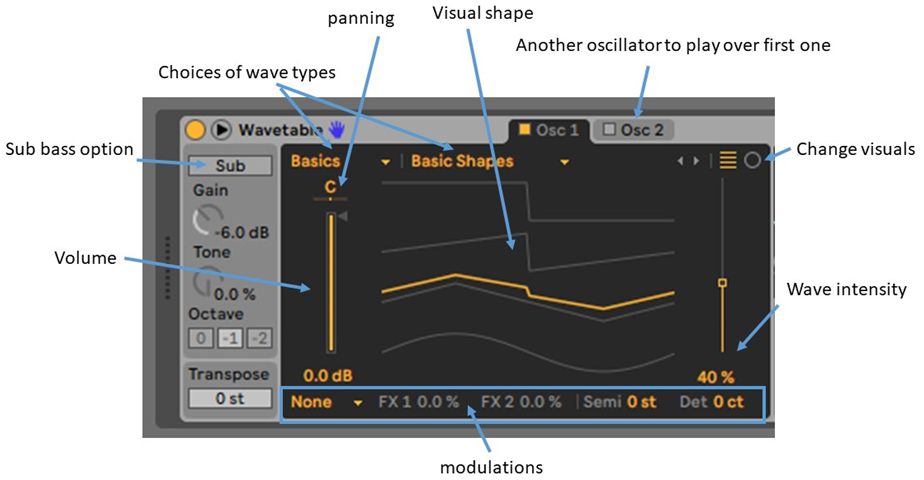
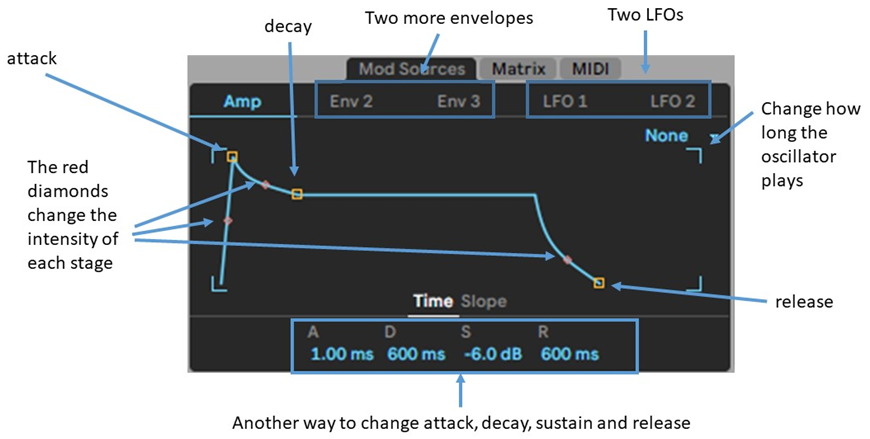
The wavetable also has an EQ setting inside the software which does exactly what any other EQ does, but you can only have two points to change. If you wanted to change more things with the equalizer, you could add an eight-point EQ as an effect so you have more freedom over the frequencies and can really refine your sound more. At the right end of the software, you can modulate the sound of your oscillator even more with an envelope and LFOs. An envelope can change how the sound of an oscillator changes over time by using attack, decay, sustain and release. An LFO can create pulses or rhythmic patterns by changing the wave’s speed of the lower frequencies. I will run through some of the envelope features.