Microphone Placement And Techniques
Stereo Miking Techniques
Having a good microphone placement before tracking an instrument is essential to have your desired depth and space in the recording. The most standard stereo microphone placement is what’s called the ‘X-Y Configuration’. This is where the two cardioid microphones are at an angle to each other (such as 90°), with one on top of the other, facing the instrument or amp. This gives a broad stereo image as they are facing different areas of the instrument or amp. As they are so close to each other, you would face minimal issues when converting the track to mono (Gibson, 2002). See the visual below to show what this microphone technique looks like in practice.
The ‘A-B Configuration’, or the ‘Spaced Pair Configuration’ uses two omnidirectional microphones in a parallel and in a straight line, usually around three to ten feet apart depending on the size of the instrument you are recording. Use this technique if the room you are recording in has good acoustics you want to implement into your recording. Using this setup will allow you to capture the natural reverberation and ambience of the room whilst also recording the instrument you want to track. This combined together will create a great stereo image with good acoustics. However, this setup is not suitable for mono recordings (Gibson, 2002). See the image to see how you can set this configuration up. I will use this configuration for my overhead mics above the drum kit as this captures the cymbals well and allows me to place them directly over my hi-hat and crash on the left and crash and ride on the right.

A less common microphone pairing is the ‘Blumlein Configuration’ named after British engineer Alan Blumlein (What is the Blumlein Technique?, n.d.); it creates a reliable sound when it is converted to mono and is the best setup to do this with. The sound it creates sounds true to what a listener would hear of they were in the room during the recording and gives the recording space and depth that is hard to get with other microphone setups. It picks up ambience well and depending on where you place the setup height-wise, you can control the tones and reverb it picks up from the room (Gibson, 2002). This could be a nice technique to use when recording stems as I want them to sound ambient and wide with some natural reverb, and I don’t want the cymbals to be too close and harsh-sounding.

The final most common setup is the ‘MS Configuration’ (M being ‘mid’ and S being ‘side’). This gives a true stereo picture and achieves a natural acoustic sound. This setup uses two microphones, a bidirectional microphone as the ‘side’ and another microphone as the ‘mid’, usually cardioid. The side microphone picks up the ambience and natural reverbs of the room and sides of the instrument as it is 90° from the instrument being recorded, whilst the mid microphone picks up the instrument directly. However, as the two sides of the bidirectional microphone are out of phase with each other when you have recorded through the two microphones, you have to split the side recording into two channels, reverse the phase of one of them and pan each channel hard left and hard right to hear the final product. (Gibson, 2002), (Keller, 2020).
Miking Vocals, Guitar And Drums
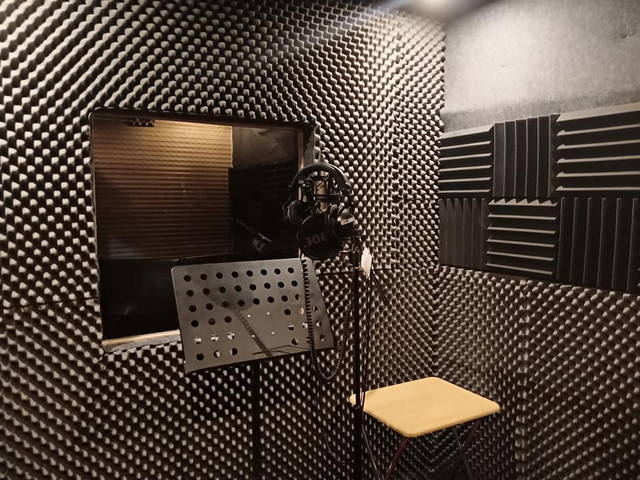
Vocals are arguably the most important aspect of any song. They’re the focal point of the track and give the song meaning and emotion, and they determine whether the song has a good outcome or not as most listeners focus on the vocals and lyrics before anything else. The mic placement is important as it determines the general sound of the vocal recording. Different placements depend on the genre of music, the microphone you’re using and the vocal timbre. Generally, you should use a condenser microphone with a cardioid polar pattern for recording vocals, or a ribbon mic when using a close-miking technique (Gibson, 2002). Placing the mic further to the vocalist allows for more room and picks up ambience, but the vocals will sound quiet and colder. Close mic technique records a thick, warm vocal that will sound full and quite heavy, with little to no room ambience. In most cases, place the microphone 6-12 inches from the vocalist to get the right amount of vocal thickness and ambience (Gibson, 2002). However, we could experiment with placing the microphone on the further end of that distance to get the natural, lo-fi sound we desire.
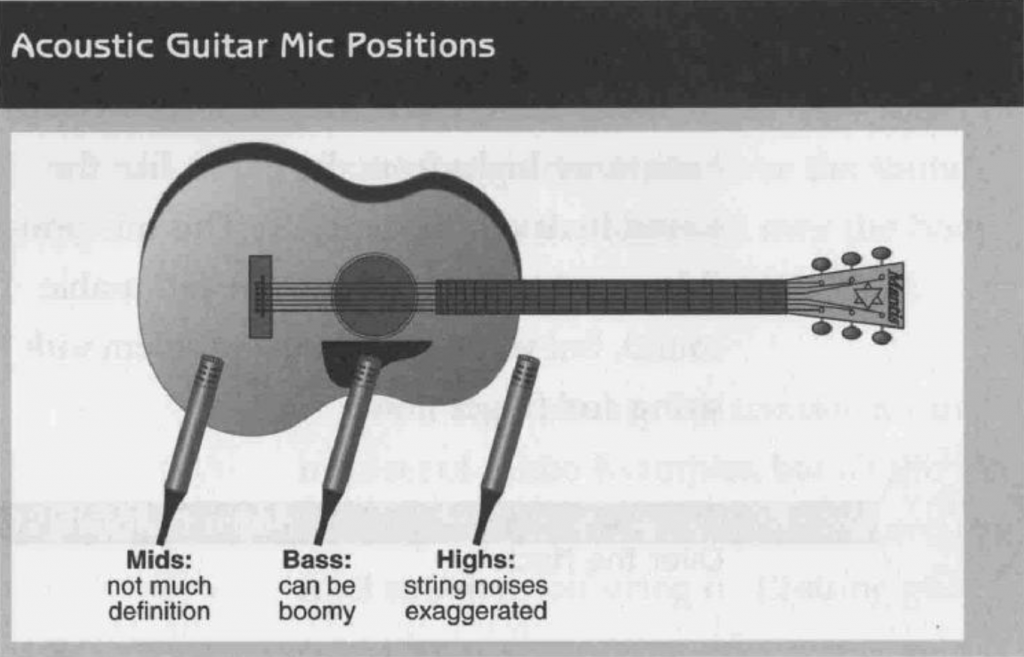
Miking up guitars depends on the type of guitar and the sound you want to achieve. To amplify acoustic guitars (if they aren’t electro-acoustic), you need to use microphones. If they are electro-acoustic, you can plug them straight into a DI box and into the mixing desk but this is not suggested for recording situations as it makes the guitar sound dull and small, ruining the natural sound of an acoustic instrument. To mic up an acoustic guitar, you can use a condenser mic as they pick up small details in the recording, however, they can capture a lot of bass, so make sure to roll this off in the mix. You can put the microphone at different places on the guitar, such as the neck, soundhole, or bridge, or use multiple microphones to capture a fuller and more detailed sound, but this can start phase problems when recording (Gibson, 2002). Again, having the microphone(s) further from the instrument itself gives more room sound and ambience.
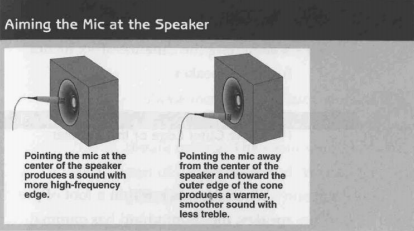
Miking up an electric guitar is similar to an acoustic guitar in some ways. Generally, you wouldn’t DI an electric guitar as it would sound too harsh and jarring. But instead of miking up the actual instrument as you would with an acoustic, you would run the electric guitar through an amp and then mic up that, more specifically, the speaker cone inside the amp. Condensers and dynamic microphones are best suited to mic up an amp. Aiming your microphone(s) at different areas of the speaker cone produces different sounds, see the figure below to see how this works. To test and mix sounds, you could aim multiple microphones at different areas of the cone, such as having a dynamic microphone in the centre and a condenser away from the centre (Gibson, 2002). The recording will contain little room ambience if your microphones are close to the speaker cone. I might experiment with a condenser microphone being a little further from the speaker to capture different sounds, but also one close to the amp to record a more full, brighter sound. I have also seen people record amps using a kick drum microphone placed near the speaker cabinet behind the speaker cone to pick up lower frequencies. Also, I have heard of guitarists placing a microphone near the body of the guitar (as you would an acoustic guitar) to hear the pick or fingers striking the strings, giving the guitar a more percussive element.
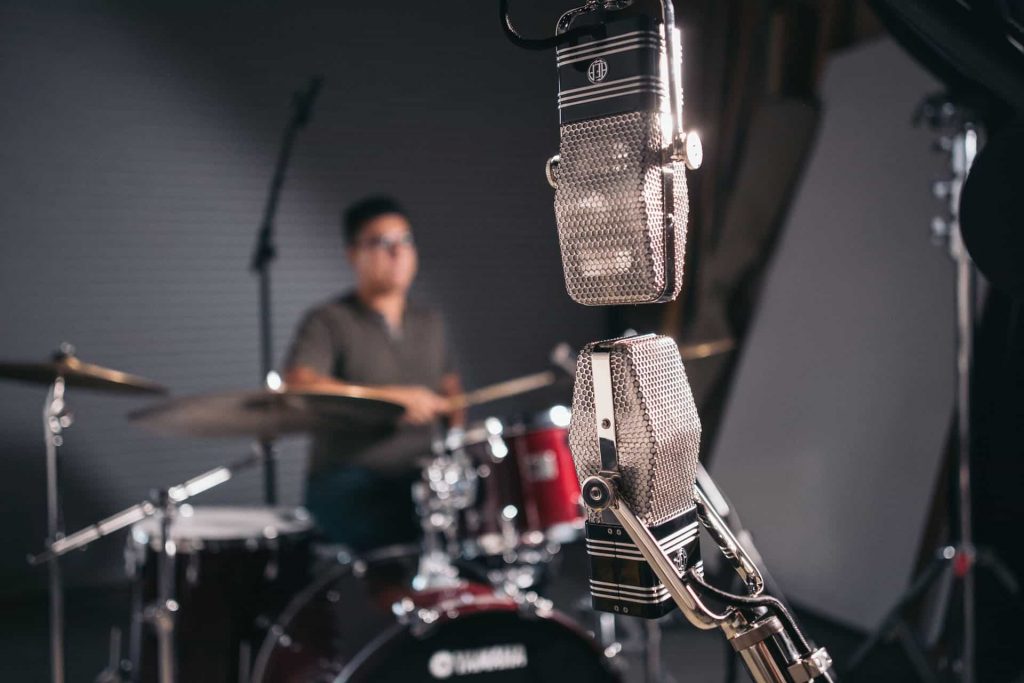
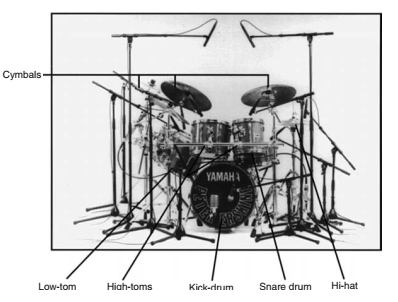
The basic rule of miking a drum kit is to have two condenser microphones above the kit, facing in the directions of the hi-hat and ride and microphones to mic up the drums at a close range. Condenser microphones will need phantom power for them to be heard better. Finally, you will need a kick microphone placed in or around the kick drum to pick up bass frequencies. Sometimes the kick drum resonant head has a porthole for you to place the kick mic; if not, place it just outside of the head. Notice the image below to see what a standard drum microphone setup would look like. You can experiment around with different configurations that include lesser or extra microphones and equipment to achieve different sounds. The room plays a big part in the sound of the drums too; if placed in an acoustically treated drum booth, the recording will be very dry, allowing for the mixer to add their own effects after the recording. If placed in a larger room such as the main studio, or even a reverb chamber or large hall/cathedral, the drums will sound very spacious and you will pick up the natural echo and room ambience.
- When it comes to recording drums for our own tracks, I plan on using this configuration to mic up the drum kit and capture an ambient stereo sound:
- Two overheads in spaced pair configuration
- Snare mic facing batter head
- Tom mics facing batter heads
- Hi-hats
- Kick mic by microphone port on the resonant head
- Could experiment with a Blumlein configuration a few feet from the kit
Experimental Recording Techniques
Imperfections seem like a thing you must eliminate from music to make the track flawless and ideal so it performs well in the charts. However, this is not always the case, especially with the genres and songs we are taking inspiration from. Obviously, huge mistakes need to be removed and re-recorded, however, minor issues like a slight tempo change, a very minor timing issue or not striking a drum perfectly are longed for in grunge and music as it creates uniqueness and a sense of lo-fi. It allows both the musician to be more expressive during their recording. With everything sounding absolutely perfect, the process of writing the song and the authentic vision is lost to quantizing, removing noise and computerized effects (Nisbet, 2019). I think of myself as a perfectionist and have previously produced tracks with this mindset, so I could challenge myself with this project to keep certain imperfections to make it unique and representative of the grunge and lo-fi scenes.
(Nisbet, 2019)
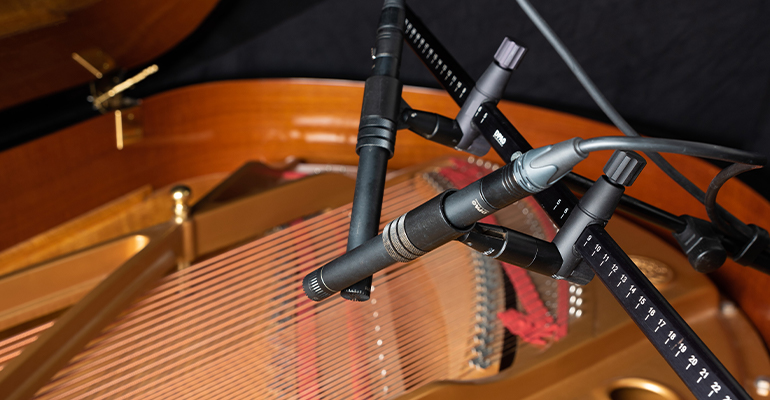
Ambience is an important factor for all music, but especially when used in genres like slowcore, lo-fi and soft grunge. Ambience can be created using many different tools, one of the easiest being a laptop. My friend showed me a plugin on Ableton called Treetone, a part of the Inspired By Nature pack for Max For Live. I was impressed by it and started to do more research into the plugin, as I thought it created a great ambience and there are so many parameters to make your sound totally unique, as well as the plugin being easy to use. However, if we wanted more of a natural ambience, we could use actual instruments. For example, using a piano. Noam Wallenberg, in the article below, used a contact mic on the piano running through effect pedals such as delays, reverbs, filters, tape emulators and tremolos to create a soundscape that is atmospheric and airy (Reverb, 2017). This would work very well in the background of our music to give the song more feel and atmosphere. Perhaps it would sound interesting to use when the songs go quiet dynamically, and there is just guitar or vocals, for example.
A feature we really want to implement into our music is the retro, almost gritty sounding recordings that you used to get from tape recorders, cassettes and vinyl players. This grungy, lo-fi musical aesthetic has come into fashion dramatically recently and I love the sound of it. To employ these sounds in our own music, it would be ideal to use physical gear such as four-track tape recorders, modulators and outboard gear as this generally gives a warmer, more authentic sound. However, the chances are that we won’t have access to these so using plugins and Ableton effects will work fine too. Ableton’s saturator and vinyl distortion effects help to emulate the sound of an analog machine, adding colour to your tracks. However, one of my favourite external plugins is the Vinyl VST from Izotope. This simulates record players from different decades and allows you to use other parameters such as spindown, wear, warp, noise and more to recreate a nostalgic sound. Another VST I have done some research into is the SketchCassette. A tutor showed told me about it and thought it would fit my project, so I downloaded the demo and did a quick experiment with it. It has different cassette presets as well as age, saturation, waveforms, flangers and many more parameters to experiment with to achieve your desired sound. See the audio and video below for a quick idea as to how it can affect a simple track.

Acoustic Soundproofing And Noise Isolation
Frequency Reflection
When it comes to recording and mixing, square rooms with bare, thin walls and corners are your worst enemy. Corners trap frequencies, making it harder to EQ music when there are unrealistic and altered frequencies being trapped around the room. Bare, flat walls allow the sound waves to reverberate off the walls until they eventually get phased out, which can be especially bad in a control room when you are trying to add effects like reverb and echo to channels as it creates an unrealistic reverb that won’t appear when playing it in different environments. In recording situations, this can affect the quality of recordings as these reverberations can be picked up by other instrument microphones. Thin walls make the acoustic isolation poor as noise from outside the room can bleed into the recordings (Huber and Runstein, 2005). Here are some things you can do to create uneven spaces in control rooms and studios, according to Modern Recording Techniques (Huber and Runstein, 2005):
- Eliminate open joints such as underneath doors or vents by putting something, such as a thick piece of brick or concrete, over them.
- Invest in some acoustic separation techniques, such as buying a drum shield and thick room dividers on wheels to separate instrumentalists recording live in a studio.
- Place objects in the corners of the room and try to make the edges of the room more curved or generally less of a right angle to ensure frequencies do not get trapped in these areas and continue to reverberate.
- Set up the drum kit on a riser to reduce unwanted low-frequency resonances from the studio floor.
- Place things like thick wooden boards on the walls of the studio and control room to make the bare walls more uneven, thus making the sound waves phase out quicker.
Frequency Absorption
Creating fewer areas for sound waves to be trapped or reverberate around is great, but you also need to ensure the sound waves are quickly absorbed too. This can occur when studios and control rooms are made out of materials that struggle to absorb sound waves, such as hard materials like brick or concrete. To help walls, floors and ceilings absorb these reverberations, you can use common objects like blankets or sheets to cover hard walls. You can also place rugs or sheets on the floor if the room is not carpeted. A great investment is foam tiles, which absorb noise and reverberations easily. Placing them on walls also helps to make them uneven. You can get many types and shapes of foam tiles and they all reflect sound waves in different ways (Huber and Runstein, 2005). Some common examples of foam tiles and how/where they are used are pictured below.