Compression
Compression is a mixing and mastering technique. A compressor shrinks the soundwaves of a track or channel down and reduces the peaks of the waveforms. It essentially reduces a song’s volume range but in a positive light by still keeping the dynamic range present. It is vital for mixing and mastering your tracks as it removes any sounds that are too loud and brings up any noises that are too quiet, making the final song balanced.
When working with compressors, you first need to adjust the threshold. This sets the level at which we want to compress, in dB. For example, If the threshold is set at 5dB, the compressor will bring anything above that down to 5dB if a ratio is not set.
The ratio adjusts the percentage of compression that you are applying. So, if the ratio is at half, the compression will work at a half rate. For example, if the threshold is set at 9dB and the ratio is at half, the threshold will actually work at 4.5dB because it has been halved. This essentially determines how much compression we actually want to apply to that signal. When mixing, bass sounds good at around 4:1, drums and vocals at 2:1, and other things like guitars from 2:1 to 6:1.
The attack is how long it takes for the compression actually kick in and start working. This is hugely important for drums; a slower attack would be for a softer kick, a faster attack would be for a more punchy kick so depending on the genre you are making, you would want to adjust the attack accordingly. For example, the attack would want to be faster if you are making an electronic or hip-hop track, or softer if you are making a jazz song and are wanting a more feathered kick.
The release is for when the sound drops below the threshold; it determines how long the compression will stay on for after the audio dips below the threshold amount you set. For example, for a fast release, the volume will drop rapidly when it hits a peak, and for a slow release, the compression will stay on for a longer time, not dipping the volume as much. Preferably, you want the compression to be dropping just before the next hit or peak on a waveform. If the release is set too slow, the compression will not release in time for the next hit, therefore making the compression less prominent.
The last thing you want to set when working with compression is the makeup gain. This has the ability to change the whole average volume of the track once compression has been applied. As compression can often lower the volume overall of the track, makeup gain is important if any volume has been lost to the compression. It can bring that lost volume back up whilst also keeping the peaks that you compressed relative to the rest of the track’s volume.
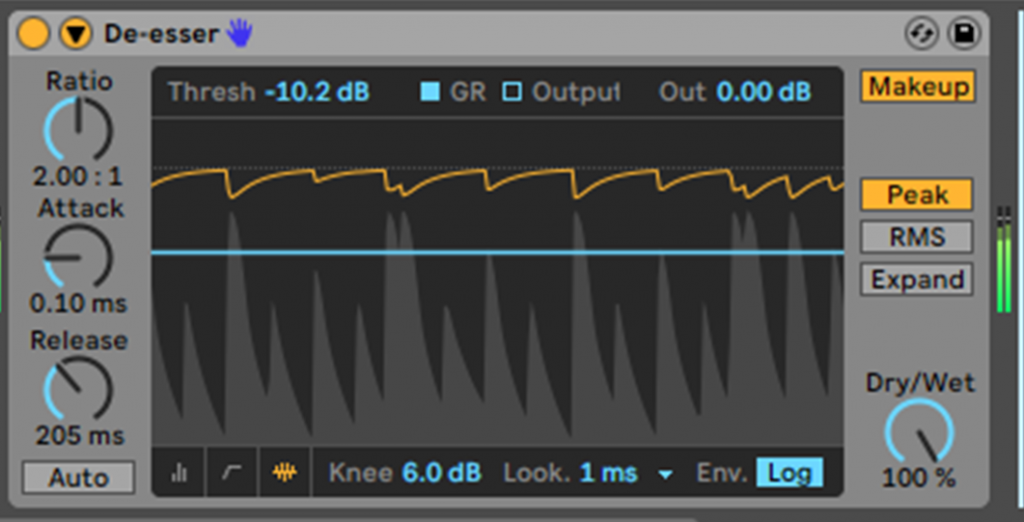
I got some practice with compressors by using an old track of mine and adding compression to the drum track. I prefer using Ableton’s compressors as you can see all of the waveforms and it is much more visual than some other plugins. The de-esser preset that I used here is meant for sibilance on vocals and instruments. First, I set the threshold to just on the tip of the snare hits in an effort to cut some of the kick noise out, and a little snare as well. After this, I set the ratio to 2:1 as this is recommended for drums. I then changed the attack to 0.10 ms so the compression comes into work fairly quickly to give it more of a punchy feel. The release comes next, and I set this to 205 ms. This means that the volume drops fairly quickly, making that compression more prominent and ensuring the volume starts to drop just before the peak hits. Finally, I enabled makeup so I can gain back any volumes I might have lost during the compressing process, whilst still keeping the dynamics where I want them to be. For now, I’m going to stick with Ableton’s own compression effects and get used to using these. However for projects in the future, I could look into some compression plugins that might be more suited to me and do a better job at compressing.
Sends And Return (AUX) tracks
A return track (or sometimes called an AUX track) is a great way to use effects on your channels in an easier and time-saving way. ‘In the studio, AUXes are used to create a headphone mix or are used as FX sends’. (Dittmar, 2018). Using return tracks when mixing allows you to add the same effect to multiple buses or individual channels, and you can adjust how much of an audio signal is sent into the return track, or in other words, the dry/wet. This process of putting an amount of sound through a return track is called a send as the signal is following an alternative path to the master bus. When using return tracks, it also lowers your CPU usage as you are not having to put the same effect onto separate channels, but instead are sending the same audio signals to different effects at once.
In Ableton, using return tracks and sends is very easy; you just add a return track by right-clicking on the arrangement view and going to ‘add return track’, and then go to the live view and here, you can adjust how much of your audio track’s signals are sent to that return track, and what channels you want sending to different effects or parameters. Here is a video that visualises this:
Automation
Automation is an essential part of mixing, and almost every single song will use some form of it. . Automation is ‘A system that memorizes and then plays back the position of all faders and mutes on a console.‘ (Owsinski, 2016). This essentially means that it can change the sound, volume and mutes of your song during playback after you have told it what to change. For example; ‘Lets say you want a particular instrument turned up during a certain section… This is something you would do during the automation phase of the mix.’ (Dittmar, 2018). Automation can also apply to effects and other parameters as well. It can be inputted through a mouse and keyboard on your preferred DAW, or, if you map a dial from your midi keyboard to a parameter, you can move the dial during recording and it will remember what automation you have made. Automation can be very fun to use, but you also need to think of the more correctional uses for it, such as making sure the volumes are balanced the whole way through the song. ‘Even with parameter automation as sophisticated as it is these days, it still takes some time and a critical ear to be sure that everything is heard.’ (Owsinski, 2016).
As well as automating audio and midi channels, you can also do the same to return tracks, telling the DAW when you want the send to start moving and how the return track’s parameters will change in the song. It is very easy to input automation into songs on Ableton; here is a quick video that shows how you can do this:
Panning
‘The wide, or panning, dimension is placing sound elements in the stereo sound field in such a way as to make a more interesting soundscape, and, to a lesser degree, so that each element is heard more clearly.’ (Owsinski, 2016). Panning is a simple way to make your stereo mix sound a lot full and wider. You can pan your tracks to different areas left and right. On Ableton, you can pan left and right up to 50, and when you hit 50, it is classed as a ‘hard left’ or ‘hard right’ as no sound would be coming out of the other speaker. This is a great way to separate different instruments from each other and make your song wider. Mixing in mono first is a good idea as then you can experiment with panning once your mix has been cleaned up so there will be no clashing sounds or frequencies when you move in to pan them. You can pan different instruments to wherever you want, but generally, you should stick to a guide to help you get the best and most genuine stereo sound. For example, you wouldn’t want to pan the bass hard left and the main melody line hard right as they will become extremely separate from each other and won’t carry each other as much. Instead, you might want to pan relative to how you would see a band during a live performance. You should also be careful when panning because it can lower the volume of that instrument so ensure to bring the volume back up after panning it if you want to.
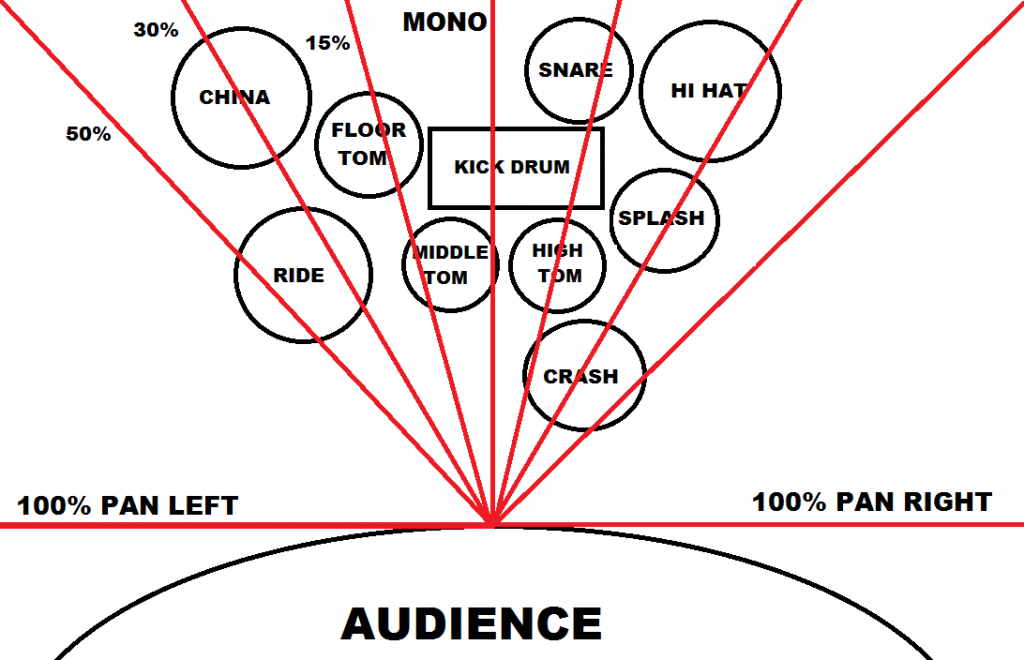
This image shows a basic understanding of how to pan drums for the best effect. Drums are usually panned relative to an actual drum kit but the position of these can change according to your own preference. For example, a drummer might pan so the hi-hat is on the left and low-tom on the right, but others can see it through an audience view; the hi-hat on the right and low-tom on the left. Personally, as a drummer, I prefer panning with the hi-hats on the left as this makes more sense to me because that is how I usually see a drum kit. However, for most mixes, the kick drum, snare and some toms will stay generally in the centre. In songs where the producer uses a drum sample, you cannot pan these drums as you cannot split the different types of percussion (unless you spend a lot of time copying the same track and using an EQ to filter out each instrument on the kit)! But, this is not so much of a problem as you can pan other percussion parts.
Even though you might want to stick to a general guide, you can also be very creative and unique with this as well. You might want to use effects like auto-panning which essentially automates panning so the sound will move around your head to create a much more interesting feel as a lot of panning usually stays in the same area for the whole song, making it quite static and uneventful. However, you don’t want to go too crazy with this as it can make the track sound extremely messy and can even cause some dizziness! Also, Ableton’s delay effect has a ‘ping pong’ feature which is similar to the auto-pan, but it only pans the delay effect and not the actual track itself. This can be brilliant for ambient and spacy instruments or little jingles you might have throughout the song that you want to make more prominent and entertaining for the listener.
Volume Balancing
Volume balancing is an important aspect of both mixing and mastering. In mixing, making sure your instruments are all balanced can make sure you can get ideas of instruments you want to be at the forefront of the song and which instruments you want to be more in the background. When balancing volumes in the mixing stage, you must leave enough headroom for the mastering stage. When mastering, you want to make sure the song as a whole is very balanced. You can do this by lowering or upping the song on the DAW fader and by using a compressor on the whole song. The compressor makes sure that any loud peaks in your song are squished down to ensure no clipping or distortion occurs when that peak plays. If your mastered song does not fit a certain volume parameter (if it is too loud or too quiet) your songs can be denied by streaming platforms as they want a song that is nicely balanced and not too dramatic with volumes.
When I get to mixing my track, I am going to add my effects first, then compress, and then figure out your volume balances for all of the tracks. Generally, you want your track levels to be around -23db to -9db by using the faders on each channel. If you want something to sound distant like some ambience or any fx, this would have to be lower in the mix, around the -23db mark, but it can be even quieter if you need. However, if a quiet channel is hardly making a difference to the track, you can always just remove it and this will improve your workflow and even CPU usage as you have one less sound to worry about. If you want an instrument to be at the forefront, for example, the drums or main melody, you would have this around the -9db mark, but it can be even louder if you need it.
Having loud sounds and final tracks can be risky as sometimes it can start to clip. Clipping means that the sound is too loud and will start to distort and crackle. You can tell that a track is peaking when a red area comes up in the volume gauge. This will cause problems if it is not resolved as your final master will be of low quality and will not be accepted by most distributors. You could also cause physical problems in the long run for both you and your fans as listening to loud music can cause issues with your hearing. Your fan would lower the song down if there is a loud peak, but then the rest of the song would probably be too quiet; it’s about getting the perfect balance to make sure your song is professional and safe for listeners.
Overall, you need to make sure the instruments you want to stand out more have more volume than the others. Vocals and lead melodies would be the most important in most modern songs, and will stand for my two singles as well if I want to record vocals and create some main melodies through the song or even solos in certain places. I will also make sure to balance the volume of my track as a whole at the mastering stage to make sure it has a good amount of loudness, and to make sure the whole song is nicely balanced.