What Is Mixing?
Mixing is the process that generally comes after recording and producing a track. It meshes all of the different channels and elements together so they work perfectly with each other, cleans up the sound and allows you to get creative and produce your own, unique sound by using effects and experimental techniques (How to mix music, n.d.). Think of it as making a piece of artwork and this is the final coat; painting over your work again with the aim to make the illustration look more professional and prominent. No matter how amazing the recording equipment is you will always need to mix your songs. Almost every song you’ve ever listened to will have had a mixing stage, especially in more recent times where it is so easy to get hold of the necessary equipment and easily accessible software that emulates hardware that could be expensive and hard to come by.
The most common effects can be split into two categories: correctional and creative. For example, processes such as level balancing EQ and compression can be seen as correctional as they help fix things that could cause an issue with the overall outcome and sound of the track. Level balancing is quite self-explanatory; use the faders to increase or decrease the volume of each channel depending on what parts you want to sound bold or more distant. EQ allows you to change certain frequencies of a sound, such as using a high pass filter to drop anything under 100 Hz to get rid of muddiness on vocals and guitar, for example. You could cut around 5-7 kHz in the vocals to remove any nasal sounds or sibilance, but increase the frequencies over 10 kHz to give the vocals more air and brightness. Compression helps the dynamics of the track without removing the feel of the song. It takes sound waves over a certain dB level (that you set) and automatically brings down the volume so there are no clipping issues and the sound waves are more uniform. You can then bring back up the lost volume with the makeup gain.
Creative mixing allows you more freedom with how exactly you want your song to sound. You can experiment with different effects or plugins to make your piece unique. A very common effect used at this stage would be reverb, which reflects a sound and determines how long the sound endures. This, when paired with volume levels, can take certain instruments or areas of the tracks to the background of the song if you bring down the level and bring the reverb up (vice versa if you want it to be at the forefront). Also used a lot is a delay, this is another time-based effect, which acts similar to an echo; it replays the sound until it eventually fades out. This is used a lot on vocals to give them more presence and interest. This is a good effect to experiment with, especially with melody-based tracks as it can create some very interesting harmonies and themes. Another effect that is commonly used, especially in guitar-based pieces, is a chorus. This effect works by duplicating the same soundwave, slightly detuning and moving the timing of the audio so it sounds fuller, similar to a choir.
The Mixing Process
Before you even begin to mix, you should always take time out to organise your DAW, workplace and the session you are working on. This means optimising your software and laptop for the best performance, setting up your workstation without distractions and having everything you may need around you and working well (How to mix music, n.d.). When working on your DAW (in my case, Ableton), you need to name all of your tracks based on what audio files they are playing, group different channels, for example, put all of the drum kit audios into one group. Finally, you can colour code your groups to make them look separate from the other groups. This will all help the workflow of your mixing progression and saves time trying to find channels that aren’t correctly named or colour coded. Finally, you need to cut empty spaces in recordings. This is hugely important to again, increase the workflow of your mixing progression but also to ensure you don’t leave in anything you don’t want to be in the song, such as the vocalist saying something before they start singing, the 4 stick clicks from the drummer before the song starts, bleed from other microphones in the live room, or just general noise and sounds.
The first thing you do when mixing is balance the levels. Think about what instruments you want to sound distant and which ones you want up close. With this in mind, use the faders to bring up or lower the volume of each channel. You can solo each channel to think about where you want the sound to sit in the audio field, and slowly bring in more instruments until you have the whole song level. This is important to make the song sound realistic and minimise issues with clipping (How to mix music, n.d.).
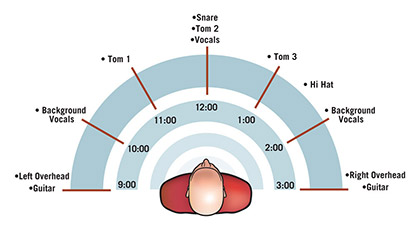
An important part of the early mixing process is sorting out your panning, as this can affect the volume balances of the track and you may have to re-adjust the faders after panning certain instruments. As panning something hard left or right makes it quieter (as it will only be coming through one speaker), if you still want that track to be prominent you will have to increase the fader more to counteract this loss of volume. Panning also helps to make the scene of the song more natural, giving a wider and more realistic stereo image. For example, panning a drum kit with overhead left at about half left (vice versa for overhead right), and your tom mics panned as they would be seen on a drum kit, you can make a naturalistic-sounding drum kit. If you have many guitar tracks and want to give each one space, you can pan each one to different areas of the stereo field to create this.
The next and one of the most important, but longest steps is equalisation. EQ helps to create realness in your recordings that might have been lost through microphones and the room you recorded in. It also helps to a balanced frequency field, ensuring there aren’t too many low frequencies that make the song sound muddy (How to mix music, n.d.). To do this, you can use high pass filters first on the instruments that need it, like parts of the drum kit, guitar and vocals. Like volume balancing, EQ each track as solo and bring them into the rest of the group to see how they sound together. Then, listen to it in full and make any final EQ changes there. Then you can experiment with the EQ by bringing up and lowering certain frequencies to get the sound you want.
Compression comes next and helps remove any issues with clipping by bringing down the volume of any soundwaves that go over a certain threshold that you set. It does this without decreasing the feel of the song as you can use the makeup gain to bring back any lost volume. You could use this on a snare that has very inconsistent hits to make the sound waves more uniform and invariant (LANDR, 2018). Different forms of compressions can be used in songs, such as sidechains and limiters (often called brick wall limiters). A sidechain uses an external source to trigger a compressor, an example is a kick drum that triggers the bassline to be compressed. This is a very useful tool in many genres of music to stop the clashing of frequencies but is also used a lot experimentally in electronic music like house or pop to make the song move about more and make it more danceable.
Next up is the reverb effect. This is a very prominent sounding effect and can make a huge difference to your song sound and mix, depending on how you use it. By asking yourself questions such as: ‘Do I want an artificial sounding reverb or natural like I’ve been recording in a church? Do I want a long reverb tail that lasts a while and creates airiness, or a short, snappy reverb? Generally, you should put reverb on drums and vocals to create space and have them sound more natural. You can also add reverb on other instruments, but the bass is usually left dry. You can set up a reverb bus to minimise CPU usage and put specific amounts of reverb on different tracks easily. If you have a quiet channel that plays in the background, put more reverb on it to have it sound more specious and further away, and vice versa for a loud channel.
After this, all the other effects come after. These mostly include delay, chorus, distortion, filters and more to find the sound you want, but can also include previous effects such as reverb and EQ in a more creative way. Saturators, stereo effects, auto-pans, vinyl distortions and more can be used too to further make your sound real and interesting. This inspired you to experiment and get creative with new ideas and sounds, But don’t go too overboard as using lots of effects can make your track sound messy and can use up a lot of CPU. As well as stock effects, make sure to find plugins you think might help achieve your sound and experiment with them. In my case, I could use plugins like Vinyl and Sketch Cassette.
To give your track movement and feeling, you can use automation to your advantage. Automation allows you to change different parameters of a track or effect whilst the song is in play. For example, if you wanted a delay on the vocal to last longer once the line has finished, you can bring up the feedback parameter on the delay near the end of the track’s region to do this. If you wanted a track to fade into the background for a specific part of the song, you can gradually bring the volume of that track down and combine it with an increase in the reverb’s wet parameter. You can do the opposite to bring the track back to the forefront if you wanted.
A final, but often unused technique for mixing is using references both during and after your mixing stage. Having references is helpful to use as inspiration and try to figure out how they made a certain sound and what effects they could have added to achieve that sound that you want too (How to mix music, n.d.). I can use the songs I analysed in my research to use as mix references as they inspire me a lot for this project. Again, keep asking questions such as ‘does it sound like them? What have they used that I could add to make it similar and more like the intended genre?’ If you find something you want to add to your track, go back to the mix and make the changes to see if it works in the context of your song (How to mix music, n.d.).
After you’ve finished your final mix or have a new mix draft, the last thing to do is to listen to it or your progress through different speakers which is important to get an idea of how different people will hear the song. For example, listening to something through a car or professional sound system will bring out the bass more as the speakers are of better quality and will give you a more realistic sound. However, listening through a phone speaker or headphones will bring out more treble as the speakers are not great with bass frequencies. Listening to your mix in different environments will also affect how you hear the track. Playing it in a soundproof room will sound extremely controlled and professional compared to listening to it in an open field, which will sound more distant and reverberant as the soundwaves have a lot more room to travel away from you.