Overall, I have really enjoyed working on this side of the project, especially during the recording sessions. Due to the COVID_19 pandemic, we couldn’t do a recording project last year, so we have done it now as a joint project with the performance side. I wish we could have had more time to go over studio recording and mixing as I feel like some things were rushed over very quickly and I would have liked more time to practice recording and being in the studio. I already knew a little about mixing from last year, but this has helped me improve on this knowledge and understand why we do certain things during mixing. However, I do want to use and improve the skills I learnt this project potentially for my final project, as last year I didn’t record many live instruments as I wasn’t sure how to go about this and didn’t want to use my production time by learning how to record in the live room.
Week One
This week, we spent a lot of our time looking a the basics of studio recording. This involved researching equipment you might find in a common recording studio and why, or general studio rules. This might include different microphones and their polar patterns, DI boxes, health and safety, signal chains, acoustics, and any issues you might have to solve such as phase. This was important to learn first ass it made us understand the point of a high-quality recording studio and any problem solving we might have to do during our time in the studio. You can find all of the research on this by clicking the button below:
After going through some research, we moved into the live room to set this area up in an industry-standard way. This is important to know if we ever wanted to do multitrack recording or record the drum kit in college, or in a studio outside of education and you didn’t have a sound technician on hand. In the live room, we were tasked with mic’ing up the drum kit and ensuring these were all placed correctly, DI’ing the keyboard and bass, setting up vocal microphones, and setting up a microphone correctly for the guitar amp. We also had to make sure the order of XLRs going into the D-snake was correct (drum kit first, then guitar, bass, keys, vocal mic, but this can vary depending on how many XLRs need using or who you are working with). If the order was wrongly communicated, this would cause problems in the control room as channel two, for example, might be recording guitar when it is meant to be recording the snare drum.
After this, we were given a very brief overview of the control room and its purpose. We set up the hardware (e.g monitors, mixing desk, computer) and opened Logic. We had to create the right amount of channels on the software, and name them all after what they will be recording. After this, we tested the levels by selecting each channel, turning up the gain on the mixing desk, then turning up the fader until you can hear the instrument coming out of the monitors. this is a very simple test to make sure everything in the signal chain works, as if we didn’t get any sound coming through, there clearly would be an issue somewhere down the line in the signal chain. We had this a few times, but it was simply because the jack lead was dodgy or something wasn’t plugged in correctly. For this, we just tested the jack lead to see if it was emitting electrical noise instead of instrument noise and replaced it with another.
To this is our first week, I think we did very well in setting up the live room and control room. Even if these were the very basics to be able to successfully record music, it is one of the most relevant and necessary things to know for musicians today. I want to use these skills soon in my final project, and hopefully beyond college, if I ever record music out of education or go to university to study music further. I think we could have improved our first week by spending a little more time in the control room and understanding how to use things in there, as we took a while to set up the live room. We also didn’t focus on health and safety much, and as a result, the live room had wires going all directions on the floor and was not as safe as it could have been.
Week Two
For the second week, we had a lot more time to set up the live room and control room ready for recording. We were split into our bands, and our group set up the live room whilst the others set up the control room. I was tasked with setting up the drum kit and microphones, as I am used to doing this outside of college so it wouldn’t take too long. For this, I mic’d up the kick, snare, all three toms and used two condenser microphones above in a spaced pairing, and plugged these into the D-snake in that order to ensure everything was tracked right during the recording stage. I had some time to help the other students in the live room and tried to manage some of the wires around the room.
Sunday Chaos (my band) recorded the first song we learnt; ‘You Got The Love’, as this was our most rehearsed song and we knew we would do a good job of it. This only took a few takes to get a full recording of the song, which is quite impressive. Lucy just recorded a draft take of vocals as she had a sore throat and was unable to do a perfect take. We will overdub this draft take next week with a much better-sounding version.
Mistakes are bound to happen during recording, but to counter this you just keep doing more takes. If we had more time, I would have liked to do a few more takes of the song as a whole because there were some mistakes that I noticed myself and others make during the recording. I have recorded in a studio before as a session drummer, so this was not new to me, but I really enjoyed working in an actual recording as it is different to a performance; you are focussing only on how you play and not trying to entertain a crowd at the same time. I want to record more live drums in the future when writing my own music as I feel like recording instruments live is more authentic and gives me more creative freedom over licks and fills compared to using samples or creating midi drum parts.
Week Three
This week, we had the other band, Taunt, record their cover ‘Fleabag’ in the live room. This means they were setting up this room whilst we set up the control room ready for their recording. This consisted of turning on all the electrics (monitors, mixing desk, computer) and opening and configuring Logic (naming channels, making sure every channel had the right input). Next, we had to set the levels of each channel. We did this by requesting the kick drum as the first instrument, controlling the gain so we could see the meter going up to around -12dB to -6dB, and turning the channel one fader up whilst making sure the master fader was also up. From there, we were able to hear the kick coming through the monitors and we did the same procedure for every other instrument, except for the overhead drum mics, where we had to also enable phantom power. We also had to ensure the band’s headphone monitors were working so they could hear the other band member’s instruments and us when we talk to them from the control room. After recording a take of the drums and draft takes of everything else, we recorded final takes of the bass, guitar and vocals.
After Taunt had recorded their track, we went back to ours, overdubbing Lucy’s vocals from last week. She did a great job of the new take, and after she recorded some harmonies over the top of the chorus. I had to help with this, as she was struggling to find what note she should be singing to get a nice harmony. I recorded a lower harmony that she could then match this, but an octave higher. As well as playing the drums and singing, I also recorded some percussion as an addition. The tambourine added a lot to the song and gave it some high-frequency rhythms that battled with the other drums and lower instruments in the frequency range.
For our track, I would have loved to experiment more with harmonies and percussion, perhaps adding more stacked harmonies to specific phases in the choruses to give them more emphasis and presence, or add some recorded claps that we could have combined with the snare throughout the song to give this more punch. As this week we spent a lot of time in the control room recording the band, it was interesting seeing recording from a different perspective. If I ever needed someone else to record an instrument for me in a song, I now know how to go about this and will most likely use this knowledge for my final project.
Week Four
Now that we had recorded both of the band’s songs, we were given the task to mix them. We first had a brief talk about what mixing is and what essential things you have to do to create a good mix. After this, we got to our computers and started to clean up the Logic session so it was both visually and audibly clearer and easier to navigate. Visually, we used grouping and colouring tracks to differentiate different instruments and parts of the song. We also got rid of any channels we didn’t want, for example, the draft takes of the guitar or vocals. To make the song audibly clearer, I cut out any parts of the song where the microphone was picking up any spill when the instrument wasn’t being played, and I put fade ins/outs on the start and end of each region so there would be a smooth transition from quiet to any noise. During this, I must have accidentally moved some vocal parts out of time, but I used my ear to make them sound in time again.
After doing some general track cleaning, we moved on to the real mix. This week, we looked at how to EQ, pan and balance your volumes. We EQ’d the tracks first, removing the bottom and muddy end of higher-pitched instruments such as vocals, guitar and keys and some drums like the snare. We boosted some lower frequencies in the kick and bass, parts and boosted the high frequencies in the vocals, giving them move brightness and presence. I then went into each track and panned it to the right amount. I panned the drums as you would see a real drum kit (e.g. snare middle left, kick centre, low tom middle right, overheads far right and left.). I also panned the vocal harmonies around the scene to make them seem more realistic and dynamically complex. After doing this, I turned down all the faders on my channels and started volume balancing from scratch. I balanced the drums first, bringing up the kick and snare the most, and overheads the least as they tend to carry through the other microphones a lot which you cant get rid of. I then brought in the instruments, having the strings act in the background and guitar and keys at the front, with the bass sitting comfortably in the middle. Finally, the vocals had to be powerful as they should be prominent in the mix, and the harmonies should come in as support.
I think in terms of mixing this week, I have done quite well, but I could have done better. As I learnt a quite a bit about mixing last year, I used a lot of this knowledge here and was able to do this quite independently. However, if I had gotten through more of the mixing stage this week, I could have had next week to focus more on ways to make the song sound more creative and different. I won’t have much time next week to do this, but if I get time, I will definitely look at automation, creative EQ, auto-panning, delays and more.
Week Five
After starting to mix the track last week, we carried on with this throughout the lesson this week. I worked a lot on adding the right reverb to different channels. To do this, I created a reverb send that I could put the drums through, instead of having a separate reverb effect on each drum channel. This made mixing these easier as I was simply focussing mainly on how much of the drums I wanted to send to that bus to give them a bit of space and airiness, but not so much that it removes the initial punch of when the drum or cymbal is hit. I did the same for the vocals and instruments; creating a reverb bus to send the channels through to. I wanted the harmonies to be fairly saturated with reverb to make them seem more distant and spacious, and I feel like this contrasts well with the vocals at the forefront. We had a tutorial on compression, how to use it, and why it’s helpful in a mix. I started adding this to my mix, but I struggled with what settings to use on the different instruments. After some help, I started to understand the general rules of compression like the threshold, makeup and ratio, but I’m still not 100% sure on how to use compression, even though I know what it’s used for.

Track Groups 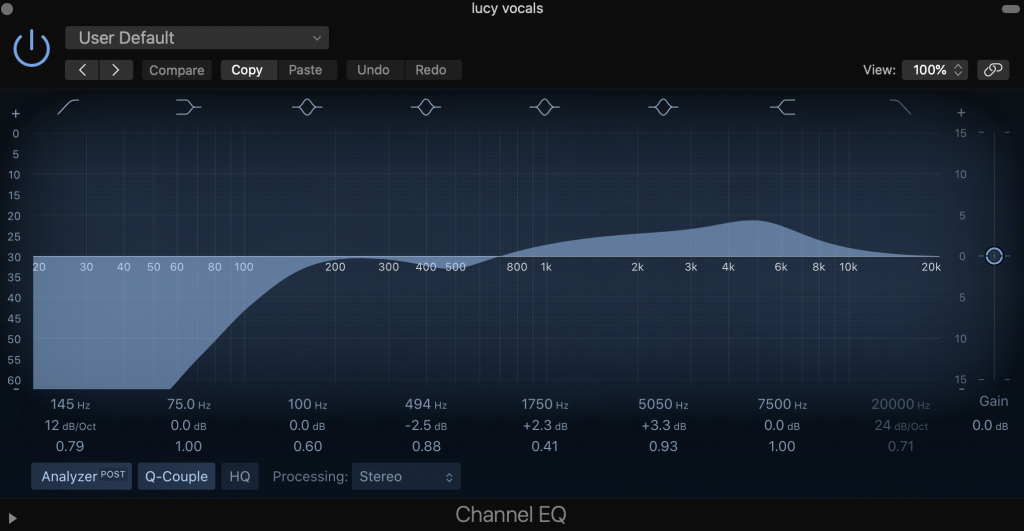
EQ 
Reverb 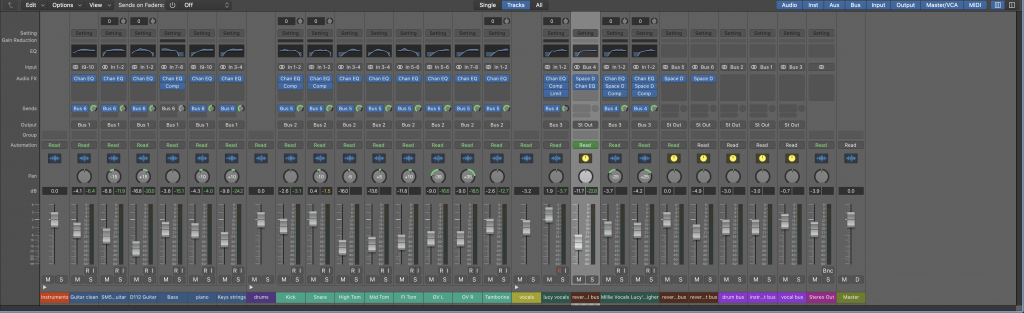
Mixer 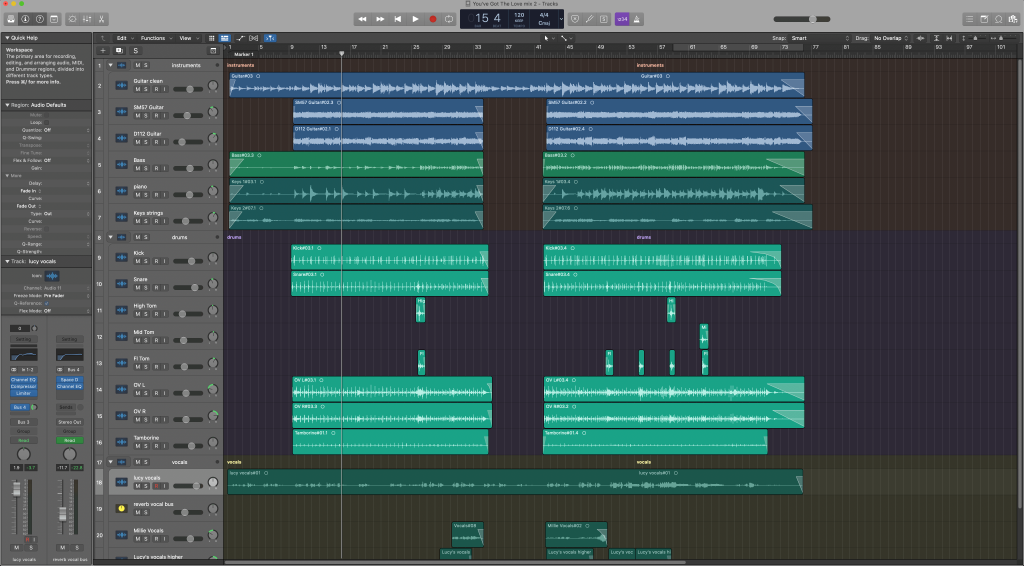
Track Arrangment
After working through the basic areas of a mix, I wanted to experiment with the little time I had left, so I added a little bit of reverb automation at the start as an experiment, just before the vocals come in the for main verse after the intro. This makes the transition between the two parts smoother. Finally, I checked with a tutor to make sure it sounded like a valid mix and bounced down the track. I then uploaded it to SoundCloud. here is the final product:
Overall, I think my final product is fairly good to say I had never recorded a song with this group before or mixed live instruments in this way. I wished we had more time to work on this part of the project as if we had, I feel like I could have made a much more professional-sounding and creative piece. When I go into mixing again, I plan to have more of an understanding of how to use compression and what general settings I should be using for different instruments, and use creative mixing techniques. However, I can use everything else I have learnt in these lessons, such as setting up a studio, recording into Logic and creating general mixes to my advantage in projects to come if I ever plan to mix my own music and make more use of the live room.