Recording the music and setting up the studio
Mixing music is a career that plays a huge role in the music production industry, learning to mix music is an important skill if you strive to become a music producer or independently mix your own music. For project one we were tasked with recording and mixing our own songs, the songs we were recording are from our set list for the live performance event on the 20th of October. The songs we recorded are You’ve got the Love and Fleabag. Before we recorded the song we had to set up the studio to be ready for a live recording session.
The first thing we did to set up for the recording session was to mic up the drum kit, to mic up the kick drum we put a cardioid dynamic microphone half way inside the hole of the kick drum. This would capture the warm bass of the kick drum, we then set up the overhead microphones using to mic stands. It was important to set these up an even distance apart from the snare drum, the microphones we used for the over heads were cardioid condenser (require 48v) microphones. We used condensers to capture the high overhead cymbals of the drum kit as they are really good at picking up high frequencies. We also applied a cardioid condenser mic to the snare drum, high-tom and high-hat to make sure we captured the higher frequencies of the percussion. For the rest of the kit we used dynamic microphones to capture the lower and powerful sounds of the kit. It is important that when setting up microphones on the drum kit that they are out of the way of the drummer, so that the does not hit them with the drum sticks. With parts of the drum kit including the: snare drum, mid-tom, high-tom and floor-tom it is important the microphone is facing the centre of the drum to capture the impact. The microphone on the hi-hat however should be facing the outer circle, this is because it captures the impact and vibrations better than it does in the centre of the high-hat. When positioning the mic for the hi-hat it is important to make sure it not too close to the crash cymbal , this is because it will hit the microphone below it when it is played by the drummer.
The microphones of the drum kit have to then be plugged into the channel box using XLR cables, it is important that the wires are neat and tidy to avoid tripping hazards or danger to equipment. Setting up the keyboard is a lot simpler than setting up an entire drum kit, this is because it does not need microphones. The output of the keyboard get’s plugged into a DI box, this DI box then converts the audio signal into data which then goes into the channel box. Setting up the bass guitar and electric guitar was the same as setting up the keyboard for this audio recording session. Opposite the live room is the mixing studio where all the data from the channel box got sent to, this is because it got rigged up to a Logic Project were we could record all the instruments into in real time. In the live room we had to wear headsets when playing our instruments to avoid audio spill as much as possible. To make the vocals sound clearer in the mix they were recorded at separate times, this in no audio spill on the track for the vocals.
Organising the track
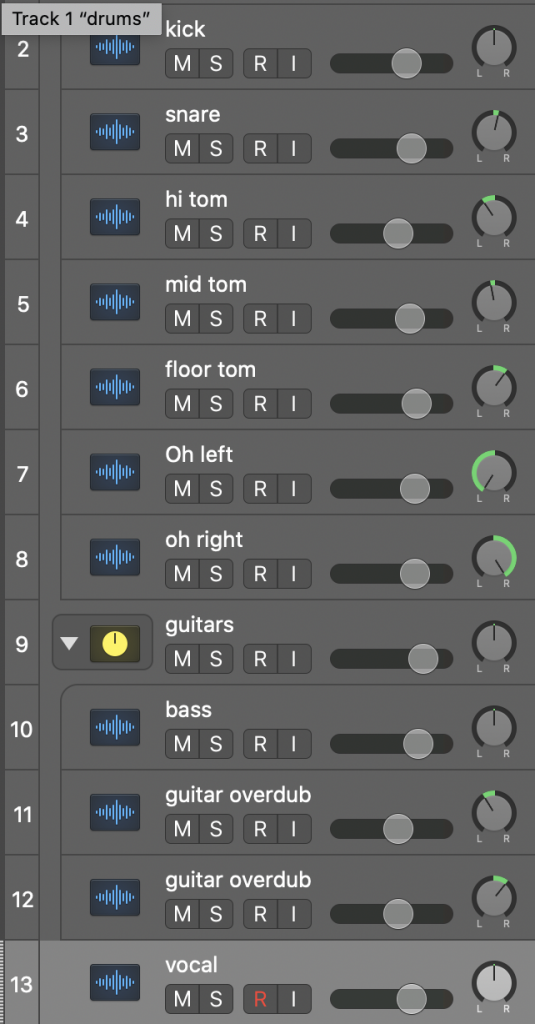
When creating a new mix project it is important that everything is organised into a format that is comfortable for you, this is so that you have an improved work flow to help you mix your music. To organise my own project I started with colour coding my instruments into different groups, for example I coloured all my drums in blue, guitars in pink and vocals in orange. I made each colour contrasting to make sure I could easily tell the difference. I then placed the drums and guitars into Logic groups (Shift, command, G) so that I could solo the drums and guitars instantly when needed in my mixing process, there was only one vocal track so there was no need for a group there. Usually logic names new audio files random names which don’t identify with the instrument it actually is, however in our previous recording session we named each channel after the instrument it was making it a lot easier when organising the mix. To organise the project I also cut silences out of the track as it cannot be mixed and there is no need for it in the project. I cut away the silence using the scissor tool in Logic, cutting away the silence also makes it easier to look around the project as it removes clutter and clears up the template.
There was also some spare channels from the guitar and vocals I had to remove which were used as reference for the recording session, these had to been forgotten to be deleted from the template so I had to do it myself. These spare tracks had to be deleted as they were out of time and sometimes played incorrectly.

Levels
The next step in my mixing process was to adjust the dynamic levels of each channel to a level which is safe and allows other instruments to be heard. When listening to the recording I noticed that the bass was very quiet in the music as it was getting lost in the sound of the drums and electric guitar, to solve this problem I turned up the bass a little bit. I did not turn it up too much as conventionally it does not sound good for the bass to be the main instrument of the song, and this was the case in the context of this song. I also had to turn up the vocals as in the chorus when the music got louder the singer sometimes got lost in the sound of the music. I was careful when balancing the dynamics of the drums because the kit should sound like it’s at a similar level, this is because drum kits are usually played at similar level by the drummer and the song should sound as close to a live performance as possible. I did spend too much time on levels at the start as you have to constantly alter levels when mixing music as you start to add reverb, compression, EQ and start panning then in other directions. Therefore I mostly did my levels when moving on in the progression of my mix.
Applying EQ
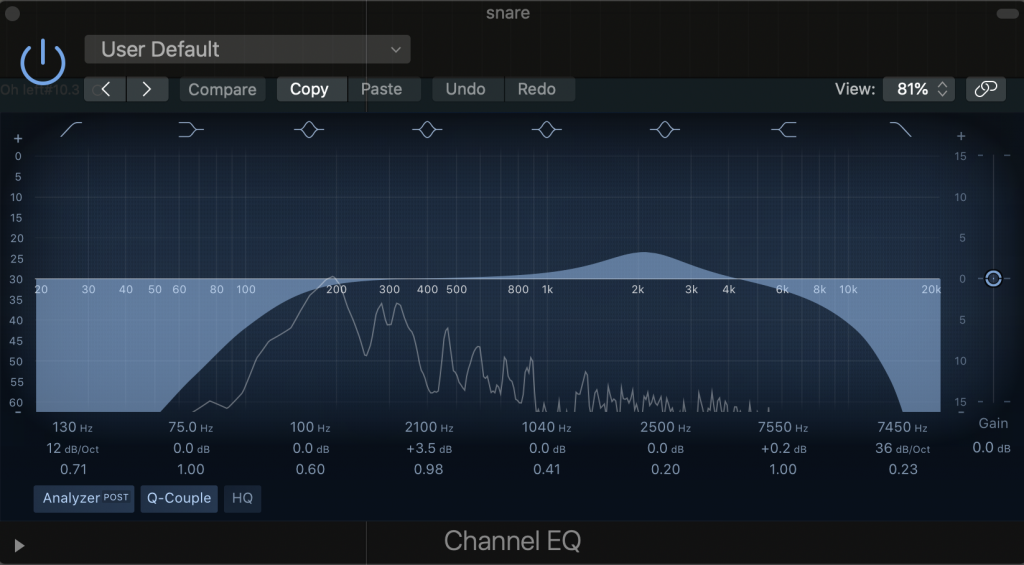
An EQ is used to balance out the different frequencies inside of your mix, this is used because in most cases the instruments inside of the mix share frequencies ranges causing it to create a messy sound of different frequencies fighting for space in the mix. By using EQ we give each different instrument their own comfortable space in the mix where they can be clearly heard among the other instruments. As you can see with the snare drum I cut out some low frequencies to get rid of some of the excessive low end in the mix to leave space for the kick drum and bass. I also cut off some high frequencies to remove harsh tones from the music and spill from other instruments. I boosted the frequencies around 2500hz to make the snare sound more clear as this is the frequencies where it is heard the most. The instrument that caused the most problems in the mix was the electric guitar as its heavy distortion was clouding up the mix and making it sound messy with its low end frequencies. To fix this problem I added a low cut from 20- 170hz on the guitar to get rid of the low end which was messing up the low end of the mix. I then added a boost in the middle frequencies of the guitar by around 5db, this made it sound a lot cleaner as the guitars frequency was most comfortable around this frequency. I also got rid of the top frequencies on the guitar as they were emitting some harsh and scratchy tones from the strings.
For most music listeners the lead singer it what people pay most attention to in a song, this means that mixing the vocals has to be handled carefully to make sure it sounds as best as it possibly can. The first thing I did with the vocals was add a low cut to the channel as the low cut frequencies were not important to the vocals, and it was mostly just making the mix sound messy with too much low end. Adjusting EQ is different for every voice as every voice is unique, for this specific voice in I thought it sounded it’s most most comfortable around 248hz, therefore I added a boost around this frequency range to make it sound more natural. I also got rid of some spill by lowering some of the middle frequencies by a few db to make sure it sounded clearer. When adding EQ to the overhead mics on the drum kit I added a high pass, this is because I wanted to emphasise the cymbals on this channel. I did not cut any frequencies out because I wanted it to include all of the drums in the mix on the overheads. I made sure to copy over my EQ arrangement of overhead 1 onto overhead 2 this is because the EQ and volume of the overheads should sound the same, otherwise the mix will sound unnatural and unbalanced.

When listening to over the track I realised that the dynamics of the music would sometimes suddenly get louder, this made the music sound unorganised as the music would suddenly get louder without reason. To fix this issue I used a compressor, a compressor is used to keep all the instruments at a similar dynamic level throughout the music. It does this by compressing the sound when it reaches a specific threshold of volume, this is controlled by the threshold parameter on the compressor. This tells the compressor when to kick in, the attack parameter decides how long it takes the compressor to activate once it has surpassed the threshold. The first track I decided to compress was the vocals, this is because it sounded quiet in the music and also spiked in volume during the song. I set the threshold of the vocals to around 25db, this is because this is where the volume started to peak and setting the threshold too low would make the vocals sound very quiet. I then set the attack speed to 15ms to allow some transient through to make the vocals sound more natural and not over compressed. I also set the ratio to 8:1 meaning every 8db that rises above the threshold get’s compressed to 1db. This was the best option for the vocals as it did not over compress the track neither, it also stopped the vocals from spiking in dynamics. Then to even the volume of the compressor in the mix I raised the make up gain by 6db as the vocals where still too quiet compared to the other instruments. This is because vocals should lay on top of the songs instrumental arrangement to make sure it is easy to hear for listeners.

The next step in my mixing process was to create a sense of space in the music, the two key ways to creating space in music is by adding reverb and expanding the stereo field. It is very important to not add too much reverb to different instruments as it can make the mix sound cloudy due to the reverb tails overlapping each other. When I was adding reverb to the vocals I realised that adding too much made the track sound very distant and unclear, to solve this problem I lowered the wet parameter of the reverb and raised the dry knob of the reverb. This controls how much of the modulated and unmodulated signal gets through into the output signal. I then lowered the distance and size of the reverb to make its reverb tail shorter and activate quicker after the input of the sound, this overall made the reverb sound a lot more natural in the mix of the music. The reverb for the drums had to be very short as it plays different parts of the kit very quickly, this means it is very easy for reverb to pile up on the drums. This is why I had to make it even shorter for the drum kit, this was to avoid a cluster of reverb from the drums piling up in the music. There is no rules when it comes to mixing music or adding reverb, however some styles might not fit into the context of the song you are mixing for. When mixing the vocals I decided a short reverb would suit the mix of the song this is because it is a fast rock song. There is often not a lot of reverb in rock songs as it can pile up very quick, however in the 1980’s it was very common for people to use long and experimental reverbs in music. Fleabag is an up close and personal rock song, this is why I believe it suits a short reverb style.
To create more space inside of the mix I started to pan the instruments in different directions of the stereo field. It is important that the panning of the instruments resembles the position of a realistic band recording session, when panning instruments it is helpful to imagine a band set up and pan the instruments in the direction of the instruments on stage. I panned the bass in the centre of the mix because it is the foundation of the music, panning the bass in the left or right of the stereo field can also make the music sound lop sided and uncomfortable for the listener. As the vocals are also the focus of the music I also panned these in the centre of the music because vocals are the main focus of the music in the context of Fleabag, much like the bass, panning the focus of the song such as the vocals to the side can make the song sound lop sided. I panned the drums in a similar arrangement to a realistic drum set up in real life, this is to make the music sound more natural in the mix of the music. For example I panned the 2 overhead mics to the furthest right and left of the stereo field, this is because over head mics are on the furthest side of the drum kit possible in a real life recording session. I panned the electric guitar to the left in the mix to resemble a similar layout to a realistic band recording session, it also sounds flat if too many instruments are placed in the centre of the stereo field. This is because it ruins the element of space If all instruments in the same area of the stereo field.
what went well?
After mixing the track each instrument can be heard more clearly in the mix of the song, clearing and balancing the tracks was mainly a result of applying EQ and compression to the different tracks in the mix. Applying compression to the vocals allowed it to sit on top of the music and be easier to hear, however I believe I added to much reverb to the vocals. This is because there a moments were it sounds unnatural and tinny because of the reverb, to fix this I could have turned down the space parameter of the reverb plug-in. I think I did a good job with balancing the dynamics and EQ of the drums, this is because there was a lot of spill coming from other parts of the drum kit. Through the EQ I got rid of most of it resulting in a clearer mix, I also balanced out the drum kit to sound like a whole instrument through compression. This is good as it allows the music to sound more realistic and similar to a live performance. The stereo field in the music could be improved as it sounds very flat as the instruments panned too close to each other, the creates a lack of space and dimension in the music. I did pan the over heads to the far left and right which was a good panning decision as it reflects a real drum kit, however because I have not panned anything else it sounds unnatural. To fix this problem I would spend more time on panning the different instruments in the music to make it create a bigger and more immersive stereo field in the mix.
how will you improve in the future?
To improve my mixing in the future I would make sure not to add to much reverb unless it suits the context of the music, this is because in this song I added to much reverb and it made it sound cloudy and unorganised which is not what I wanted in my mix. Before starting a mix in the future I would also make sure I am more familiar with compression, this is because compression is still a element of mixing which I do not understand. To familiarize my self with compression I will do research online and pick up different techniques applied to different instruments and tracks in compression. At the end of the mixing sessions I was running out of time to mix therefore I could not spend much time on levelling and compression, next time I will manage my time better to make sure I’m not wasting it. This will later give me more time to spend on tidying up my mix and fixing little imperfections.
Source List
2021. Fleabag Mix. [Online] Bradford: Isaac Hill. Available at: <https://soundcloud.com/isaac-hill-341691242/fleabag-mix> [Accessed 22 October 2021].