(CLICK HERE) Link to full sound cloud album of my compositions development journey: https://soundcloud.com/isaac-hill-341691242/sets/doom-eternal-project
For my final project at college I will be writing a theme for the final boss fight of DOOM Eternal, which is a fight against a monster called the Icon Of Sin. This composition will be inspired by the original score of the Icon Of Sin boss fight soundtrack, but the music I make will all be of my own work. However I will be using techniques I have learnt through my research on the production of the DOOM soundtrack as well as other research on music production tips. I will be composing my music around gameplay who I myself have recorded. The original game already has music over the gameplay, to solve this issue I am going to record my own gameplay footage with no music, so that I can eventually compose my own music over it through Logic. I am also going to put timestamps throughout the gameplay video so that I know when specific significant events happen in the gameplay so that my music can interact with these events and change around them. The time stamps will act as a musical cue, meaning the music will react to the significant events in gameplay when they occur.
My Gameplay
| Time stamps | Event | How will the music reflect on this? |
| 0 : 09 | Introduction to Boss fight | Build up tension, bass riff comes in. |
| 0 : 31 | Phase 1 begins | Climax of the music |
| 3: 51 | Phase 1 of fight Over | Music gets a bit quieter and becomes less tense |
| 4: 03 | Phase 2 beginning | Music reaches it’s second climax, loud dynamics |
| 7 : 08 | End of battle | Victory music (triumphant), synths play in unison |
| 7 : 55 | Titans Falls / Game outro | Introduction riff comes back in for the outro of the music |
Composition 1 Development
Week 1 – Composing for Doom
link to music: https://soundcloud.com/isaac-hill-341691242/doom-eternal-composition-1-v2
The first thing to consider when starting my piece of music was BPM, time signature and the key signature of the music. I wanted my music to sound scary and intimidating so I knew that I wanted to work in a minor key. To decide what key I wanted to work in I played through the scales and picked the key which I thought had the most fitting tone for the idea of my music. The key I picked was for my composition was C minor, this is a safe key to operate in when making scary and intimidating music. Next I decided to pick the time signature of 4/4 common time, this is because I wanted to make a catchy and fast paced tune that doesn’t feel like it’s dragging or rushing early on in the composition. I am willing to change all of these musical parameters if I believe it would sound good in my music. The BPM was a factor I carefully considered, I wanted a fast paced composition because my music is inspired by DOOM and the BPM is usually very high in tempo in the original soundtrack. This is because higher tempos illustrate aggressive atmosphere in the music. The BPM I chose in the end was 140, this was a very fast tempo to pick my music for but I was comfortable with composing within it.
At the beginning of my music I decided to open with an ambient and scary theme, I chose to do this because I was writing for a boss battle between a man and a giant demon. I wanted to highlight how powerful and intimidating this demon was in my music, this is why I chose to open with an ambient introduction. The original score for the Icon Of Sin also began with an ambient and scary theme, this inspired me to make an ominous and ambient theme for the Icon Of Sin. The foundation for this ambience was made from a synth that played the note C1, I played the note very low because it gave off a grumbly and ominous tone through the instrument. This note lasts a total of 17 bars, the deep growl of the note created an intimidating and mysterious sound. But this 1 note was not enough for music, because it didn’t sound as intimidating as I wanted it to and it got . boring after hearing the same tone for 17 bars drag on.
To fix this problem I duplicated the synth and played the same note of C, one octave higher than the other synth did. This note lasts a total of 2 bars and occurs every 10 bars, I wanted the music to create a visual image of the Icon Of Sin passing through your eye sight. I was inspired to do this by monster movies I have seen in the past such as Godzilla and cloverfield. In these movies the first time you see the monster it often moves through the characters eye sight and into the distance, I wanted to capture this is my music.The note quickly comes and goes and fades into silence, this creates a sense of distance in the music as the sound seems like it is moving away. The synth fit very well with the ambience, but I knew it could sound better. Through automation I panned the sound left to right, this means you can hear the sound go from your left to right ear. This created the image I desired of a huge monster walking past the player in the game. This intro was beginning to sound very good to me, it was almost done but needed a but more work.
I decided to go back to the original synth that played a C1 and worked on it some more. I wanted it to sound more interesting by adding some articulation to it, the first thing that came to my mind was vibrato, fortunately for me the MIDI mapping keyboards we have access to have allow us to control vibrato accurately using the joy stick function on the keyboard. I inputted the C1 note into Logic again but this time I gradually increased the vibrato of the note, this created a very interesting and unique sound. It created a sound that sounded like a tap rapidly dripping mixed with a percussive hit. This added another layer to the ambience of the introduction. At this point I was very pleased with the introduction and decided it was time to move on.
Next in the music I wanted to introduce an intense bass riff, guitar and bass riffs are very common in the original DOOM Eternal soundtrack, this is because they can add aggressive tones to the music and also fuel the track with energy. I spent an hour experimenting with ideas to make up a riff, the main goal I had when making a riff was to make a fast paced and aggressive riff that is interesting to the listener. I didn’t play the riff to a metronome because I wanted to be free with creating my riff outside of the tempo, and if this meant changing the BPM that I had set I was ready for that. Eventually I came up with a riff that I was happy with, the riff is written in a mode of C minor. Writing in a mode can make very interesting music as it does note start on the same tonic as the other instruments in your music. The riff starts on a tonic of D2. The riff I wrote gradually increases in pitch. I made it increase in pitch to make it build tension in the music. I also wanted the riff to be catchy to the listener, which I also believe I was successful in. To make the riff catchy I played the 2nd and 3rd notes in the riff multiple times, this gave it a distinctive rhythm and sound that would make it catchy. This is because increasing in pitch often is used to build tension in music, especially in the dub-step genre. The original score incorporated aspects from the dub step genre such as glitch effects and step risers. The riff was faster than the tempo I had chosen which was 150BPM, instead the riff settled in with a BPM of 190.
I was finished with developing a riff at this point so my next step was to build from it’s foundation, the first Idea I had was to add harmony to the riff. The first thing I wanted to think about was what the instrument of the harmony would be, the instruments I decided upon where the 2 synths used in the opening of the music. I wanted the music to gradually climb up in intensity, this is why I made only the first ass harmony synth play for 4 bars. After the 4 bars where the synth plays I introduced drums as well as a second synth into the music. This is because the more gradual increase in instrumental texture sounded more natural and easier to listen to. This is because I really liked the sound of them and wasn’t ready to let them go so soon. The harmony of my composition works by harmonising with the first note of the riff at the start of every bar. The 2 bas harmony synths play in unison with a 1 octave difference, this creates a powerful sound in the music, this is because the same notes are being played at different frequencies. Each note in the harmony lasts one bar, and they harmonise with the riff after the brief moment of unison with it. I wanted the harmony to operate at a slower rhythm to give the music some breathing space, this is because too many fast rhythms may make the music sound muddy and choatic which is not what I wanted in my music.
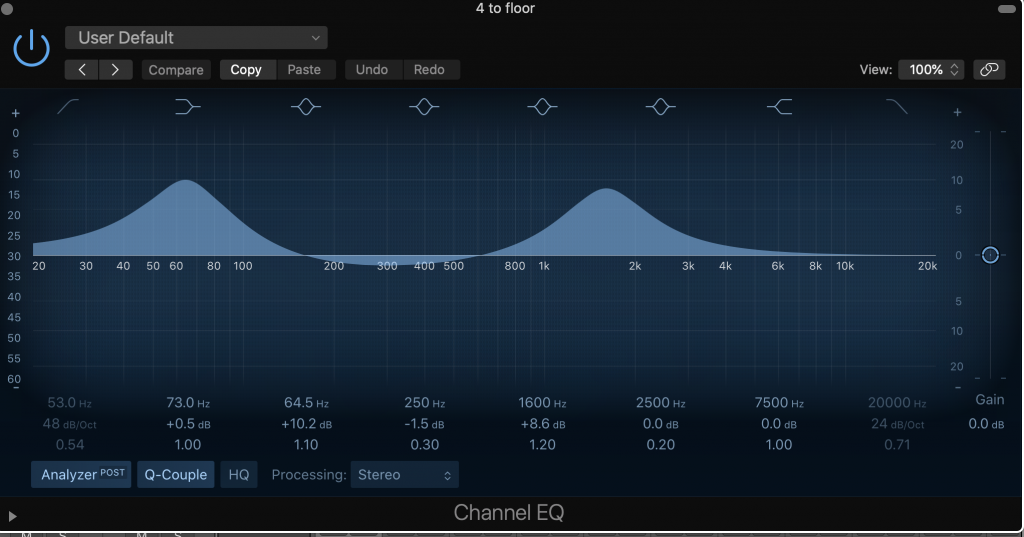
The last thing I managed to get done this week was introduce drums, these drums are very simple and could do with some more work. The drum beat I chose was a simple 4 to the floor drum beat, I added the drums to build up the instrumental texture in the music and to put emphasise on the beat of the music. I think this is a good start to a greater idea but needs more work, this is because the drums are simply not powerful enough and might get lost in the mix when more instruments are added. When developing my drum beat I will take inspiration from the aggressive drums Mick Gordon has in his music, these usually consist of a lot of cymbals and crashes. Having a four to the floor drum beat I understand is completely fine, but my music is inspired by DOOM where he usually uses more intense drums than a four to the floor drum beat.
Next week I would like to make the four to the floor drum beat more dominant in the mix to establish a stronger rhythm and make the music sound more intimidating to the listener. I would also like to begin designing my own synths via Logics digital synth design plug ins. This will help me develop my skills on sound design and will help me establish a stronger rhythm in the second half of my composition. Next week I need to import footage of my DOOM gameplay into Logic so that I may compose around it, to do this I will need to record footage of the game over the weekend and put it into Logic on Monday morning. Doing this will allow me to accurately compose around the gameplay on screen.
Week 2
link to music: https://soundcloud.com/isaac-hill-341691242/doom-eternal-composition-1-draft-verse
A huge mistake I made in the first week of the project was to compose without any gameplay footage, making music without the footage meant some of the music I made in the previous week might not sync accurately with the gameplay footage. The ambient opening I worked on in the first week of my project did not sync well with the gameplay footage, this is because it did not match the intensity of the opening of the gameplay footage. To fix my mistake I removed this ambient opening and alternatively started my composition off with the bass riff I thought of in week 1. The riff worked well at the start of the music because it matches the aggression and intensity of the gameplay footage. This week I also began to add audio samples that I found on the website called ‘splice.com’ , this website has all the audio samples you could wish for in your music, these samples are also royalty free meaning I am safe from copyright claims when using them in my music.
From splice I downloaded many audio samples and found sounds that I believe would work well in my music, these sounds include audio files such as: breaths, sirens, screams and ambient sounds. I chose the samples because they had an ominous and scary atmosphere to them. The original DOOM soundtrack also incorporated samples and found sounds into the music, the Icon Of Sin score includes sounds similar to the ones I download for the same reason of expanding on the atmosphere of the music. I downloaded sounds that where similar to the ones in the original score because I was inspired by how they impacted the atmosphere of the music and brought such aggressive emotion out of the music. The sirens and screams brought a terrifying tone to the original score and I wanted to replicate this tone in my music so I downloaded sounds of similar categories.
Before the bass riff comes into my composition I placed an atmospheric and creepy sample called ‘reverse breath’. This sample is very short in length but very important to the atmosphere of the music, this sample creates a brief build up of tension before the riff comes. This breath prepares the audience for the release of tension for when the riff comes in. After this sample is played all the instruments of the A section come into the composition, the sample makes the sudden increase in instrumentals seem natural and steady. When all the instruments come in the sudden rise in texture creates a loud and aggressive punch in the rhythm that relates to the aggression of the original DOOM soundtrack.
The reason I imported my gameplay footage into Logic so soon is so that I could accurately compose my music around the moving image, this will give the music the opportunity to evolve as the footage developes. The music I made in week 1 was not mixed at all, this resulted in some mistakes in my music. One of which was that some instruments where too loud in comparison to others resulting in them overpowering the other instruments in the mix. The bass riff was unfortunately inaudible because the other instruments where too loud compared to it, to fix this problem I cut off some low end frequencies off of the bass harmony synths because this was the main instrument over powering the bass riff in the mix. After that I put EQ on the 2 bass harmony synths, cutting off some low end frequencies, after I did that the bass riff was a lot more dominant in the mix.
There was a few other problems aside from the unbalanced EQ tracks, one other problem I ran into was that the A section was very anti-climatic in comparison to the build up of tension that came before it. One other problem with the music was that the A section was ant- climatic in comparison to the build up of tension that came before it. This made the music seem weak and un energetic. Next week I will fix this problem by adding more aggressive and interesting audio samples to the mix, these may include sounds such as: buildings collapsing, nails scraping, and banging metal. The sounds I just listed are all percussive this is because my music is currently lacking on percussive elements. This is because the only form of percussion I have is a four to the floor bass drum which sounds weak in my mix as of present.
However I did begin working on making my A section more interesting this week, I did this using the siren samples I downloaded on splice, the context I used these samples in was inspired by the original score for the Icon Of Sin. My initial idea I thought of when trying to make my A section more interesting was to build tension, I referred back to the original score to see how Mick Gordon built tension in his music. It was clear to see that he teased his listeners with false builds ups of tension using risers effects, this technique inspired me to do the same in my music. Fortunately one of the samples I downloaded on splice was a siren riser sample, this sample constantly rises in pitch, this causes tension as our ears want to hear the siren stop escalating in pitch. I put this sample in the A section of my music to prevent it from being repetitive and to also make it more aggressive and intimidating.
The siren riser sample worked very well in terms of building up tension in my music, but once the sample was over it sounded anti-climatic. This is because the sample had no chain event in the music, meaning it just played and had no impact on what came afterwards in the music. To fix this I added another sample which played after the siren riser, this sample that came after wards was the sound of a world war 2 air raid siren. I chose this sample because it has a similar tone to the siren riser because they are both sounds of similar categories, I also picked the sample because it helps tell a story through the music of DOOM. This is because the demon attacking the world in the DOOM Eternal story could mean the end of humanity. I used the world war 2 air raid siren because I can only imagine how terrifying it would be to hear that siren back in the years of world war 2, the air raid siren was terrifying and only sounded when an area was at maximum risk of being attacked. Playing the siren in my music would signify how terrifying and dangerous the Icon Of Sin is in my music. That was my creative intention when adding the air raid siren to my music.
At this point in my music I had a draft version of the A section in my music so I thought it would be Logical to start developing my B section. The B section is where I plan to establish the powerful and aggressive rhythm that Mick Gordon has in his original Icon Of Sin score. I tried to replicate Mick Gordons technique of creating this heavy rhythm, Gordon does this by playing multiple distorted synths in unison. This creates an intimidating sound in the music, this is because the unison starts to fill up the frequency spectrum and become dominant in the music. I tried to use this same technique in my music using a similar technique, I began this process by creating three tracks using Logics ES2 synth design plug-in.
I created 1 synth with an intense noise parameter on the synth, noise is a parameter which adds a static tone to the synth. Gordon used this parameter to create his heavy rhythm in the score. In the original Icon Of Sin score the most obvious use of the noise parameter is in the opening of the track, this is the synth with the very low attack speed which sound a little bit like a jet engine taking off. The other 2 synths I created where very low in pitch and had a very high attack speed, this meant the synth immediately reaches it’s dynamic peak. I did this because it sounded very aggressive to and it matched the intensity of aggression I wanted in my music. These two synths all has the same parameters and distortions, the only thing different about them was that they play the same note but 1 octave apart from each other. I now know it was a waste of time to create 2 synths with the exact same parameters on two separate tracks, this is because I could have just played the same notes one octave apart on the same MIDI channel or just adjusted the number of voices played on the unison synth parameter instead of creating 2 synths. Overall I like the idea of the synths playing in unison to create an intimidating sound in my music but this idea must be further developed next week.
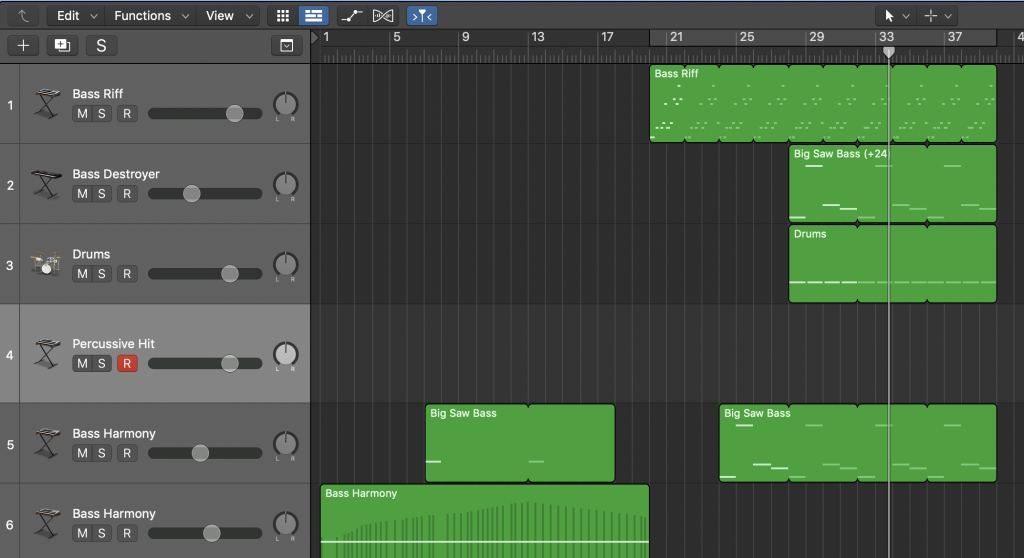
In my next session I will develop more ideas for the B section of my music . I will also make the A section sound more aggressive using found sounds, samples and more percussive instruments. This week I decided to organise my Logic template to increase my overall work flow, I did this by colour coding my tracks into groups. I made my drums dark blue, audio samples light blue, I made my B section synths pink and my main riff red. I did this so that the track where easily identifiable to myself this is because my channels are starting to increase in numbers and later it may be harder to find specific tracks. A problem I realised I might face this project is a struggle for time do complete my composition, this is because the gameplay footage I recorded is worth 400+ bars of music in length and it may be hard to complete this track in 9 weeks to a professional standard. To fix this problem I will loop certain areas of my music to last longer in length, to make sure the loop doesn’t get boring I will add audio samples around it and make instruments drop in and out of the mix to make it more interesting. I cannot however loop segments of the music randomly because it must accurately reflect on the visual gameplay footage.
Week 3
This week I realised that I was wasting a lot of time on focusing to get one idea to work, the idea I am taking about is the unison synths idea that was planned to establish a heavy rhythm. Eventually I came to the conclusion that this idea was not going any where in development so I had to come up with a new idea. I have now learnt a new lesson on time management, which is not to waste too much time on developing one idea that might not even work out. After this I spent most of the week developing new ideas for the B section of my music, to help me think of a B section I referred back to the original Icon Of Sin score for inspiration. I realised that in that score Mick Gordon used a lot of percussive instruments to create powerful and intimidating rhythms. I decided to go back to the splice website to find percussive sounds such as: metal scrapes, doors slamming and other percussive sounds.I spent around a half hour collecting different samples so that I could experiment with them in Logic and maybe use them in my music. In this third week of my project I also decided to get on top of my written work so that I may focus more on my practical work once I did this. I am aware that you cannot complete all of the written work within a week, but if I completed enough written work, it would give me a short space of time to only focus on my practical work and evaluations. In exchange I had to sacrifice some time of my practical work to allow to complete my written work.
I realised over the weekend that what I did this week was an example of really bad time management, and the time I wasted could have been spent focusing on my practical work inside of college. If I could do this week again I would manage my time a lot better, I would do this by dedicating all my time inside of the college to practical work, and all the written work I would do outside of college. This would be a better idea because I have access to a device at home meaning I could do written work at home, however I cannot work on my music at home as I don’t have access to a DAW. Therefore the way I managed my time this week was very bad and I will never do that again. I did not however miss out on a harmful amount of time on practical work as I had time to develop ideas and download samples from splice.
Week 4
link to music: https://soundcloud.com/isaac-hill-341691242/doom-eternal-week-04


Heavy Beat Drop Section Live Guitar Track
This week my main focal point of this week was to develop ideas for my B section and experimenting with sound design techniques. last week I had realised that my 3 synth unison idea for the B section was not going to work so I had to develop new ideas. Initially I chanting in this section to resemble the demonic chanting in the original score but after some experimentation on this vocal track I came up with a better I idea. From splice I downloaded a sample that has chanting that says ‘hey’. The first thing I decided to do with this sample was to cut it up so there was only one ‘hey’ in the sample. This would give me more freedom with the rhythm of this sample because it would be shorter and fit in closer quarters from each other. I then wanted to make the track sound more aggressive so I added some distortion to it which made the sample unidentifiable as a vocal and sounded more like an instrument of percussion. I was inspired by this percussive sound to turn this sample into an aggressive bass drum so I decreased the pitch of the sample and added some reverb onto it, this made the sample sound like a concert bass drum. I then arranged this sample to play in 1/8th notes to give the music more rhythmic energy. I liked the sound of the ‘hey’ chant so much that I decided I wanted to use it in my next section of music.
Going back to the opening of my track I decided I wanted it to have elements of the ambient introduction I made in my first week of the project. The elements I wanted to include had to be short in length this is because the only issue with the ambient opening was that it did not sync well with the gameplay footage, re introducing the ambient opening would lead to the same problem as I had before. To re-introduce the few elements of the ambient opening I added the scrapes and clicks synths as well as the vibrato bass harmony synth from week 1’s ambient introduction, this worked very well with the bass riff at the start of the music. This is because the bass riff still added tension and aggression to the music while the ambient instruments added a subtly ominous and mysterious tones. I was very happy that I was able to re-use the ambient introduction in my music once again, because it had a clear ominous and mysterious theme to suit the Icon Of Sin.
To make the B section more aggressive and punchy I added a heavy impact trailer hit sample that plays every two bars. This added more tension into the music and made the percussion sound a lot more aggressive than it every did before. This sample worked really well but I learnt that over using a sound can be very annoying to listen to in music, this is because it gets very boring to listen to over and over again especially if it very dominant in the music. I learnt this by listening back to my track, I learnt when listening back to the track that I was over using the trailer hit sample too much which made it annoying to listen to. The next percussive element I added to this section was a very low grumbling bass sound, this sample had a lot of low harmonics that added a lot of uncontrolled aggressive tones to my music, this sample repeats it’s self for the whole duration of the B section. Unlike the trailer hit, this low grumbling sample was less dominant in the music therefore it is not annoying to hear as it mostly acts as an instrument to fill in the gaps of my music.
In the B section I added was another ‘hey’ chant track but this time it added a different type of distortion to the sample which made the it sound different express it’s higher harmonics bringing out an aggressive tone to the percussion, this sounded distinguishably different to the other ‘hey’ chant sample I have in my composition. I added an alternate version of the ‘hey’ chant so that when it plays along side the other ‘hey’ sample it it buts emphasise on that beat as both samples of percussion will be playing in unison. This idea worked very well because the two samples fit together very naturally and worked well with the other percussive rhythms in the B section. The layering of the two ‘hey’ samples sounds very subtle but made a huge difference on the B section making it sound more interesting and lively. The very final percussive instrument I added was a percussive (FM) synth, at this point in the project I decided to be very experimental with effects and Logic’s plug in synth modules. To create a percussive synth I went onto the retro synth plug-in I then selected the percussive hit pre-set. When this pre-set was set up I decided to turn it into an arpeggiator to see how crazy I could make the percussion sound with a fast rhythm, I made the synth play the arpeggio in 1/8 notes because this sounded very similar to a palm muted guitar being strummed. I really liked this aggressive tone to the synth so I decided to use it in my music to further push this atmosphere of aggression in my music. Another reason I decided to use this synth is because the guitar strumming sound the synth emitted sounded similar to guitar sounds you can hear in other DOOM Eternal compositions such as, Meathook. This composition uses harsh guitar tones to illustrate aggression in Gordons music, this is why I thought it would be a great idea to include this sound I uncovered into my music.
Originally I used the FM percussive synth in my compositions A section before implementing it into the B section. In the A section I used the percussive synth to help raise tension in the build up to the B section. I used the percussive synth in the A section by making playing it along side the siren riser, meaning the percussive synth began and ended when the siren riser did. This worked well in building tension up to the B section, but I had an idea which I believed could make it sound even better than it did. Using volume automation I made the percussive synth increase in volume as time progressed in the composition, this meant by the time the percussive synth was at the end of it’s play time it would have reached it’s dynamic peak. This idea was very successful as it built up tension for the B section in the way I had hoped for it to do. After haring how well the FM synth worked in the A section, I believed it could work very well in the B section (percussive section), I wanted to do this because it’s aggressive percussion sounded like it would fit perfectly into the rhythm of the percussive section. I tried using the percussive synth all the way through the percussive section but I found that it did not work very well in my music, this is because it made the section sound very crowded and therefore made it difficult to listen to clearly.
While experimenting on where I wanted the percussive synth into the the percussive section I thought it made a very gritty sound in one of the recordings I made for it, I decided I wanted the harsh and gritty noise to be heard in the percussive section. This however tone occurred half way into one of the notes, which were MIDI. This meant I could not cut the MIDI files as this gets rid of some of the data, meaning it would be very difficult to cut this sound out of the MIDI track. To solve this problem I bounced the MIDI track on the spot and cut out the sound I wanted from the Audio files, I then copied this into my percussive section. When placing the FM synth into the percussive section I decided I wanted it to play just before the trailer hit comes in on the percussive section The sound I cut sounds like it is trying to release tension and break into a heavy guitar riff, I used this feel of the track to interpret where I wanted to place it. Placing the percussive synth before the trailer hit made it sound like the trailer hit was preventing the synth from releasing all the tension it has been building up, my intension with this structural arrangement is to keep the audience on the edge of their seat as they wonder when the music is going to release the tension it has been building. I have also used the FM synth as a teaser for the C section which is next to come in the songs structure. When designing the sound of the synth I thought it sounded like a guitar which is what I used to my advantage, the C section will include a heavy guitar riff and I wanted to tease this the section before it. The percussive synths guitar tone acts as a teaser for the real guitar riff yet to come in the composition.
For the C section in my music I collaborated with another student called Daniel Greenhalgh who helped me record in a guitar riff. I asked Dan to record a heavy, intimidating sluggish riff for my C section. For around 20 minuets of recording tracks we had a few guitar riffs to chose from. Unfortunately a lot of the recordings sounded like unfinished ideas, this is because we were running very low on time and Dan has to be somewhere. This may have lead to the underdeveloped riffs. I picked out a guitar riff that sounded very professional and I wanted to use it in my music, the riff sounded very high quality and aggressive so I wanted to use it in my composition. The riff that was recorded was unfortunately out of time with the BPM of my music, to fix this issue I quantized the audio file to fit the BPM. The quantising made the riff sound like it was dragging in specific parts and it lost some of the elements of the riff that made it sound special to me. To solve this issue I will need to record another guitar riff in with some help, unfortunately there is no one available to play in a new guitar track for me this week, this means next week my first objective will be to get a new riff recorded into my music. To avoid the riff being out of time like it was this week I will develop a very simple drum beat for the guitarist to play in time with, I am doing this because I think the main reason the riff was out of time was because there was no drums to guide the guitarist. Another reason I think the guitar recording session went wrong is because I don’t believe I was specific enough in telling the guitarist what to play. Next time I will specify in detail what I want the riff to sound like whether that be fast tempo heavy guitar chords or sluggish arpeggios.
Week 5- TO DO
link to music:https://soundcloud.com/isaac-hill-341691242/doom-eternal-composition-week-4

This week I noticed that my music was not as energetic and aggressive in I would have liked it to in specific parts of the compositions structure, the main area where aggression was lacking was the C section of my composition. I believe the main cause of my music sounding un energetic and dull was the lack of percussion inside of my tracks instrumentation, there is only one area in my composition where percussion has been on a more advanced level than a simple four to the our dream beat, the section I am referring to is the B section also known as the percussive section. Outside of the percussive section the composition only has a four to the floor drum beat, this week I planned on expanding the use of percussion within my composition to make it more interesting and sound more aggressive. To get more percussion I went back to the splice website to find samples of percussion, after half an hour of looking for percussion I found many interesting samples such as: scraping sounds, gongs, bass drums and crashes. The main sample thought stuck out to me was a sample of two objects colliding, upon importing this sample into my template I split the sample into two section which were the impact and the crash. I knew before arranging my percussion that they had to have a strong and intimidating rhythm, this is because Mick Gordon uses his percussion in strong rhythms to create strong and intimidating percussive rhythms in his music.
This week I also recorded in a new guitar riff with the help of Ben F. The track is a riff made up of 4 layered guitar tracks, each track plays a different role in the music. The first two guitar tracks play aggressive and harshly strummed chords in different octave ranges, the other two guitar tracks play the melody of the guitar riff. I was happy with how these guitar tracks turned out because they where very catchy and also had adopted DOOM’s aggressive guitar elements such as the guitar distortion and fast paced riff melodies. Each guitar track was assigned the same forms of distortion, I did this because I believed it was important that the guitars had a close relationship so I gave them all the same distortion so they didn’t sound out of place with each other. Once the guitar track was done it acted like the foundation to my C section and all other instrumentation was built around the riff to suit it’s rhythm and melody.
The number one weakness in my composition this week was the bad structural transition from the percussive section to the C section, this transition sounded very rushed and unnatural. To fix this problem I decided to drop all the instruments out of the mix and only add two instruments which were a kick drum and a guitar. I played the kick drum on beat 1 and 2 every bar, this means for a small amount of time the music sits in silence. In this case the silence builds tension in the lead up to the C section. After I added the drums I thought it would be a good idea to tease the guitar riff of the C section, I did this by cutting up a single guitar strum from the C section and copying it into the kick drum lead up to it. I made sure the guitar played on beat with each kick, I did not have to quantise this guitar because luckily it was already in time with the kick drum. After I synced the guitar and kick up the build up to the C section sounded a lot more natural.
I decided to focus my percussion on the A section this week as it felt week in terms of percussion. I put the crashing object sample into a rhythm that worked well with the rhythm of the A section’s riff and bass harmony. Once I was happy with that I though it was time to add some sound design onto the sample, this is because rhythmic it sounded right but in terms of audio it sounded out of place and not very musical. To fix this I added some basic EQ to the sound to make certain frequencies pop out more to add more musical value to the sample. After that was done I wanted to add more energy to the sample, the best way I thought to do this was through delay. This is because it is a tools that is very useful for filling in empty spaces in music, which was something I needed help with. But it also added more depth and a sense of space to the sound as the delay faded out into silence. The delay I decided to add was tape delay which worked very well with adding more texture and energy to the A section of my music. I called this track ‘Tape Delay met’ to make it more recognisable and increase my workflow.
The tape delay percussion I worked on sounded very good and I was happy with the results but I wanted another percussive instrument in the A section that would build tension in the music through rhythm. Keeping this idea in mind I found a sample of a heavy box being dropped on the floor, this created a loud and low aggressive sound which I believed would sound good in my music. This sample had to be cut up as there was back ground audio in places where I did not want it, but fortunately I managed to capture the box being dropped by it’s self with no other sounds present. I used this sample to establish a heavy rhythm in my music that increases intensity in specific areas. For example the sample would play every half a bar when the siren riser is playing to emphasise the build-up in tension through the percussion. However it will play every 3 or 4 bars when the music is at a resting place in terms of tension.
This week I began working on the second half of my composition, in the gameplay footage this is when the boss is almost defeated. Unlike in the first phase of the boss fight where the Icon Of Sin is covered in Armor, in the second section he is appearing in bare flesh, meaning you can see the Demon for the monster it is. I wanted the music of this section to reflect on the horrifying and intimidating image of the demon at this point in the gameplay footage. In the original DOOM score the music also reflects on the Demons change in appearance, it does this by adding more distorted instruments to bring out a chaotic and intimidating tone to the music. I thought it was very important in my music to refer to the original score for inspiration. When listening back to the original score for inspiration I had realised that the music fades out and gradually increases in dynamics after the fade out, I was inspired by the original score to include this technique in my music.
To achieve the same effect I added reverb on the guitars, drums and strings that were in the C section to my music, which included Bens live guitar track. so that the reverb tail would gently and naturally fade the music into silence. The reverb worked very well, however if you add reverb to the track it will always stay active which can produce a very muddy tone to your music. I did not want this in my track so I used latch automation which gives you control over when you want your reverb to be on and off. To avoid a muddy sounding composition I turned the reverb off of the tracks for all moments previous to the ending of the C section.
Once I successfully added the reverb I was happy with the fade out of the instruments, but next I had to think about how I wanted to bring them in. Once again I referred back to the track for inspiration. upon listening I realised that Mick Gordon brought in his percussion first in a gradual incline in dynamics. I also realised that in the second part of the boss fight in the music there was a lot of dubstep inspired risers. After I had learnt this I had the idea to combine the percussion fading into the mix with a dubstep riser.
When developing my idea I thought it would be very important to quickly build intensity in the introduction to the second half of the composition, but not just through risers but also through the drums. The first thing I thought to consider when making the drum beat was rhythm, to get inspired with the rhythm of the drum kit I listened to some general dub-step. After listening to some general dub-step I realised that to increase the intensity of the music the drums tend to play a kick drum on every beat. The pattern I picked up on is that the drums initially play 1/4 notes at the start of the riser and then go to 1/8 then eventually 1/16th notes. This technique adds more energy to the composition each time the rhythmic pulse gets faster, once I understood this technique I implemented it into my music.
After all the instruments faded out I brought in a kick drum that gradually worked it’s way up from playing 1/4 notes to 1/16th notes. This build up of intensity lasted 8 bars, the drums I created worked very well as a foundation to build up intensity in my music. But I thought it needed more layers to further increase the intensity of the music more effectively. My first idea when it came to increasing the intensity of the music was to bring in the siren riser I had used previously in the composition, however this time I wanted it to be different so I searched around Logic’s effects and modulation plug-ins. After a half hour of experimenting with effects I found a modulation plug-in called ‘step-riser’, this immediately caught my attention because this section of my music was dub-step inspired. I assigned this plug-in to the siren riser which created an amazing dub-step siren riser sound, this worked very well with the drum pattern I created as it successfully built tension and had a dub-step sounding theme to it.
The last thing I though the build up section needed was a sample increasing in pitch on every drum beat. I wanted the sample to have a glitch music tone it, this is because in the original Icon Of Sin score there is many moments where Mick Gordon uses glitch effects such as stutter in his music. This is common in both glitch and dub-step music as well as the original score, so I thought it would be a good idea to follow the theme of the music and include it into my work. The sample I wanted to glitch was a female scream, this is because I believed it would add a atmosphere of terror and chaos to my music which would reflect on the Icon Of Sins terrifying presence of screen. Luckily when creating this glitch sample I already had one in my template because earlier on in the week I had imported one into my template. I had the sample however I wanted to increase it in pitch, the best way I could think of to do this would be to import it into a sampler. This is because a sampler can turn any sound into an instrument. Because I wanted the sample to constantly increase in pitch I assigned the sample to the whole MIDI keyboard for freedom in pitch escalation. Once the sample was in the sampler I recorded the sample increasing in pitch by one semi-tone in the key of C minor on every drum beat. After I had done that I was happy with the result, this is because the music effectively got more intense as the drums got faster and the risers increased in pitch.
Once I had built the tension I began working on the A section of the second part of the video games boss fight. When developing ideas for the second half of the boss fight I thought it would be very important for the music to act as a theme for the Icon Of Sin it’s self. This is because the first part of the boss fight is intense and focuses on the action with fast paced riffs and guitars that focus on the gameplay footages element of action. I wanted the second half of the composition to highly contrast on the first half of the composition, this is because the Icon Of Sin is being displayed on screen for the horrifying monster it is. For the music to reflect on this demonic titan I decided to come up with an intimidating synth lead. My instrument of choice when creating this lead was the bass harmony synth that I used in the A section to the composition, I chose this because it had raging harmonics and a large and intimidating presence in the music. The synth lead plays at a medium to slow tempo because I thought this tempo best captured the image of titan. I wanted to the synth lead to sound large and dominant to the ear so I played the same notes that I did in my right hand with my left (unison). This created an intimidating and large sound to the synth lead.
Although I know had a draft version of the second half of the compositions synth lead I had noticed the instrumental texture was very thin meaning the music sounded lifeless and unenergetic. To increase the texture along side the synth lead I added a drum kit, I wanted this drum beat to be a natural lead on from the dub-step riser section that plays previous to the second half of the composition. The best way I though to do this was to keep on playing the kick drum in the rhythm of 1/16th notes. This immediately added more energy to the music, however the drums sound very plain and boring as it was just another four to the floor drum beat on the composition. Next week I aim to add more texture to the drum kit which may include; toms, snares or crashes. This is because I eventually want to release all the tension I have been building in my composition and the drums may be an essential tool to do so in my music.
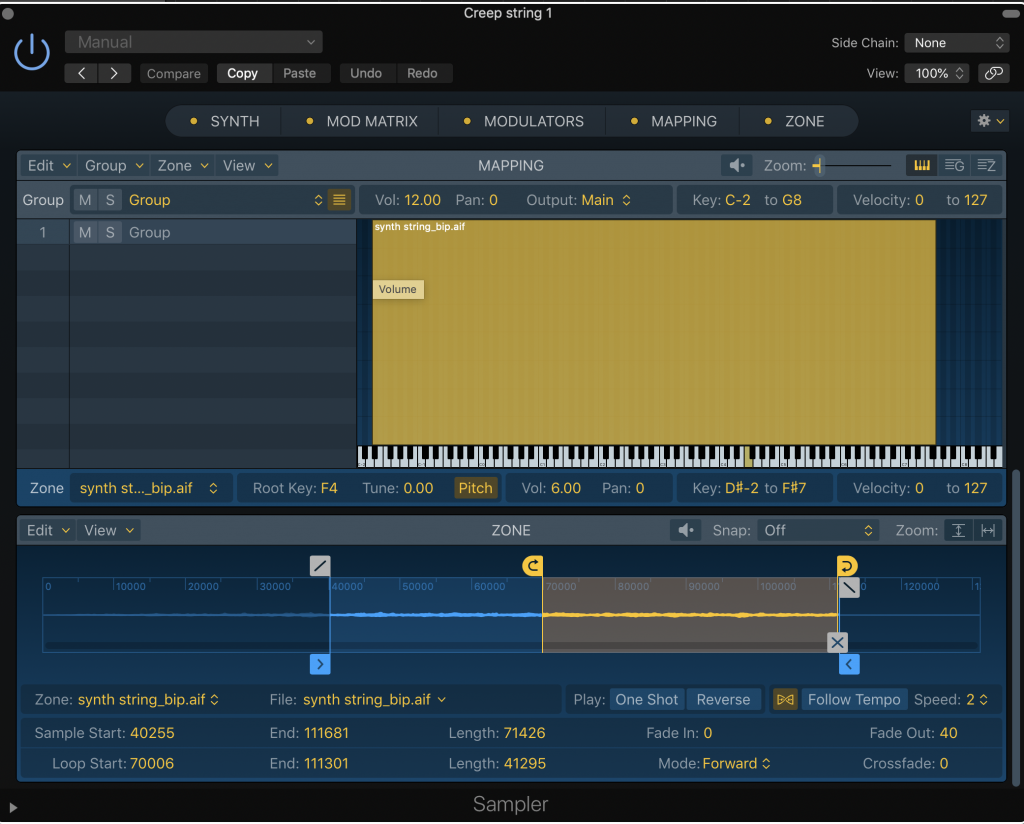
As well as the drums I added I also added some creepy strings to the section of music. I have talked about how I made these strings on the ‘Samplers’ page on my digital space. I used these strings in this section of this music because I wanted this section of the composition to sound haunting and scary to the listener. The strings I used had a haunting, eerie and scary tone to them so I thought they matched the theme I was striving for in this section of music. These strings sounded did not work as well as I thought they would have in this section, however they have given me a good foundation to build upon. To make these strings fit better into the music I will alter some of the effects and modulations I had put on it in the sampler plug-in, this is because they sound very out of place with the synth lead. However the strings will work once I adjust them to sound better within the mix. To make the strings sound as scary as creepy as possible I played clashing notes echo their harsh clashing tones through the music, I have realised that this Idea has to be used very carefully. This is because using it once or twice can sound good to get the atmosphere you want across to your listeners, but using it too much can make your music sound awful and hard to listen to.
After reviewing my gameplay footage of DOOM Eternals boss fight music with footage I realised that the boss fight end with a ambient sweeper effect. When the Icon Of Sin falls off of the building a sweeper effect comes in to get rid of all the music to bring a new riff in. I was inspired by this sweeper so I decided to make my own, however I still placed by sweeper where the original score placed there’s which was when the titan falls off the building. To create this sweeper effect I used the creepy strings I made which was inspired by the Mad Max strings from Junkie XL. I decided when I was creating this sweeper that I wanted to create a hidden message within it’s MIDI file as a form of musical cryptography. This was inspired by DOOM 2016’s soundtrack ‘cyber demon’ which has hidden images of pentagrams inside of it’s audio visualiser. I decided the message I wanted to create was not as dark as a pentagram but just the name of the game I was composing for. Doing this was very simple, I just drew in the notes using Logic’s pencil tool to spell ‘DOOM’ out. Once this was done it created a very interesting sound in the music which I was very happy with, it worked just as well as a sweeper as the original score.
I am very happy with the progress I have made this week and the ideas I have come up with. Next week I will begin to further develop the texture of percussive instrumentation throughout my composition to give my music more energy. I will also try and make the drum beat in the second half of my composition include more than a four to the floor drum beat to give my music more life. This will also help me release the tension that I have been building up in my music. The main focus of my composition right now however is developing the second half of my composition to aim to finish the whole 8 minuets worth of music for my gameplay footage.
Week 6-composing for a trailer
link to music https://soundcloud.com/isaac-hill-341691242/week-6
This week I had approached the last 2 weeks of my project, I have composed 300 bars of music. I am proud of this feat considering this is my second time composing music, however I still have 100 bars to go. Even if I finish the music to a professional standard I will not have time to mix the music, this is because my project has over 50 channels. To mix this and finish the music I would need more time. Even if I finished the music I have been informed that 8 minuets would be to long to display on the colleges showcase. This is why I would like to make a second amendment. Instead of composing for 400 bars I would like to make a 3 to 4 minute trailer for the monster of DOOM, this is the best solution to my problem. This is because the music I have been composing for was designed for the monster of DOOM, so using the theme I have made in trailer form will not seem out of place to the footage or trailer I make. I will not start a new project from scratch as this would be a terrible idea as the work I have done would have no purpose. Instead I will use the music I have made and restructure it to have more musical and cinematic value. I will make the trailer from YouTube videos that I have downloaded, I will cut these up and merge them together in a trailer which my music will go over.
Because of the sudden change of events in my project I had to make a trailer to compose my music to, making this trailer went very well and I am happy with the outcome. Despite the trailer working well visually it did not sync well with the musical structure I had in my previous composition template. To fix this problem I re-arranged the structure of my composition to fit the structure of my trailer, I also had to cut some sections short in my music because they got repetitive and also they did not fit the trailer in terms of transitions . I knew when making a trailer that is very important the audio has a strong relationship with the visuals of the trailer, by this I mean that when the trailer changes setting or get’s more intense the music has to also reflect on this.
At the opening of my trailer I took an ambient approach with my music, I decided to do this because the opening dialogue is very mysterious because the audience do not know who the person speaking is talking about. I wanted my music to reflect on the trailers mysterious and atmospheric opening, to do this I brought back the ambient opening I had to remove in my first week of the project. I did alter this opening in a few ways by adding a deep rumbling bass sound and lightening the bass harmony notes. I added the deep bass at the start because it has such a dark, ambient and yet terrifying tone to it, this is why I thought this sound would be perfect for the ambient opening that I wanted. When I was re-creating the ambient opening I remembered how much I loved using the MIDI mappings vibrato feature which inspired me to use it again. This time I decided to use it on the bass harmony which created the eerie tap dripping sound I remembered from week 1. I really liked this ambient tap dripping vibrato feature so I decided to lengthen the note of the bass harmony so you can hear it ring out for longer.
The ambient introduction I made carries on until the trailer shows the fortress of DOOM, this is when the music begins to get more intense. I chose for the music to get more intense at this point because the identity of the DOOM Slayer is slowly getting revealed to the audience. When the dialogue says ‘For he is watching’ I added the second bass harmony which is less ambient and has a more aggressive and gritty tone to it. I thought the instruments tone of raw aggression reflected really well on DOOM Guys character. This is because DOOM Guy shows no emotion except anger and a strong urge for vengeance. This instrument plays just before DOOM Guy makes his first on screen appearance so I thought it was very important to bring in an instrument that strongly resembled the intentions of the character.
When the trailer shows the inside of the fortress I decided to bring in the A section I made on my previous template in a similar structure. When re-arranging my music I decided I wanted the A section to only run through the scene on the space ship. This is because this in this scene DOOM Guy is putting on all of his Armor and getting ready for battle, just by watching this scene with no music I knew there had to be a rise of tension in the music while he is suiting up. The A section I made did a fantastic job at building tension, this is why I decided to use it in this scene. But I didn’t want the music to feel like it was overlapping the transitions in the trailer, this why I believed it was very important to cut down my music to fit the trailer. To make the A section shorter I cut it down to end after the first siren riser in the music. Shortly after doing this I realised a lot of the instrumentation I made came in after the siren riser, not including these would be upsetting to me as they did a very good job of bringing life into the music. To fix this problem I moved the instrumentation to play before the riser but this meant the music felt rushed to I even had to cut down this instrumentation to be shorter so it fell into the music more naturally.
The original game score puts emphasise of the shot gun being loaded at the end of the scene and I though this worked very well which inspired me to do the same in my music. To do this I had to make sure all the instruments naturally dropped out at the same time before the shot gun reload, the most natural way I found to do this was to end the A section after the siren riser. This was my first initial idea because this was how I ended the A section in my previous Logic template. After the shot-gun reload occurred on screen I thought it would be good to implement my next section of music into the trailer, the scene at this point in the trailer is a ritual. I wanted my music to reflect on this ritualistic environment in the best way it could from the music I had make in my other template. Eventually I came to the conclusion that the percussive section (B section) would also work best as the second part of my songs structure in this template. This is because the drums gave me a chanting pagan ritual vibe which I thought reflected well on this scene. The environment on screen also shows a lot of alien technology which worked even better with the synth bass sounds I put into my B section, which reflected on the futuristic technology of the alien environment on screen.
The trailer does not focus on the ritual for too long as not even a minuet later the Icon Of Sin wakes up. At this point I thought the music had to act as a theme for the Icon Of Sin as he is the main focal point of this scene. For this I used my most recent section of music on my other Logic template which was going to be the A section for the second half of the boss fight. I chose this section because the synth lead sounds very intimidating and ominous which resembled the Icon Of Sin very closely. This section needed to be built upon this week because the instrumental texture was too thin meaning the music had no impact.To make this section sound more interesting I added an arpeggio that played over the bass harmony, the creative thought process of doing this was mostly experimental. This is because I had access to a mini nova synth which had a very good arpeggiator mechanic. After a while of experimenting I came across a that sounded very melodic yet creepy, after hearing it I recorded the arp into Logic. It sounded good and worked well with the cinematic but the music it’s self sounded too sudden. To solve this issue I added a low pass filter to the synth that gradually released over time, this made the arp crawl more naturally into the music.
After I added the mini nova into the mix I decided to add another arp into the music to add a sense of instability in the music to reflect on the situation of the Icon Of Sin being let free. I added a synth called a 1970’s modular synth bass , this synth had a wobble sound to it which made be chose it because the wobble added a sense of instability. As you can see the main theme I was going for in this section of the music was instability and to build further upon this theme I added some sound effects. The sound effects I added where reverse chain samples from splice, I chose these sample because they had an uneasy and aggressive tone to them. To further illustrate these tones I added some sound design to them. I added some phase distortion and pitch shifter to the samples. The phase distortion added an atmospheric swooshing effect in the music which I think resembled the sound of wind blowing. In this scene I imagined there to be strong winds in the air as the Icon Of Sin is such as huge being that when the moves the wind creates a strong current around him. I thought these chains reflected on this detail well. I was happy with this sound but I wanted to get more experimental with it to see how crazy I could make it sound.
I decided I 2 chain samples to sound like they were fighting each other to further push the aggressive theme of this section. To do this I made the 2 samples contradict each other in every move they made, for example I would make one of my samples decrease in pitch every bar but the other samples would rise in pitch as if they did not want to co-operate with each other. Metaphorically speaking image these two samples hate each other, this means they both don’t want to go in same direction or follow the other sample, instead they both go their separate ways. This was my thought process when composing and arranging these two samples into my music. As well as the aggressive tone these samples emitted I also found they added an atmospheric and ambient tone to the music.
The scene is also set in a large chamber like environment so I thought a little bit of ambience would work well in this section, to add more depth to the ambience of this section I re-introduced ambient bass harmony track from the a section of the music. I re-used this instrument because in the Introduction it worked very well in terms of creating ambient and large sounds. I didn’t want this instrument to be over played, instead I wanted it to sound like it was constantly pulsing in and out of the music. This technique was inspired by the other great monster movies when the music tends to increase in dynamics and fade back into silence and repeat. The idea worked very well in the music along side the bass harmony synth lead, however I did realise that it sounded better in the background of the music rather than in the front of it. This is because it subtly added more depth and ambience to the music while it was in the background, making the track louder made it sound more aggressive. This is because it’s high harmonics made the music sound very static like, this was not what I wanted because my track had enough aggression and adding more to it would just make it sound messy and unorganised.
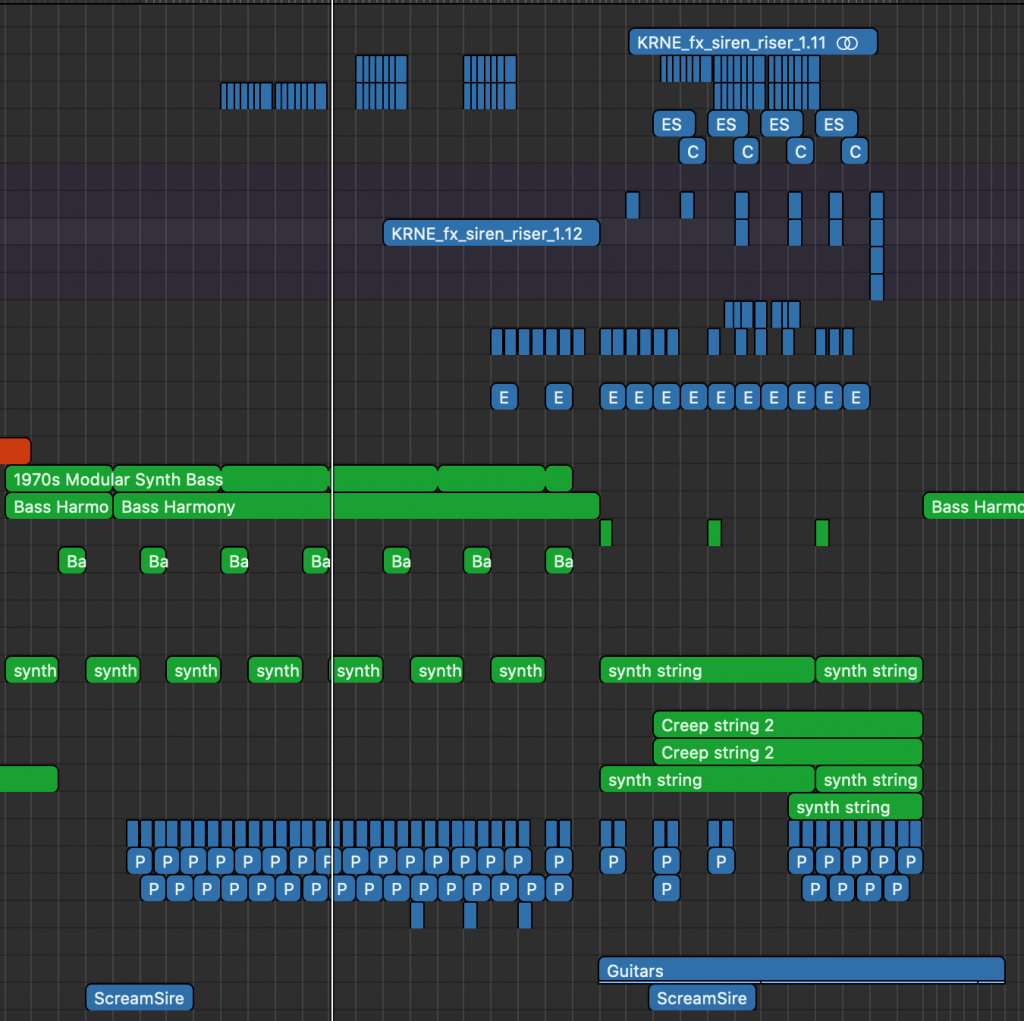
After the Icon Of Sin goes through the portal the trailer switches to show some gameplay of the Icon Of Sin destroying a city. During this section I re-arranged the music so that the C section with the guitar riff comes in, I chose to put the C section over the gameplay because the guitar riff resembles a similar style of intense music that would play over DOOM Eternals action packed gameplay.This week I added a lot more texture to the C section of my music which was mainly though percussive elements. The bass drums and tape delay return into the C section playing in the same rhythm that they do in the A section, this helps build tension in the music as the Icon Of Sin breaks free and starts going into the portal. The samples on the screen shot that say ‘ES’ and ‘C’ are samples of a a chain being pulled and the other being dropped. I used these samples to add more tension to the music because the chains emphasise the rhythm on the musics rhythmic pulse. The other samples such as: the bass drums and reverse chains I have already explained. I also added breathing samples that gradually layer on top of each other and get louder as the music progresses. These samples build tension in the music as the instruments and samples pile on top of the music our ears want to hear the beat drop, this is why I added these samples to build tension. I wanted the music to be tense because the scene it’s self is very tense, because the creature that has escaped may be the cause of the end of the world and it up to one man to stop it. These breaths initially did have some severe clips in the audio to fix this I added a fader onto the file, this faintly and subtly fades out the audio. Most of the time the faid out is inaudible but it does work very well when trying to get rid of clips in the audio.
Taking inspiration from trailers in the gameplay section when the Icon Of Sin is rampaging through the city I decided to add a creative element to the percussion. Each time the trailer cut to different frames and scenes I decided to a trailer strike sound. This is because I had heard this technique of trailer strikes being used in trailer transition all my life when watching action movie trailers speffically.

The C section ends when DOOM Guy pounds his fist onto the group and the camera pans up to reveal the Icon Of Sin. I thought it would be very important for the music to react to the events going on, onscreen more than it every has in this composition. To follow this idea I made sure the trailer hit sound played at the exact moment DOOM Guy landed on the ground, this put dramatic emphasise on the opening of the scene and worked really well. When this scene starts a synth lead starts playing which is a follow up to the synth lead that played in the ritual chamber scene. I did this because that synth lead was what I made to be a theme for the Icon Of Sin and the same creature has appeared once again, so I thought it was logical to bring back in the synth lead to represent the Icon Of Sin. Before adding more texture to this section of music I made sure the synth lead was completed first so that I could use it as a foundation for my music. This synth lead was a duplicate to the one I wrote on my previous template up until near the end of the composition.
The synth lead I wrote on my other was very long meaning I had the ability to pick out parts of the track that I liked and reorganise them to sound better. This is what I did for this final part of my track, I did listen to the lead multiple times to cut out the parts I didn’t want. After a while I came up with the synth lead that I wanted and I was very happy with it. Once I was done with the synth lead I had a very good idea. When the Icon Of Sin died on screen I wanted the music to take a triumphant turn to celebrate the victory over the Icon Of Sin. To do this I repeated the last four notes of the synth lead over 4 times, each time the synth lead plays in another 2 octaves of unison. This meant that each time the synth lead repeated it’ self the it became bigger and louder due to the unison expanding over the octaves. In the final repetition of the synth lead I wanted to ring out for longer until the end of the music. To do this I made the synth lead hold down the final notes 2 to 4 times longer than they usually did. This brought a natural and satisfying end to the music, once I finished the synth lead I thought it was time to move on and add some percussion and other instrumentation around it.
The main percussive instrument you may heat in this section are the ‘ha’ percussive chants. In this section these tracks play at a constant rhythm, I did this to make it sound like the music is always moving forward. I chose to do this because in the trailer the Icon Of Sin is weak and almost dead and the main protagonist has no time to turn back, therefore the music must reflect on this time of urgency. I used the percussive FM synth to also add a build up of tension in the music, the synth plays in rhythm with the intense drum build up that I made in week 5. This makes the music build up in intensity as the drums and FM synth build up in rhythm. Bass drums 1 and 2 from the A section still play in the same rhythm as they did when the siren riser plays, at this point in the music there is no siren riser. I did this because the siren riser would be over used and boring to hear it again after it had been recently used. I also wanted to build up intensity by layering the track in a crescendo of instruments near the end of the track, this technique is used in various orchestrations.
I used the trailer strike track to add an aggressive punch in the rhythm of the music. I did this because many hollywood action movie trailers use trailer strikes to add aggression and tension to their trailers. After I added all the percussion I decided that I was done with my track and ready for mixing, next week when mixing I will balance out my tracks with EQ and hope fully produce a clean and proffessional sounding mix.
Week 7- Mixing Begins
link to the music:https://soundcloud.com/isaac-hill-341691242/doom-eternal-trailer-music-project-draft-1
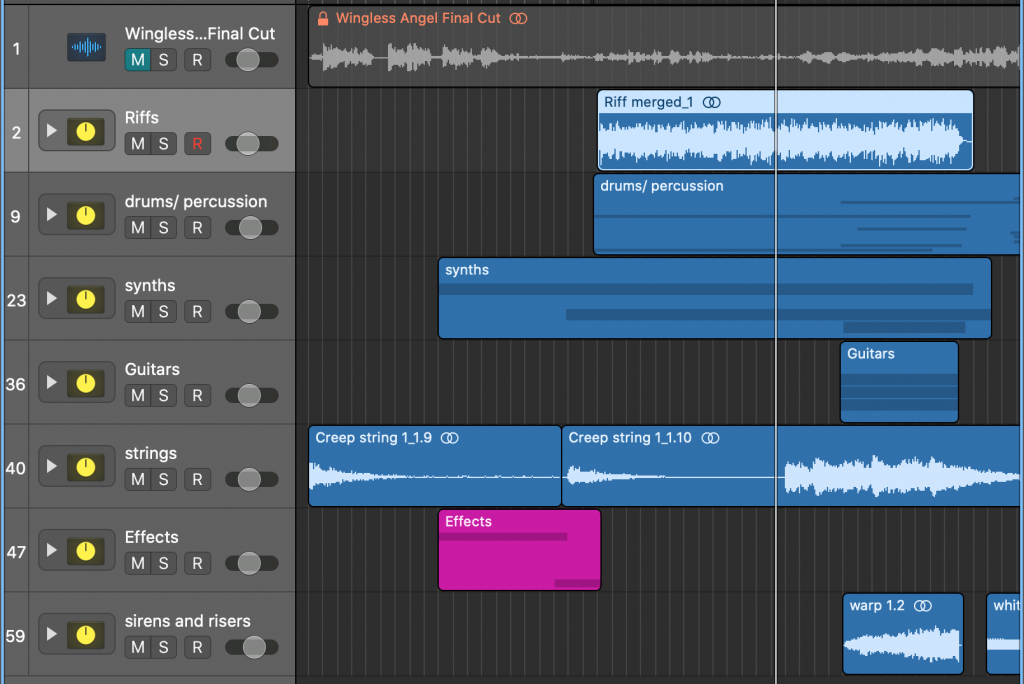
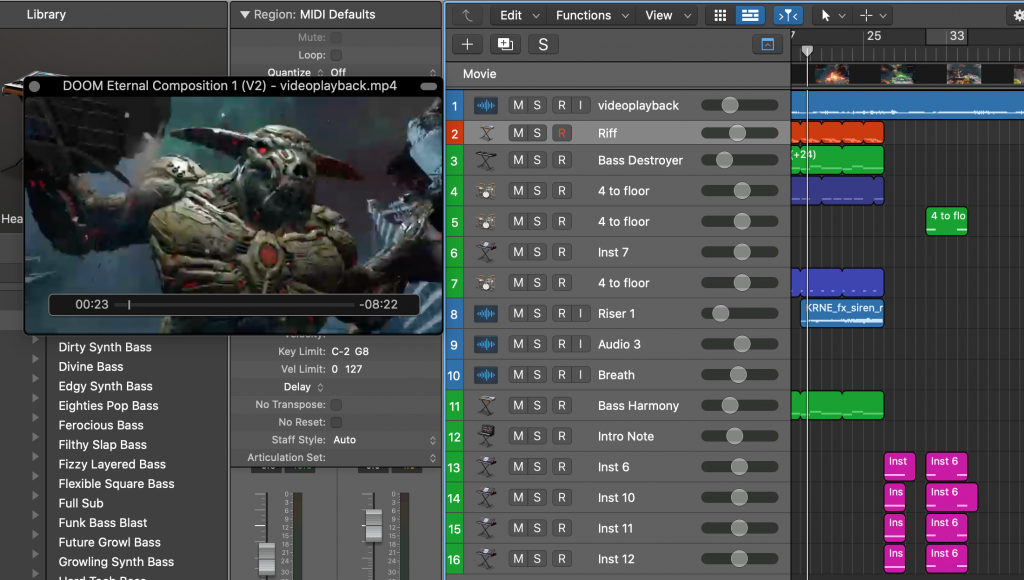
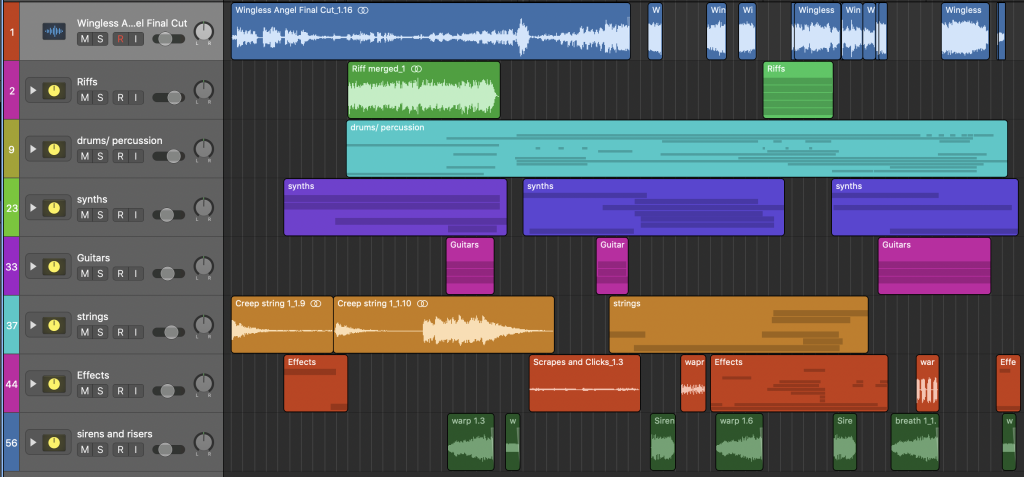
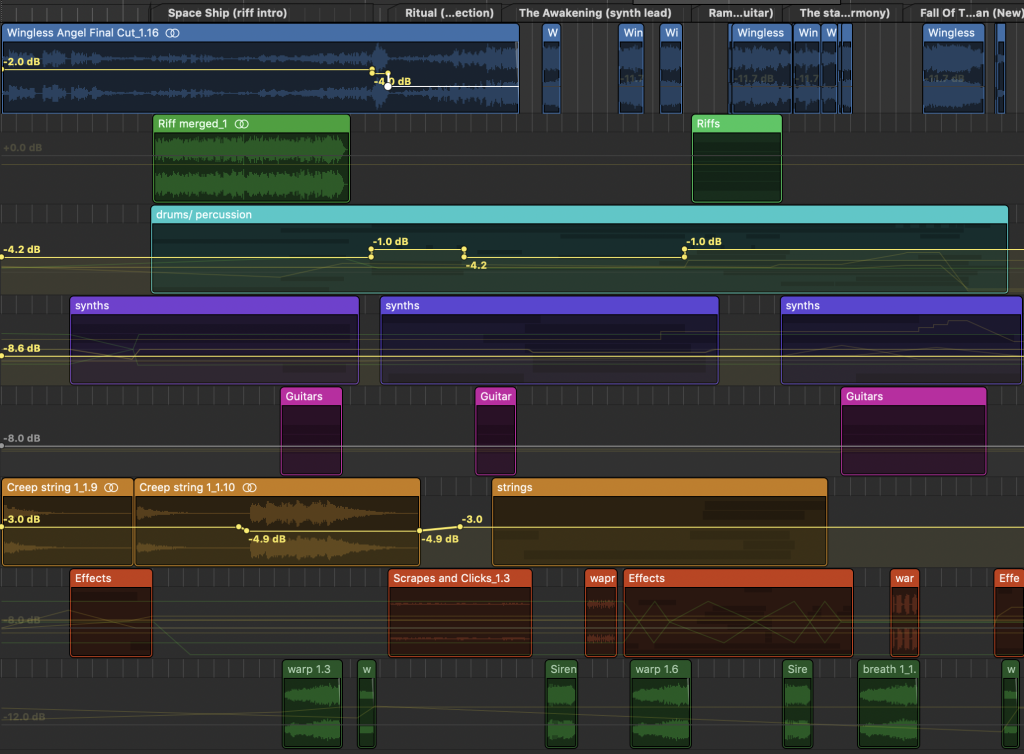
This week I decided it was time for me to begin mixing my music, this is because I was very happy with the structure and instrumentation in my music. To begin mixing the first thing I did was bounce down the tracks and export them to a new template for mixing, this is because MIDI files take up more CPU processing meaning the system will be more likely overridden by MIDI files. Bouncing down the files to audio takes up less CPU and avoids the system from over loading. Once all my tracks where in Logic I began focusing on organising my template, this is because one of the most important values when producing music is workflow. Therefore before mixing I focused on organising my template to increase my productivity. My first step in the process of organisation was naming each of my individual tracks. The names I made where mostly brief descriptions of the sound they made, one example of this would be alien string. I gave this track this name because it had an high tech alien like sound, yet it was a string instrument. I gave them these names so that I personally could easily identify these tracks from their names and unique sounds.
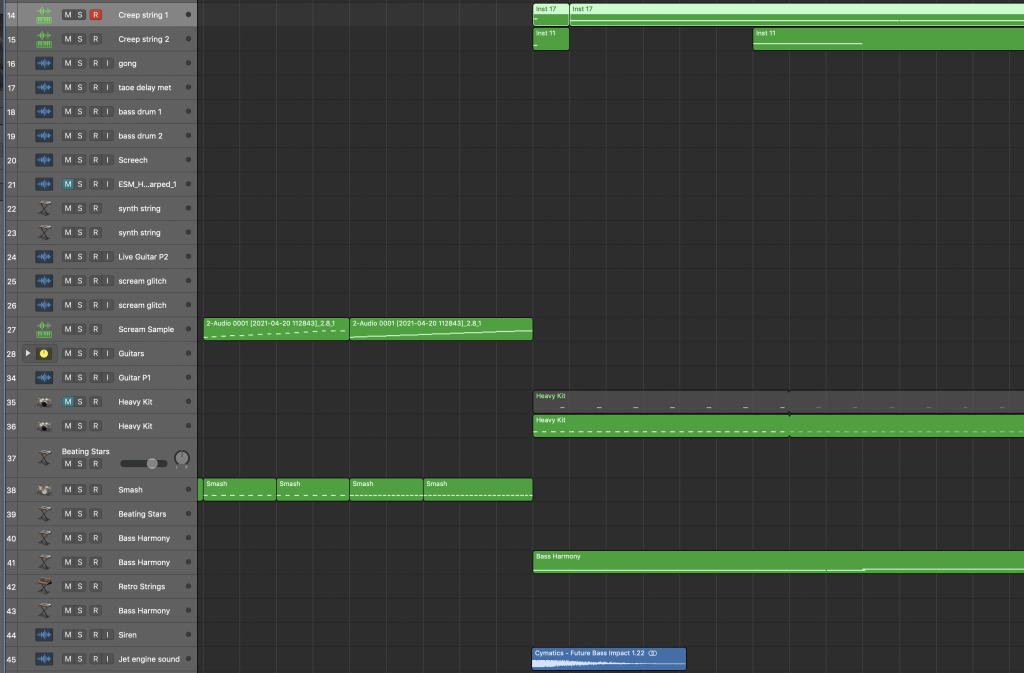
Once I named all my tracks I decided to group them based on their instrumentation type in my music, these groups consisted of: strings, synths, effects, drums / percussion, guitars and riffs. This grouping method was implemented into my template to organise my template and make instruments easier to find within their instrumental groups. I then assigned these groups each an individual colour, this makes the background of each group be highlighted in the colour you assign them. This would allow me to clearly see where each group ends in terms of tracks as the colour highlights the groups template until the border line of the group. Once I did this my track was as organised as I needed it to be in order to improve my work flow.
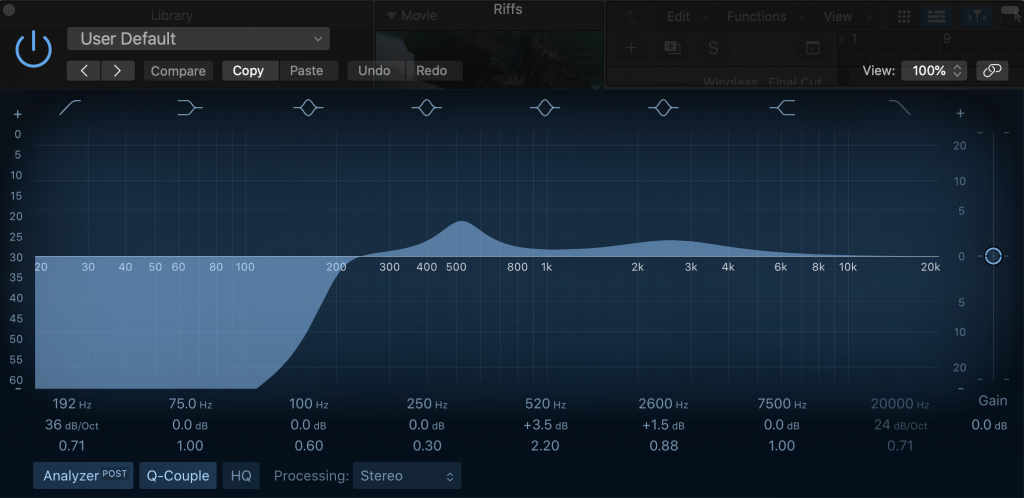
In my first stage of mixing my track I started to balance out the channels using EQ, for more information on EQ go the page on Equalisation. The main issue I ran into when mixing was dealing with the insane amount of low end frequencies in the mix, this issue was my fault due to the arrangement I had composed into my mix. Before mixing I was putting bass frequencies upon bass frequencies believing it would make my music sound more aggressive and intimidating. When I reached the mixing stage of my composition I learnt that this was all false, piling the low end frequencies made my music sound very muddy and now it was my job to fix it. This meant I had to carefully assign low cuts in the channel EQ’s to clean up my mix. Tracks such as the riff’s and synths where easier to decided low cuts upon because the low end was very subtle meaning it didn’t negatively impact the sound of the track. The hardest decisions when making low cut frequencies was in the drums / percussion group. This group was the main cause of making my mix sound muddy.
The instruments I added the biggest low cut’s on where the ‘Jet engine sound’ sample and ‘ bass drum 1 and 2’. These percussive instruments emitted so much unnecessary low end frequencies that only made the mix sound messy. The problem with making too many low cuts is that some times if you make the cut too big the track lacks punch and can sound unnatural, this was a problem I faced many times when assigning EQ. One mistakes I did make early on into mixing was using shelves to increase lower frequencies on the ‘bass string’ track. This track is at the very start of the composition, I thought because the track played alone boosting the frequency would do no harm to the mix. I learnt that boosting the frequencies can sometimes lead to the instrument sounding distorted or the gritty harmonics can begin to show in the music. This how I quickly learnt to be careful with shelving frequencies via the EQ. Assigning the EQ was such a huge challenge that I found it impossible to complete in one week, this is because my track has 47 channels that I must EQ individually to make sure that my mix is balanced.
With the EQ I decided I wanted the kick drums in the opening of my music to have a punchy tone to them, according to a guide I found through one of my tutors (https://www.musicianonamission.com/approach-equalization-two-types-eq) this was meant to make my kick drum have a punchy and aggressive tone. Fortunately for me this did work and I was very happy with the outcome of the kick drum. There was many other instances where I designed my EQ to put emphasise on different frequencies in my music. One other example where I designed EQ with creative intention was with the bass drum sample, this sample had a lot of low end frequencies that I had to cut up in order to provide a clean mix to the listeners of my track. I learnt when putting EQ on the drum that it had a lot of mid range aggressive harmonics, these aggressive harmonics sounded similar to the static original score for the Icon Of Sin. Because this is my composition of reference I thought it would be a great idea to bring out these frequencies with a notch filter to make them stand out more in my mix. This worked very well in my music and subtly added more aggression to my percussion in my music.
My mix had a lot of low end frequencies that made my mix sound muddy, but as well as this there where some tracks that emitted frequencies around 12 to 15 Kilo Hz, these frequencies are very strenious on your ears and when you hear them in music it is usually best to get rid of them. The main culprit for emitting the high end frequencies was the FM percussive synth, this had a very high pitch scraping noise that unnaturally stood out in the mix and clearly had to be cut. To fix this I put a high cut over the frequency range of 12K to 20K which fixed the issue very easily.
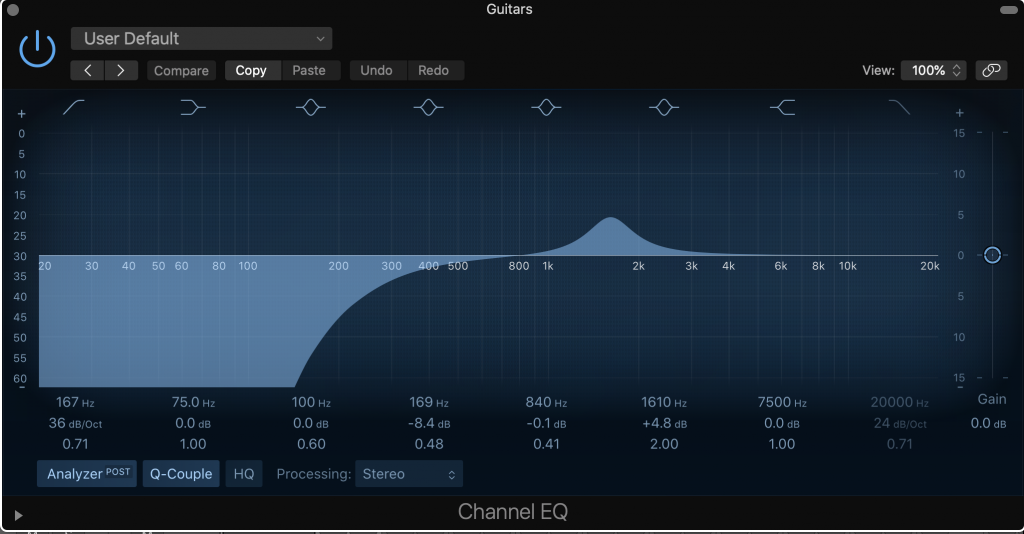
In my mix there was some instruments that I wanted to have a close relationship to each other, meaning I wanted them to have similar to the same EQ’s so they would sound like the same instrument. The main instruments I wanted to sound the same where the guitars, this is because they play the same sequences in unison and giving them different EQ’s and distortions would make my composition sound very chaotic and unorganised. This is why I gave these instruments the same EQ and distortion. When Equalising the guitars the first thing I noticed was that they had a lot of low end frequencies that were not needed on the channel, so i cut these out to clear up the mix and make it sound less muddy. When assigning EQ to the guitars I thought it was important to refer back to the original Icon Of Sin score to see how the guitars sound that mic of the score, in the original mix of the Icon Of Sin the guitars sound full and have high harmonics which give off an aggressive tone. To achieve a similar tone in my guitars I referred back to the EQ cheat sheet I found online, which stated that ‘1.5 Kilo Hz’ made the guitars have a bite tone to it. This means they sound more aggressive and in my case would bring out the higher harmonics on the guitars due to their distortion.
This week was very productive as I assigned most of the EQ on my track accurately, however the mix still sounds muddy and unclear. This is because on tracks such as the synth lead I have cut too many low frequencies out which makes the track sound compressed and musky, next week I will fix this EQ by more carefully considering how much low end I will cut out of the tracks. I will also spend more time assigning EQ to more tracks because this week I did not get through to putting EQ on all of the tracks I needed to most of these are from the ‘sirens and risers’, ‘strings’ and ‘effects’ groups. I did not focus on these this week as I assumed these groups would be the easiest to EQ as the do not as big of a role in the mix as the other instruments do. I think for my first week on mixing I have done a good job although to begin with it is an intimidating process. However I think I went into mixing with a clear head on what I wanted to do and how I was going to do it. Next week I hope to finish my track by adding compression, panning and automation to my composition next week. This is a lot of work to do so I need to make sure I manage my time carefully and work my hardest at all times.
Week 8- The final week
This week I finished mixing my music in time for the deadline of my compositions hand in date, this was not a rushed process and my composition sounded overall very good to me for my first composition. The first thing I did this week was add compression to certain instruments in my music such as the drums and guitars. After referring back to the original DOOM soundtrack I heard that in most of the compositions the kick drums have a lot of punch in them, through my research in compression I knew how to do this in my mix. To do this I set the attack speed to around 20ms this allowed the transient to get through the compressor before it activated, in the case of the kick drums the transient was the impact of the drummer hitting the kick. I then set the threshold to a low setting so that the only sound you hear from the kick drum is the impact and then the compressor kills off the sound of the rest of the kick drum after 20ms. In summary the compressor compresses all sound around the kick drum aside from the transient peaks.
After I compressed the kick drums I added some minor compression to the electric guitars, this was because I wanted to add more punch to the guitar by compressing the sound after the initial strum of the guitar. To do this I used a similar method I used for the drums, I used a fast attack speed around 50ms and set the threshold to allow the high impact of the guitar strum to get past the compressor before it was activated by the attacks speed. This worked very well and made the guitars sound more aggressive and sounded very good with the other instrumentation in the mix and well as the structural context of my composition.
When listening back to my composition I heard there was some minor audio clipping on the end of some of my audio files which I did not want. Clipping is caused when an an audio file suddenly ends in the middle of the audio file, this sudden ending cause a clicking sound in the transition from loud volumes to silence. Luckily Logic has a tool called a fader which allows you to fade out sections of your audio file, placing a fader at the end of am audio track removes clipping by gradually fading the audio into silence. I used this tool on many of my tracks such as: the siren riser, guitars and the FM the percussive synth. These tracks initially had severe clips at the end of their tracks which was easily solved with a Fading tool. When I was listening back to my track I heard some subtle but extremely high and strenuous frequencies. After soloing tracks to find where the frequency was coming from I eventually found out that the ear straining frequency was coming from the siren riser. To get rid of this frequencies I added a high cut EQ between 15 and 20khz, this got rid of those high pitch frequencies that were ruining the mix.
Automation was my final and favourite part of the mixing process of my composition, this is because this is where I found I could creatively express myself through my music. An example where I used automation creatively was near the end when the synth lead takes over the music, at this point in the music to be impacted by the trailer hit audio sample, the main instrument I wanted to be impacted by this was the synth lead. Using automation I made the synth lead get 1 db louder after each time the trailer hit is played, this made the music sound more powerful and impactful on the listener as the music reaches its dynamic climax. This was of the best ideas I had in my automation process and I was very happy how it turned out in the music. In the music I had a problem where the B section was too comparison in comparison to the A section which made it seem very compressed, to fix this problem I used automation to temporarily bring up the levels of the percussion in the music to stop it’s levels from being too quiet in comparison to the A section. There was a spot in the game’s dialogue where one of the characters says ‘welcome to seraphim’, this dialogue was very loud in dynamics compared to the levels of the music which made it sound very out of place. To solve this issue I used automation to temporarily bring down the levels so the dialogue sounded better with the music. After bringing down the levels I also heard the DOOM Slayers footsteps in the mix of my audio, I did not want this to be audible as it ruins the atmosphere of tension as the footsteps sound anti-climatic in the context they are in, to solve this issue I brought down the levels a significant amount to until the footsteps where inaudible in the music.