Live sound is the part of music which is used when live concerts of gigs are taking place in front of an audience. There are many pieces of equipment used in live sound such as: instruments, PA systems, microphones, amplifiers and monitors. During this performance we will all have to become very familiar with Live sound in order to safely and accurately set up a stage. For future reference condenser microphones and DI boxes which are used on many instruments require phantom power (48 volts), this is because it needs this specific amount of voltage to work without being over powered.
Different types of Microphones
| Type | Purpose / use |
| Dynamic Mic | Dynamic Microphones are commonly used to capture lower frequencies such as the bass drum and loud vocals. |
| Condenser Mic | A condenser microphone require phantom power (48v) to work correctly. Condenser microphones are used to capture higher frequencies and vocals. |
| Ribbon Mic | Ribbon microphones are used to capture vocals, instruments and room ambience. These microphones have the ability to capture a lot of low end frequencies and has a high frequency roll off. Meaning ribbon microphones pick up sound similar to how the human ear does. |
| Cardioid | A cardioid microphone is sensitive to sound coming from directly in front of it, this is why it is used by most singers in studio recording and live performance. Cardioid microphones are also not sensitive to sound behind it at a 180 degree angle, this is great for live performance as it means the audience will not be heard. There is also reduced sensitivity from the side of the mic from 90 degree and 270 degree angles, meaning input is a lot quieter from the left and right of the microphone. |
| Hyper-cardioid | Hyper-cardioid microphones are most sensitive to sound in the front of the microphone with reduced sensitivity to sound at the back of the microphone. |
| Omni-directional | Omnidirectional microphones aren’t typically used in live performance as it picks up sound from a 360 degree angle, meaning it could pick up everything around you. However this type of microphone is used often in interviews and talk shows. You might want to use this in studio recording if you wanted a group of people to sing harmonies into one microphone. |
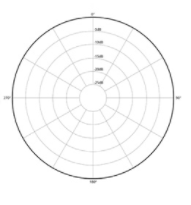
Polar pattern of cardioid microphone

Polar pattern of hyper-cardioid microphone

Polar pattern of omni-directional microphone
Setting up the stage
Instrument placement
When setting up a stage we must make sure all the instruments are placed in a position which can be seen clearly by the audience, as it wouldn’t be fare if someone on stage couldn’t be seen by there family and friends when performing on stage. We must also make sure they are performing in a safe location, as placing someone too close to the drum kit can cause hearing damage therefore everyone should be placed in safe areas. On a professional stage the performers usually adapt to the size of the stage they are performing on, for example on a bigger stage such as Webley Stadium the band will be more spaced out on the stage. This is because it can look uncomfortable when a band are too close to each other on a big stage.

Monitors
During the music performance the sound of other musicians can often be drowned out by other instruments on the stage, to fix this problem we place monitors in front of different performers. These monitors will allow them to hear themselves more clearly, here is an example of how they work. The guitar player will have a monitor in front of him and the sound technician will ask “what do you want in your monitor”. The guitar player might say “Please can I have the vocals, myself and keys in my monitor”. This will mean the monitor in front of the guitar player will have all three of these instruments in them, making them easier for him to hear in the music when performing. We don’t really ask for drums in monitors as we can hear them clearly during the performance as they are so loud.
Speakers
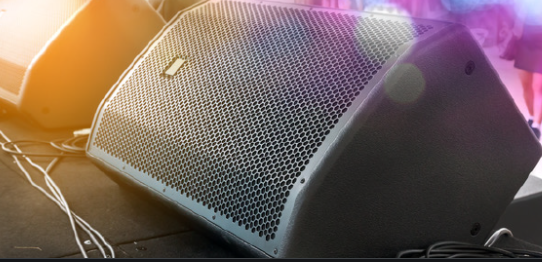
When we are setting up the PA systems we place them in front of the band but not too close to the audience, this is because it might give them ear damage from the high dynamics of the speaker. The point of the PA system is to provide the audience with sound instead of the band, setting up the PA system correctly is very important as it is easy to damage the hardware. This is because sending bass frequencies to the treble speaker at the top will cause it to explode as it can’t take such low frequencies. The sound technician must also be very attentive to the PA speakers as they often give off feedback which can drown out the music and cause hearing problems. Feedback is often caused by microphones being held to close to the monitors or errors on the control board during the performance. The sound technician must fix the feedback coming off the PA system as soon as possible as it can increase in volume very fast.

Cable Management
When using many different cables it is very easy to create a cluster of tangled wires on the stage that is in the way of the performers, untidy cables are also a sign of bad health and safety as well as terrible organisation skills. If cables are unorganised performers can trip up on wires while traversing the stage. In the middle of my bands setlist we have two guitarists which have to switch instruments in the middle of the set, if the cables are untidy when they are moving from one side of stage to the other there is a possibility they might trip on the wires and injure themselves. A good sign of cable management is that all the cables are out of the way of the performers in an organised fashion, for example when setting up the PA system there are many wires that drop down from the speaker. To organise these wires we tuck them underneath the system so that it is out of the way of the performers. Wires should also not be hanging above the floor as this is a guaranteed tripping hazard, instead the wires should run across the surface of the floor in a neat and co-ordinated line. The instrument that requires the most cables is the drum kit as it needs a total of 9 microphones which require XLR cables to function, these wires can not get in the way of the drummer as the drummer could hit them and damage the cables. Therefore the wires should neatly go from the microphones into the channel box without getting in the way of the drums. The microphones the singers have will also have cables dangling from it which can put the singer in danger of tripping over them, to solve this issue we make sure the wire is tied to the microphone stand until it reaches the floor where it will follow a neat and organised trail to the channel box.

Setting up Instruments

To make sure the audience hears everyone playing on stage we must equip every instrument with microphones. The singers on stage are usually given cardioid dynamic microphones to sing into as it has a thick and warm sound to it. Cardioid microphones also stop sound from the back of the microphone from being picked up, this is because at a loud venue sounds from the crowd will be picked up through the back of the microphone and amplified. When putting microphones on the bass drum we use dynamic drum microphones, there is often a circle cut into the bass drum which is intended for microphone to be placed half way inside. The dynamic microphones picks up the warm and thick texture of the bass drum. The overhead microphones on the drum kit usually have cardioid condenser microphones, overheads are placed so that we can hear the cymbals of the drum kit more clearly. We use condenser microphones for picking up the cymbals because they are great at picking up higher frequencies of sound. There is always one overhead on each side of the drum kit, it is very important that the overheads are both an equal distance apart from the snare drum. This measurement is used to make sure both sides of the drum kit are heard evenly through the overhead microphones.
When positioning the microphone on the hi-hat we must make sure it is out of the way of the drummer so that they do not hit it while playing, to make sure it is out of the way of the drummer it must be placed just outside of the surface area of the hi-hat. Unlike the tom drums where the microphone is facing the centre of the drum, the microphone on the hi-hat must face the outside of the raised inner circle. We place it hear because the sound of closing the high hat and it’s overall impact sounds dull in the centre.
However when we are placing microphones on the toms we have to make sure the microphones are facing the centre of the drum, this is because the centre of the toms is where the impact of the drum sticks takes place meaning we can catch powerful and punchy sounds from the centre of the drum. Placing the microphones in the outside of tom would give is a very weak sound from the drums. For the floor tom we use dynamic hyper-cardioid microphones, these types of microphones are less sensitive to sounds from the left and right of the microphone. This is ideal for isolating the toms from each other with microphones, dynamic microphones are used for picking up lower frequencies which is why we are using it on the floor tom. This is because the floor tom, much like the bass drum emits a lower frequency when it is played. When positioning the microphone for the floor tom you must be careful it is not too close to the ride cymbal, this is because the cymbal may hit the microphone if it is too close. Therefore you must make sure it is not too close to the ride cymbal to avoid damage to the equipment.
The snare drum gives off a higher frequency in comparison to the other drums, the high frequency of the snare drum is the reason we use condenser microphones on it to catch the sound more clearly. The snare microphone must also face the centre of the drum for the exact same reason as the floor tom, to capture the impact of the drum through the microphone. The snare drum also uses a hyper-cardioid microphone to further isolate the individual sounds of the drum kit, high toms and mid toms also use hyper-cardioid microphones for the same reason. High toms on the drum kit also use condenser mics as they give off high frequencies, much like the other drums I have mentioned the microphone must also face the centre of the drum. On the mid tom we also can also use condenser microphones to capture a more realistic and open sound for the drum.
Electric guitar amplifiers have two speakers inside of the amplifier, this is where the sounds output comes from. To make sure the microphone picks up a clear and strong signal from the amplifier you can place it in the centre of the two speakers, this will allow it to clearly pick up the amplifiers output. Because the guitar amp has such a large dynamic range we use dynamic cardioid microphones on the amp to pick up sound from both speakers in the amp. Unlike the electric guitar, the bass guitar requires a DI box to get plugged into the channel box. This also means it requires 48 volts, we use the DI box because the low frequencies of the bass is hard to pick up on most microphones which we have access to at college. The keyboard’s output gets plugged into the DI box, because it is using a DI box it also requires phantom power. The output signal of the DI box then goes into the channel box (D snake).
The D snake is where all the microphones and audio signals of the instruments get plugged into and turned into data, this data then get’s taken to the live sound board where the sound technicians can control the output of the instruments through the PA system. The PA system’s audio output is also controlled by the live sound board, meaning the board controls the audio output of the whole show. The sound board has many faders which all control the dynamic output of the speakers and monitors rigged up on stage. During the sound check the sound technicians will be in charge of giving each musician on stage the correct audio mix for the performance. When we are plugging audio inputs into the D snake it is important to organise the channel numbers and communicate as a team to make sure we don’t waste time trying to find instruments in the channel numbers. Drums usually take up the first 9 channel inputs in the D snake. The guitar, bass and keyboard player must then make sure they communicate to make sure they know which channel they are going into. For future reference there should be a note on the live sound board which says what channel each instrument is in.
Preparation (Keyboard patches / distortions)

Making sure all instruments on stage such as guitars and keyboards and prepared with the correct distortions and pedals is vital. I encountered an issue were the piano sound for one of the keyboards did not work so I had to run through the set with an organ sound, which did not fit the context of the songs in our set list. Therefore you should make sure all your patches are working during the sound check of your performance, if it is not working you can try get a technician to fix it or get a new keyboard. If the guitarist needs to use distortion or effect pedals such as ‘chorus effect’ it is important they have the pedals working and in front of them during the performance. Just like the keyboards these effects must be tested in the sound check to make sure they are good to go. During the 1st performance of the event on the 20th of October when playing Back to Black for taunt I initially started the song with the wrong patch. This is because I assumed it was already on the correct patch for me, this lead to me starting back to black with a square synth lead patch. To stop this problem from happening you should test your instruments sound before the drummer begins the count in for the song to make sure it is working correctly.
Another problem I faced before the mock was that the power box for the keyboard was broken and there was no others around the venue, to solve this problem I had to one of the practice rooms around college and burrow a power box from there.
Source List
Adorama, 2018. Microphones on drum kit. [image] Available at: <https://www.adorama.com/alc/what-is-the-best-drum-mic-kit/> [Accessed 24 October 2021].
Astounded, n.d. PA speaker. [image] Available at: <https://www.astounded.com/buy/pa-audio/speakers/powered-pa-speakers-singles/> [Accessed 24 October 2021].
Briones, A., 2015. The Different Types Of Mics And Their Uses | Gearank. [online] Gearank.com. Available at: <https://www.gearank.com/articles/types-of-mics> [Accessed 24 October 2021].
Fox, A., n.d. What Is A Hypercardioid Microphone? (Polar Pattern + Mic Examples) | My New Microphone. [online] My New Microphone. Available at: <https://mynewmicrophone.com/what-is-a-hypercardioid-microphone-polar-pattern-mic-examples/#:~:text=A%20hypercardioid%20microphone%20has%20a,due%20to%20their%20high%20directionality> [Accessed 22 October 2021].
ProducerHive, n.d. Cable picture. [image] Available at: <https://producerhive.com/buyer-guides/accessories/cable-management-tools-for-producers/> [Accessed 24 October 2021].
Shure, 2015. Microphone polar patterns. [image] Available at: <https://www.shure.com/en-MEA/performance-production/louder/microphone-directionality-polar-pattern-basics> [Accessed 24 October 2021].
Stocklib, n.d. Concert Stage. [image] Available at: <https://www.stocklib.com/media-54066704/concert-stage-music-and-sound-equipment-event-background.html?keyword=stage%20light> [Accessed 24 October 2021].
Sweetwater, 2020. Guitar Pedals. [image] Available at: <https://www.sweetwater.com/insync/best-distortion-pedals-for-bass/> [Accessed 24 October 2021].
Sweetwater, 2021. Stage monitors. [image] Available at: <https://www.sweetwater.com/sweetcare/articles/how-to-set-up-stage-monitors/> [Accessed 24 October 2021].