
To do a test shoot for my aqueous photography, there is a few things that I normally use. I will be guiding you through this process of how I will be shooting for the remainder of the project.
Equipment
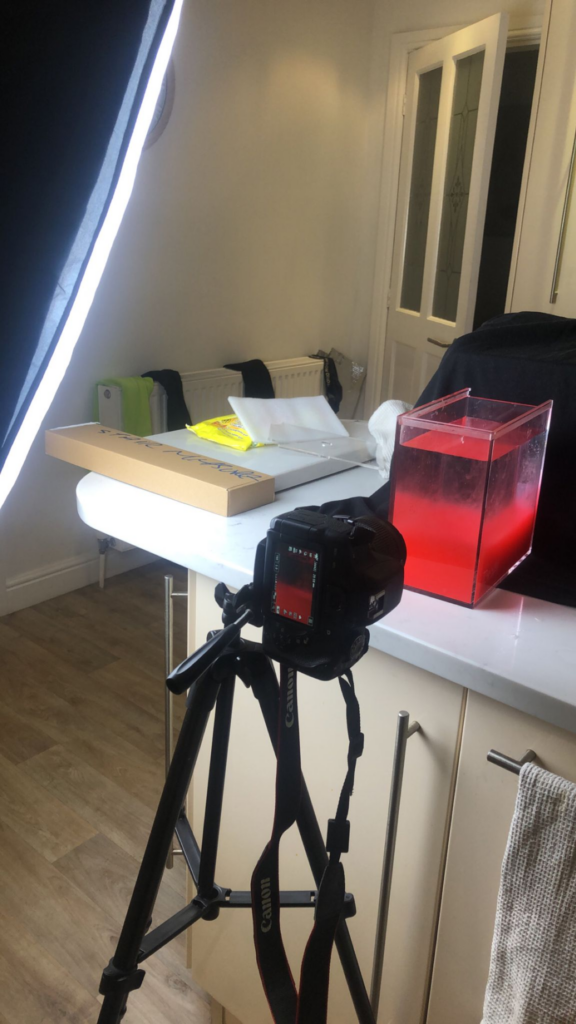
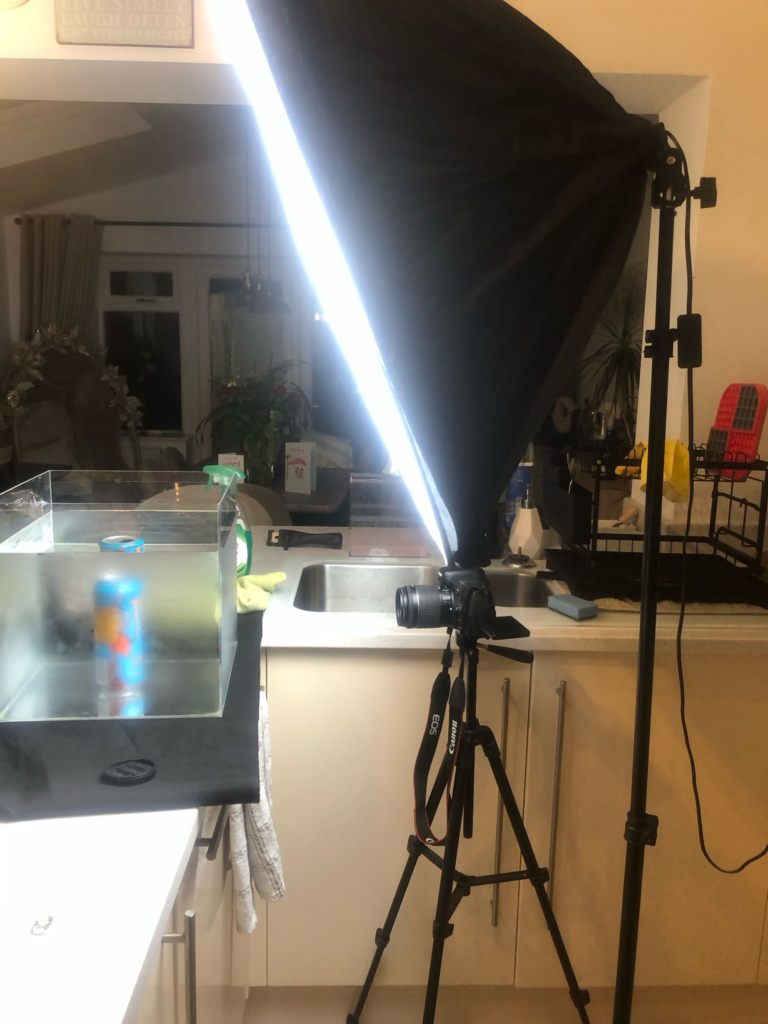
To begin, the equipment I use is very important for what I do. I typically prefer to use softbox lighting for the shoots because I think that it looks a lot cleaner. This is because softbox lighting provides a more smooth and even light to the entire image. I have experimented with using dishes in the past and it doesn’t work as well in my opinion. I will typically only use one of these lights because you don’t normally need more than one. I also like to stay away from using flashes for this because the flash can normally not keep up with the continuous shooting used in aqueous photography.
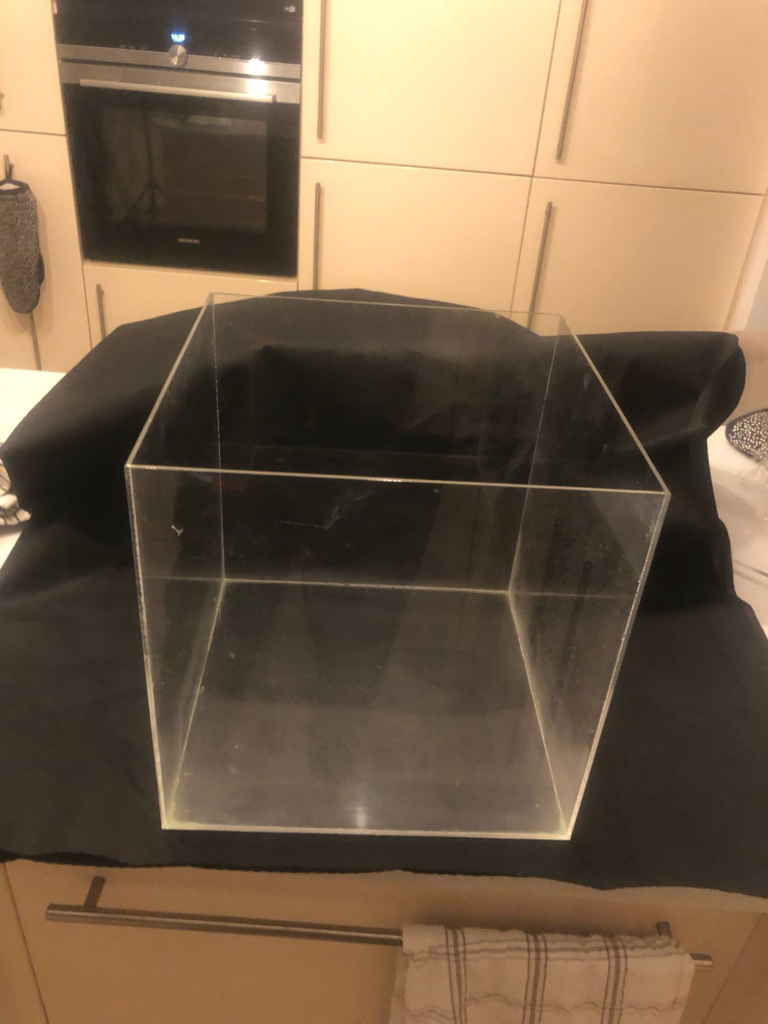
For a choice of tank, I found that using a small acrylic box was a good idea for it. I use this because it is big enough that I am able to capture the full cloud while being small enough that its not a massive pain to empty, clean out, dry and refill during the process. However, I will sometimes use a bigger cubed foot acrylic box
Paint
For the paint, I have found that acrylic tends to do the best. I have attempted to use other substances such as condensed milk and ink, but mixing acrylic paint with water is able to create a nicer effect without whitewashing the colour. With condensed milk, the colour is usually not vibrant enough when using things such as food colouring and ink is not thick enough as well as being more expensive to get.
I will mix the acrylic beforehand with water and work to create the desired colour and viscosity. If you mix it with too much water, it will be very thin and the clouds will appear almost transparent in some cases. It also does not create the rolling cloud look we are looking for. If you mix it with too much paint, it will be too thick and will come out in more of a line and will not split apart and dissipate into the clouds we are trying for. It is also very important to mix it just before you take it out into your syringe, because if you do not it your cloud with have little bits of solid paint coming off of the main cloud, which makes it look like it is breaking apart.
Method of Delivery
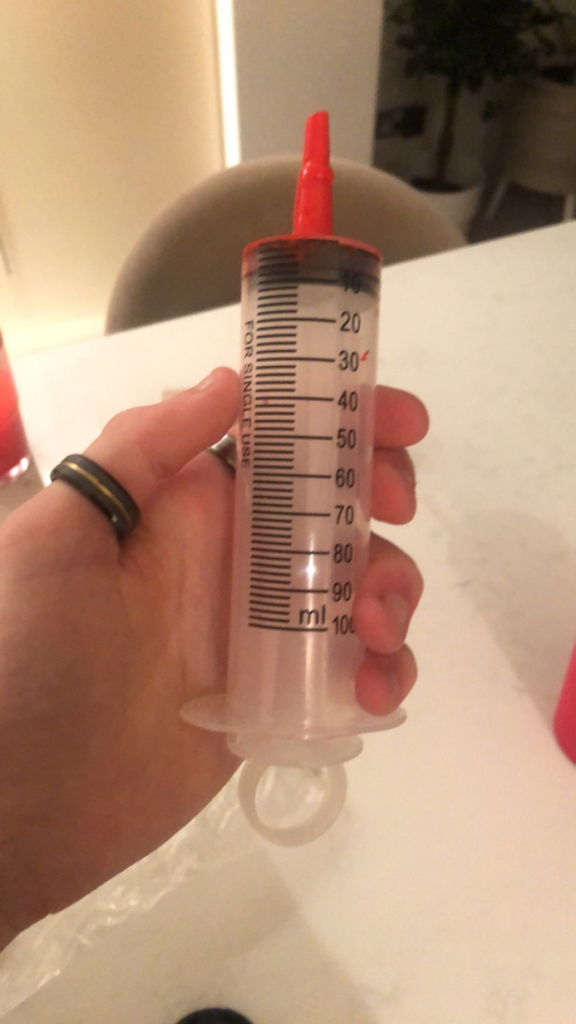
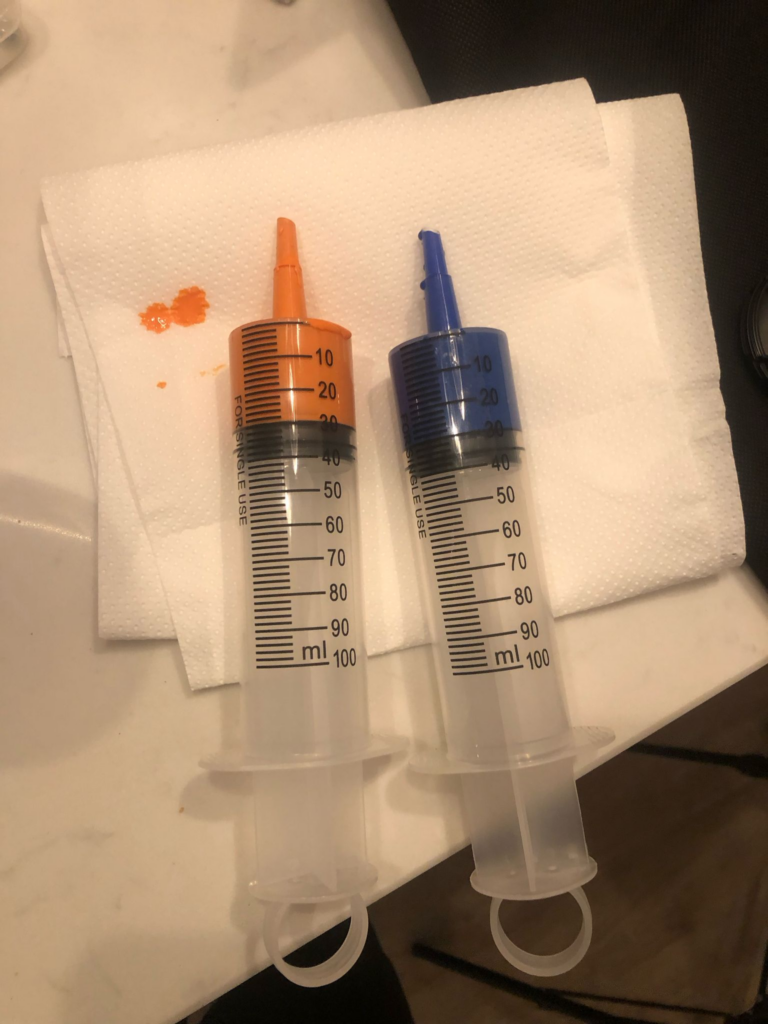
To deliver the paint into the water, I typically use a big syringe. I used to use a smaller version, but because the nozzle is bigger it creates a more continuous spread. However, I still use the smaller syringe when using the smaller tank because I do not need as powerful as a stream. When using the smaller syringe, I will use about 5ml of liquid for the stream and when using the bigger syringe, I will use about 30ml of liquid. I have found that these typically create a good balance of being enough to make nice clouds and not overdoing it to the point of where it becomes too big and too much to clean up.
Camera Settings
I will use most of the same camera settings when I do this style of photography. Because the idea behind this style is freezing the image, you want to focus on using a high shutter speed. I like to hover around the 1/160-250 mark when doing this style depending on the light level. I also use a fairly small aperture so the entire image is able to be in focus. This is very good to have when doing this style of photography because of how much depth there is to it, so it is important to make sure everything is focused. I use around 800 ISO for this because I do not use flash, so quick bursts of light are not available to me for easy bright lighting. However, I do use a bright box light so my ISO can comfortably sit around 800, preventing any grain on the images.
The Setup
The setup for the shoots are very similar. However, the difference comes in the uses for the different boxes. When I use the smaller box, I am normally trying to isolate just the cloud on its own. When I use the bigger box, I am usually promoting a product, normally some kind of or bottled product.
Small Box
To begin with, I will set up the area of the shoot. I like to do this near a sink so I have easy access to water both to fill and drain the tank. For this example, I will be using a black backdrop. I place something behind the tank to drape the backdrop on and I place the box in front of it to create my shot.
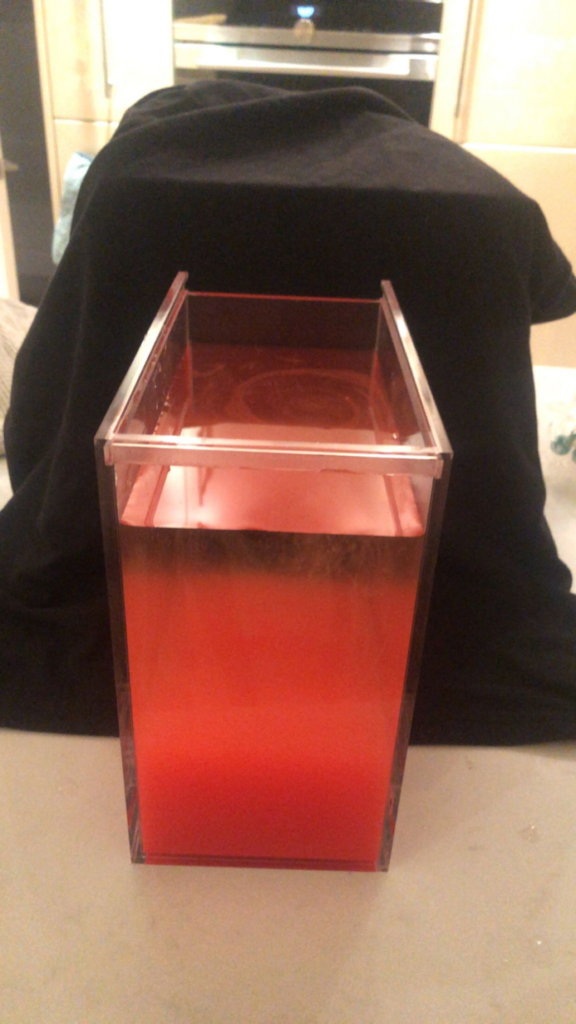
I will then setup my camera in position to check that everything will look fine and is composed correctly. I don’t worry too much about anything around the edges because I know that those can be simply cropped in Photoshop. I shoot in portrait with the smaller box because I am focusing on just one stream of paint and it means that I will get a higher quality than if I was to shoot landscape and crop the edges out.
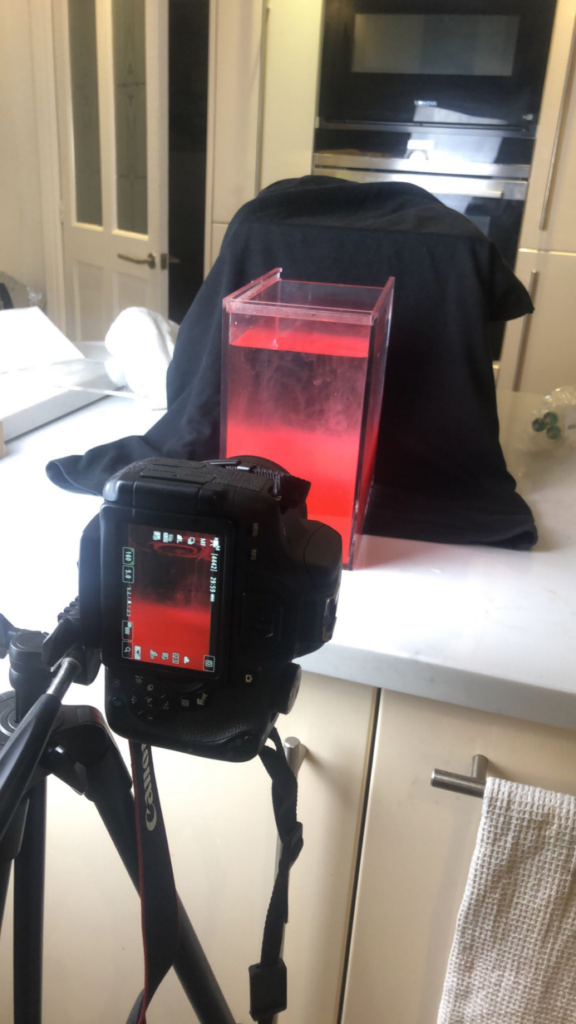
After this, I will set up my lighting. For this shoot, I was placing the box light looking straight down on to the box at an angle. This made it so the subject was lit, but so the reflection of the light wasn’t shown in the box.
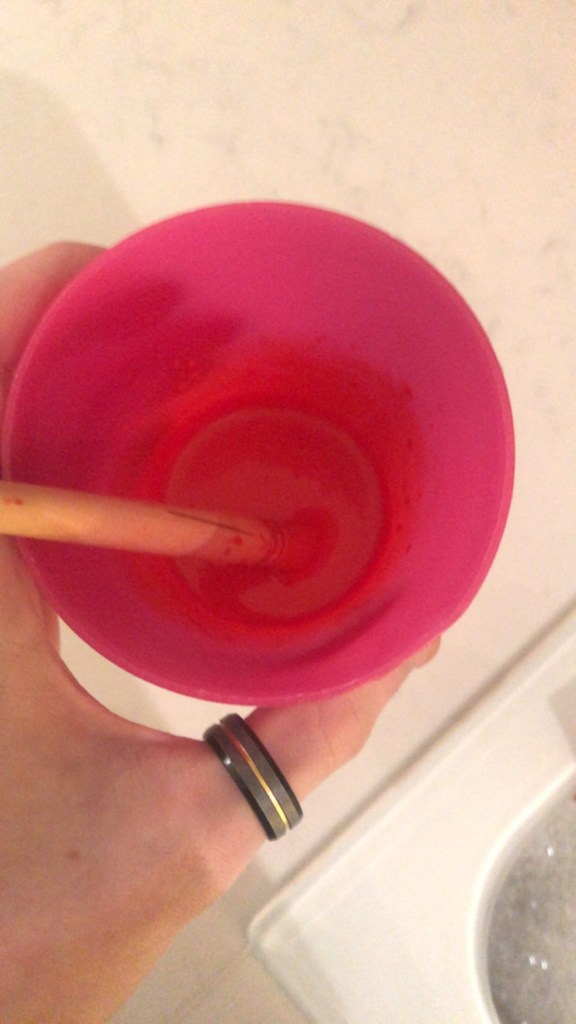
After this, I will make my mixture. I use a plastic cup that is easy to clean to create the mixture and add equal parts water and paint. I will then adjust from there stirring with a paintbrush until I have a completed consistency
I will then load it up in my syringe. For this shoot, I was experimenting with using my bigger syringe on the smaller container.
After this, I will fire the paint into the container while holding the shutter button on continuous fire. If I am using multiple colours with multiple syringes, I will use the self timer to give myself time to get ready and let it fire off 10 shots. However, I only use that method on the smaller tank because the 10 shots are too little of an amount for use in the bigger tank. With continuous shooting, I will usually get a roll of raw pictures that look like this.
After I get my shots, I will drain out the tank, clean it so there is no residue of any paint with a sponge, dry it so no air bubbles are created and then fill it back up and repeat.
Big Box
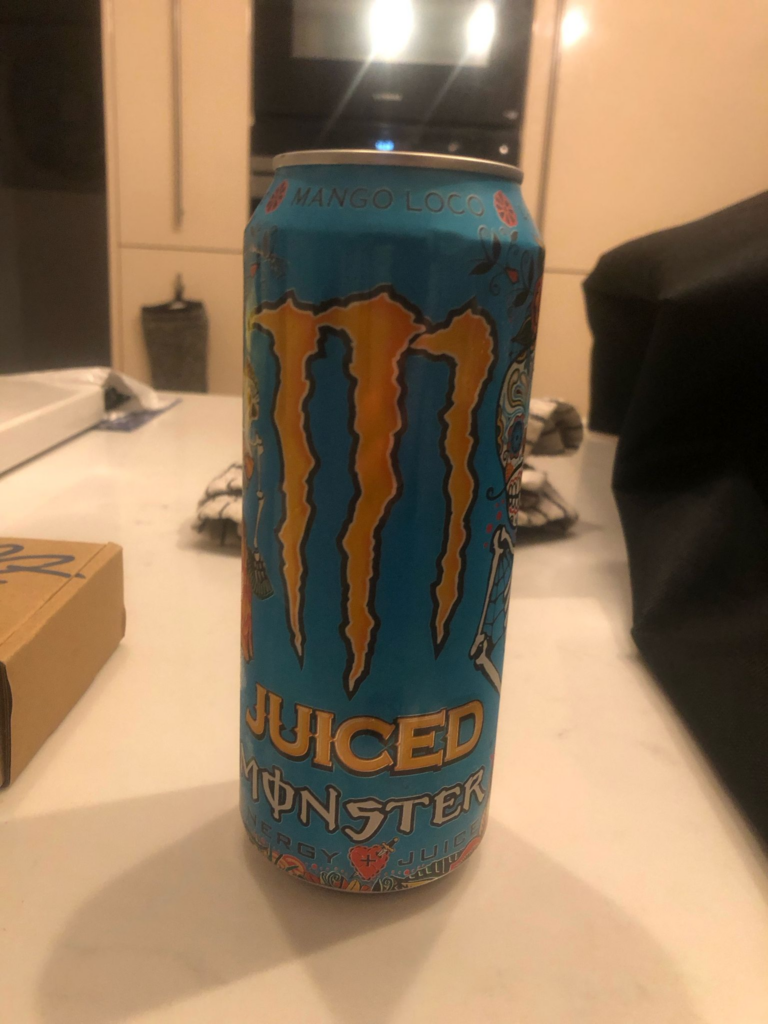
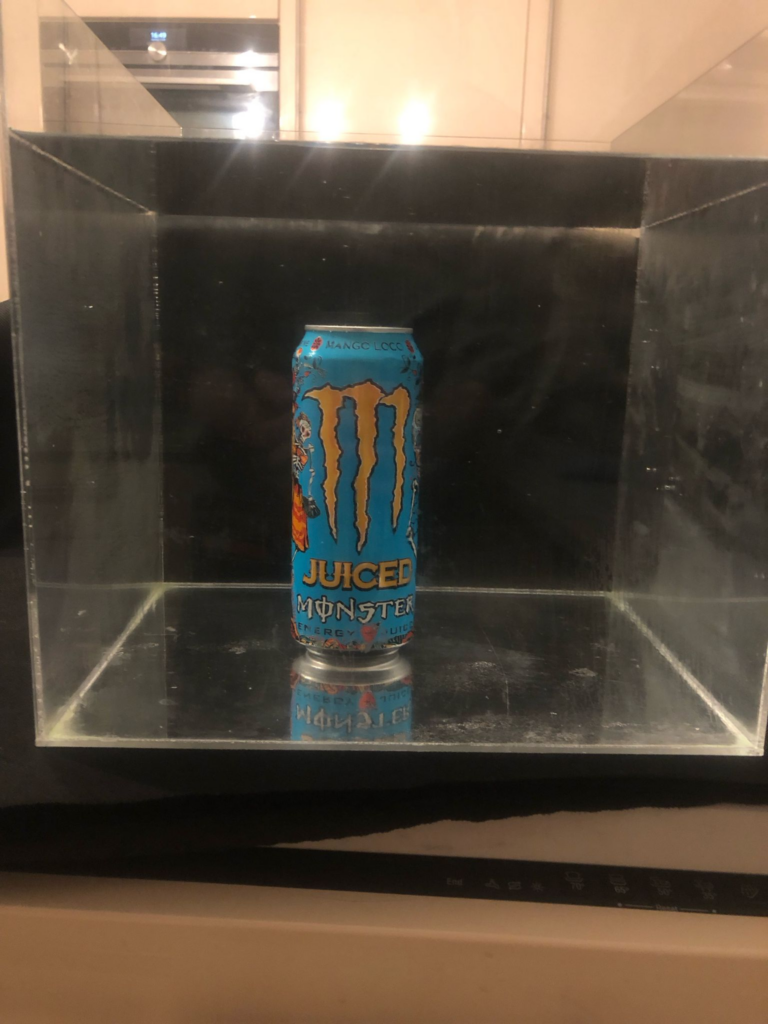
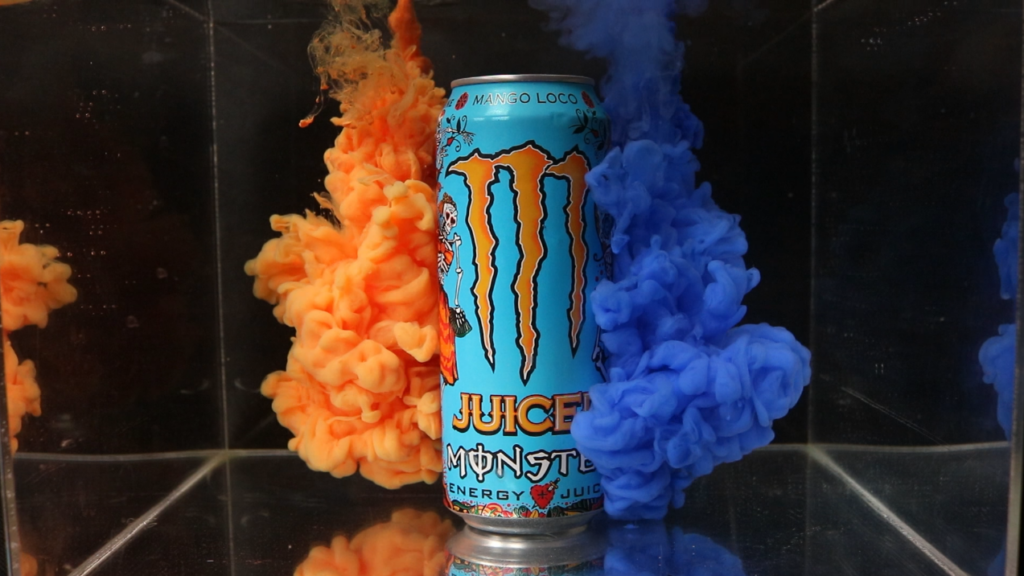
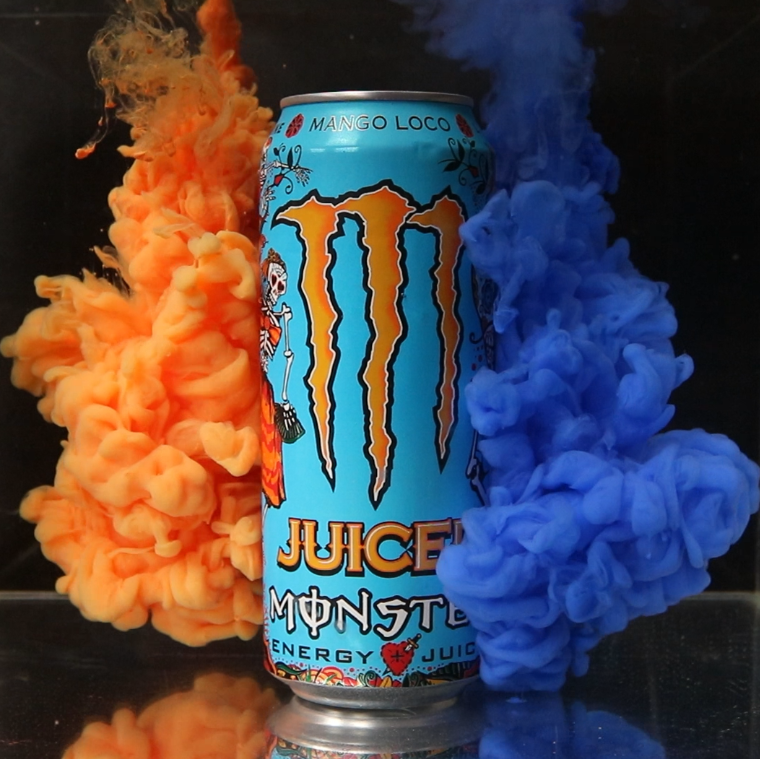
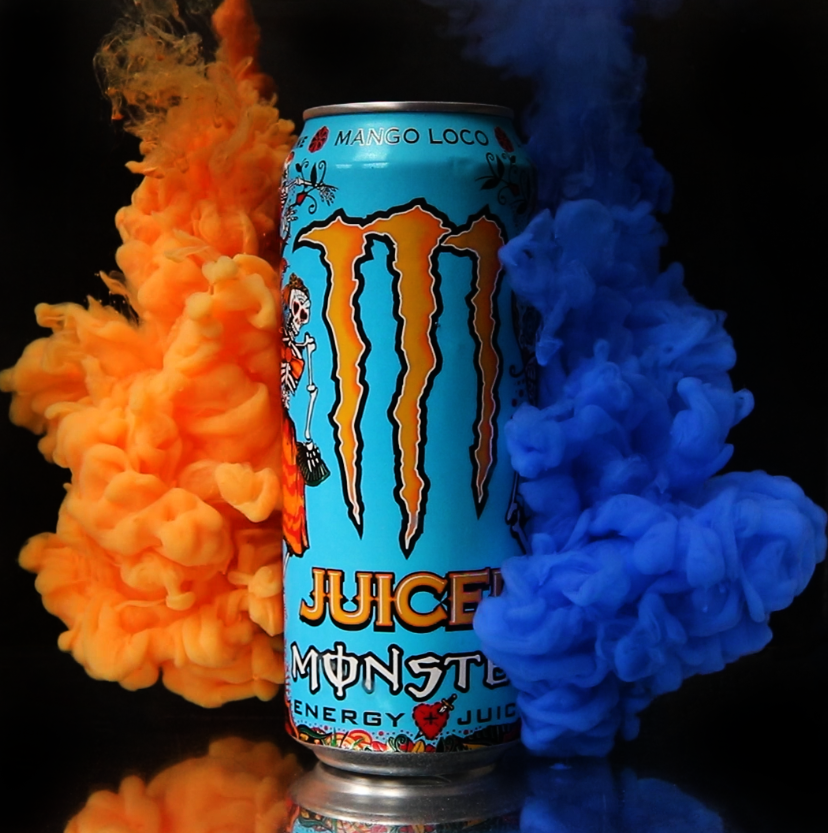
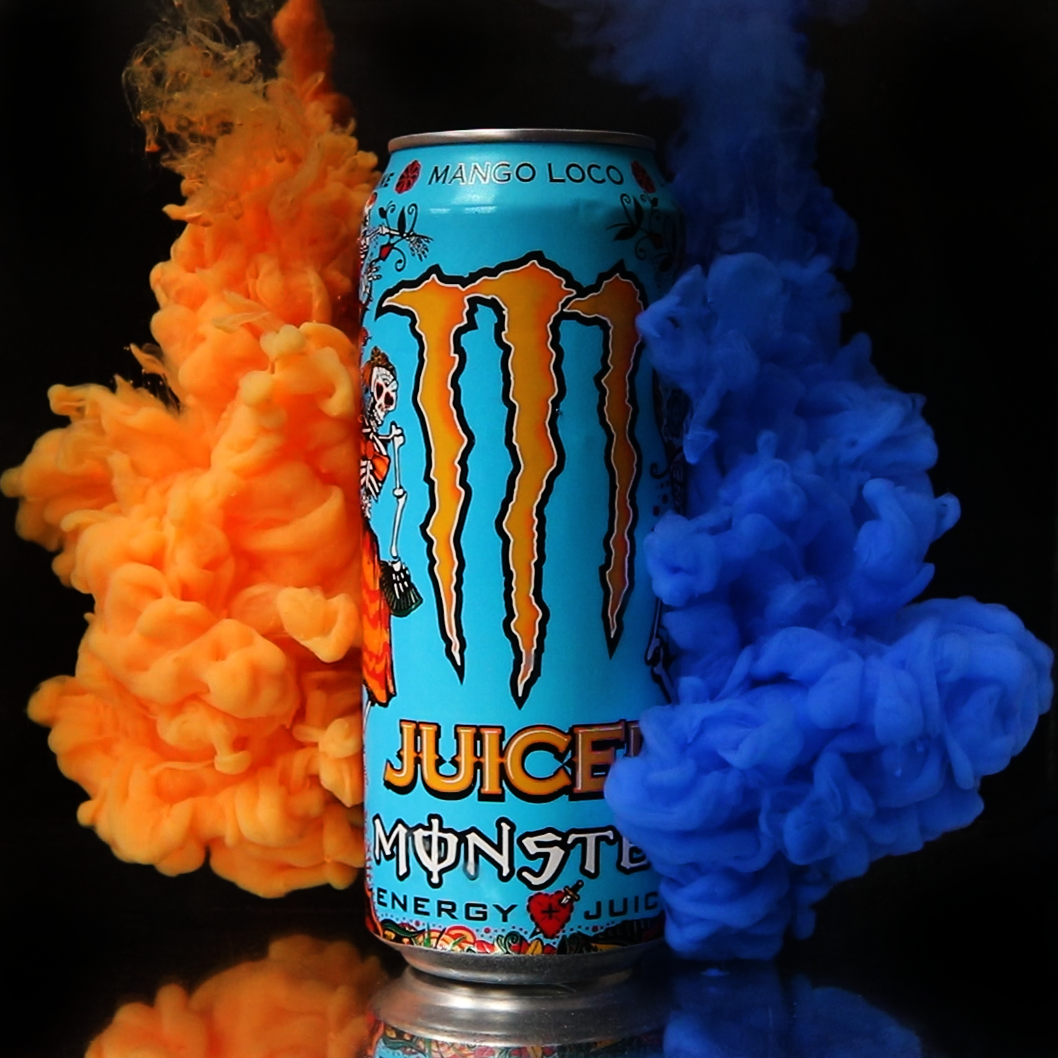
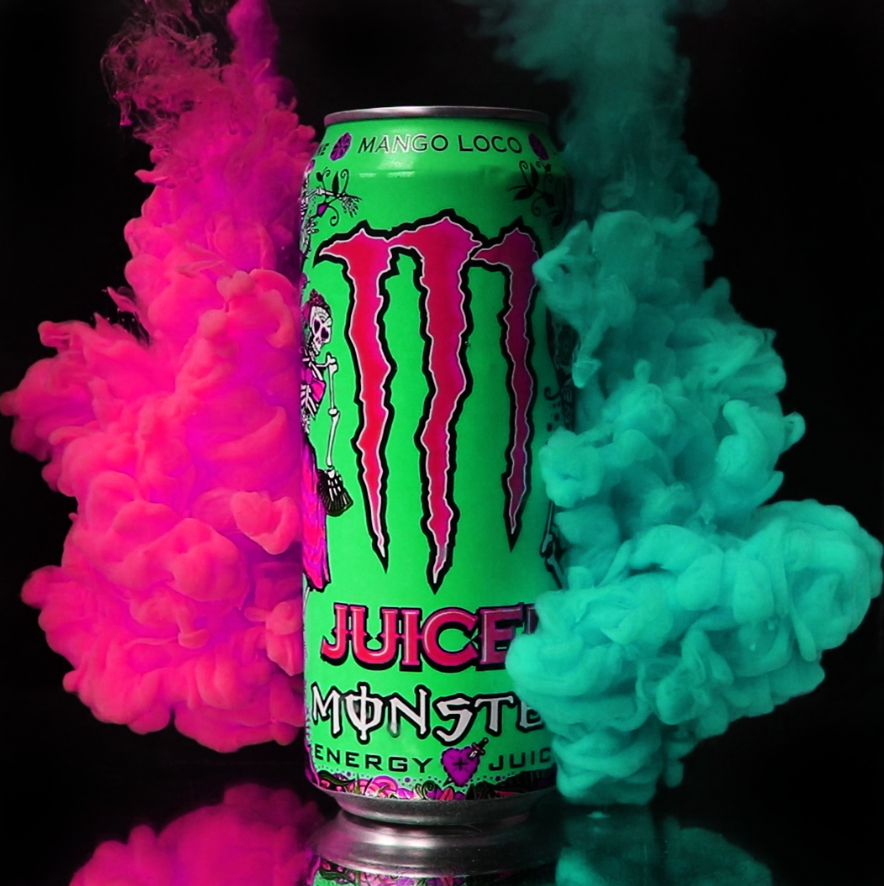
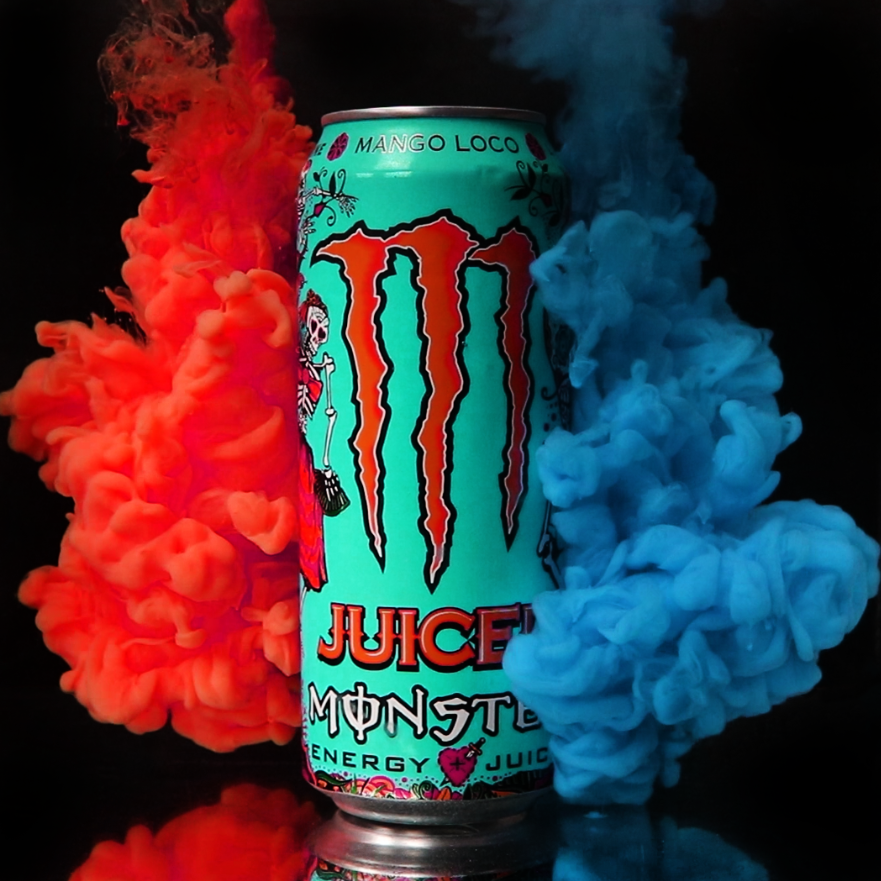
For the big box, a slightly different approach is taken. For this example, the product I will be using for the advertisement is the Mango Loco Monster Energy Drink.
I will still start by preparing the background and placing the box on the background to setup my shot.
I will place the camera in front of the box, but I will be doing it in landscape this time. This is because the box is much larger so I will be focusing on making the shot more wide to use more of the space that I have. I am also going to have 3 components to this shot; the can, the left orange cloud and the right blue cloud. I also decided to use a polarising lens on this shoot because there was a slight reflection in the box that I didn’t want to interfere with the shot.

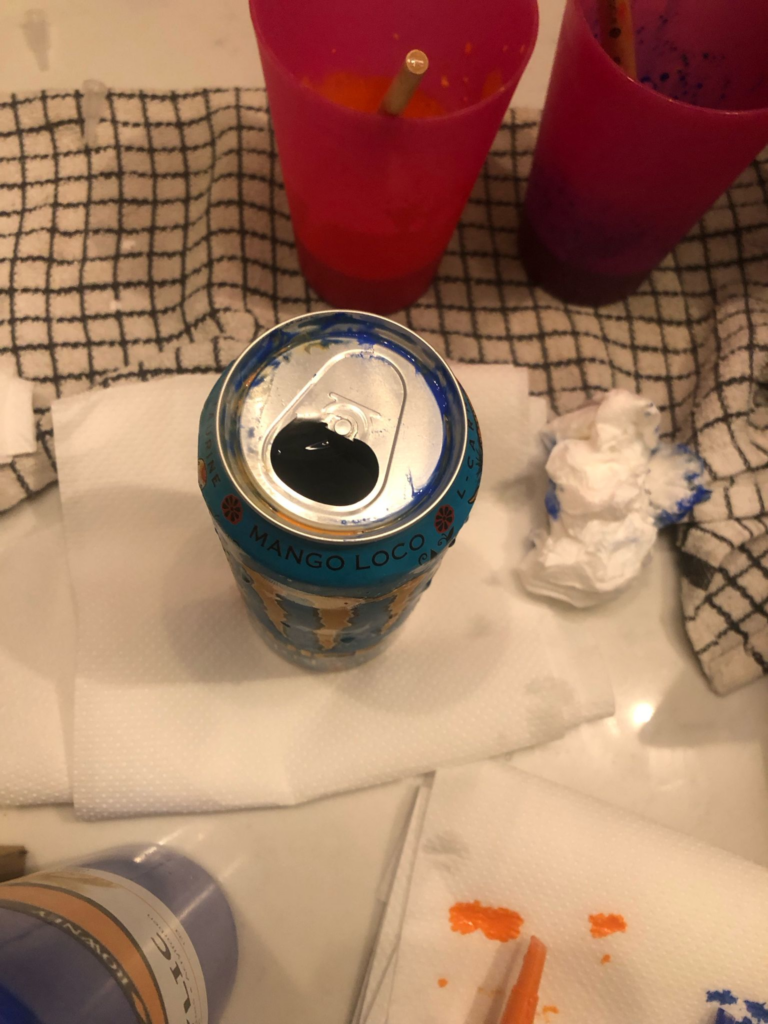
To prepare the can, I had to think of a way to keep it in the water. To start, I opened it and drank all the liquid inside.

I was looking around for something that I could find that was solid. I did not want to waste anything liquid and I had nothing in a high quantity that was dense enough to make the can stay down while submerged in the water, I also figured that if the thing I placed in the can was liquid, it could spread into the water and ruin the shot. To combat this, I found some old metal nuts that I used in a previous shoot.
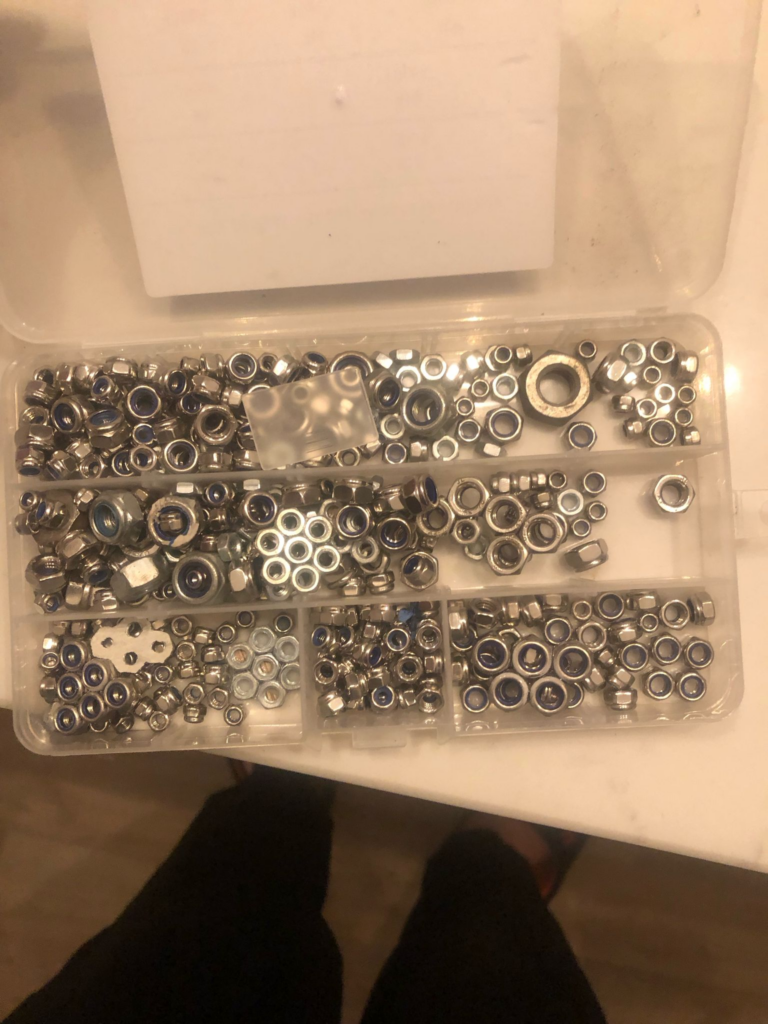
The nuts were way more dense than the water and were able to fit into the top of the can just fine. They were also cleaned so there were no bits of dust or anything that could seep out into the water, so I transferred all of them into the can. After this was done, I set up my lighting in the same way as before to avoid reflections and filled up the tank with cold water. To test the can would sink, I placed it inside the tank and it stayed at the bottom.
I then prepared my colours in the same way as before, using my plastic cups and paintbrushes.

To test the consistency, I used a glass cup with some water in and two small syringes. This allowed me to see how the paint would move in water without having to clean out a whole tank.
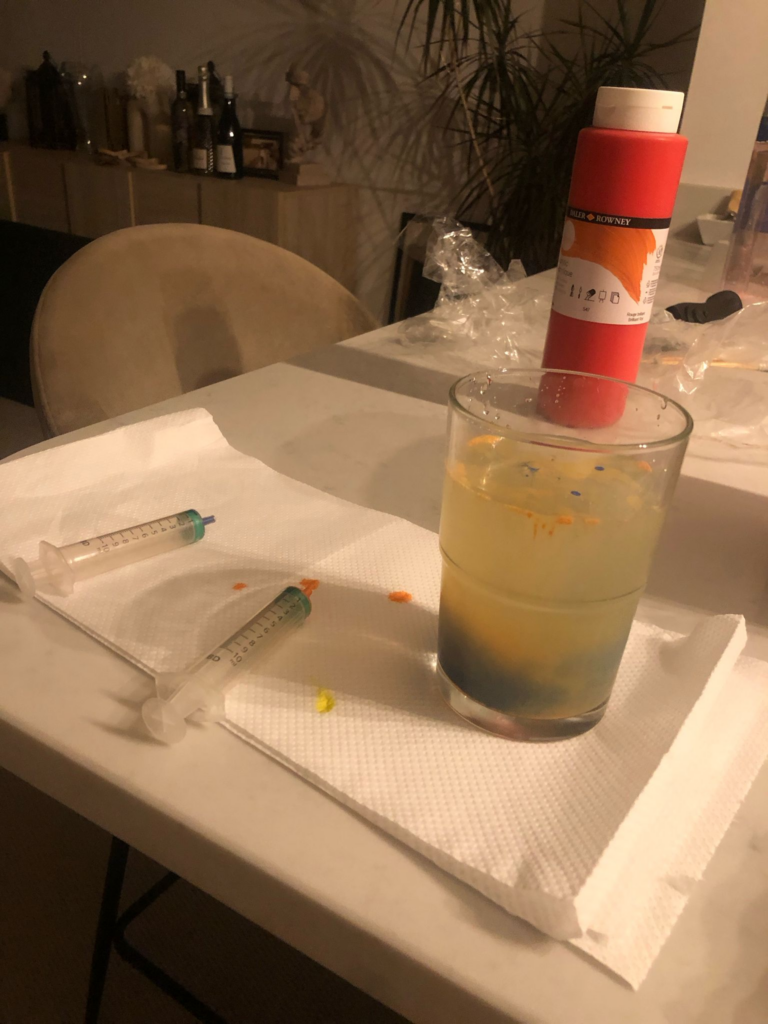
After making sure the consistency is good, I prepare the big syringes. In my first shoot, I was getting a lot of stringy bits coming off of the paint clouds. I discovered that this is because in-between the time that I mixed the paint and me preparing everything else, the paint has sunk to the bottom so the consistency had changed, causing the mixture to become thinner. To fix this, I stir it for a few seconds just before I put it into the syringe. This makes the consistency perfect again and ready to be used.
When it came to shooting, I noticed that the shot had become very cloudy. I noticed that it wasn’t the water being cloudy, but the tank itself.

A short term fix for this was to use some window and glass cleaner on the tank. Combined with a microfibre cloth, this made the outside look normal again.
However, the issue persisted when I did more shoots. This was only affecting the big tank and not the small tank, so I was very confused. I eventually figured out that because I was using cold water, it was turning the tank very cold. Because the acrylic isn’t very thick on the big tank, it was very easily getting cold, causing the warmer air outside of the tank to condensate, creating a fog on the outside of the tank. This wasn’t present on the smaller tank because the acrylic was much more sturdy and thick. Combined with the smaller quantity of water and much quicker filling time, the issue was not in any way present. This was a simple fix, I just had to fill the tank with lukewarm water so condensation didn’t take place.
After this, the cleaning process is similar. I use Q tips and paper towels to clean the top of the monster can and drain it of water to make sure that no excess paint from it goes into the next batch of water.
I then empty out the water by using the smaller tank as it is much easier to carry. I clean out the paint in the same way as the smaller tank, using paper towels. After this, I refill the tank and set up for the next shot.
For my test shots, I decided to use a different strategy. Because both of my hands were used for the syringes, I was not able to hold the button for continuous shoot. However, I was also not able to use the self timer continuous because it only provided 10 shots. I would need much more if I wanted to get a good turnout. Because of this, I decided to experiment with using video on my camera. I was not sure of my camera’s video quality, so I used this shoot as a test for it. My idea was to take stills from the video and use those for edits. To slow down the video, I simply took it into Adobe Premiere Pro and altered the speed to 50%. The framerate looks very slow because I discovered that my camera shoots video in 30 frames per second, but that wont be an issue for this style. Below is the slowed down video.
Editing Practice
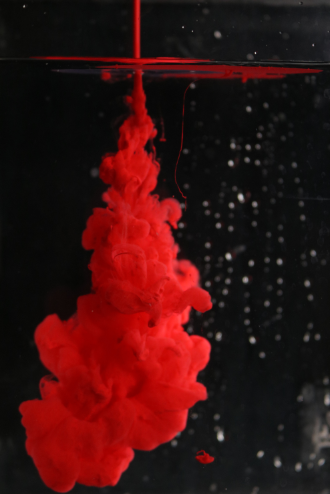
To practice the style of editing I will be using for the main picture, I will be using one of the stills from the video I took above.
To begin, I cropped the image into a square. I also straightened it in relation to the tank to make sure it was even.
I then burned the shadows. This creates further depth and contrast for the clouds while also making the colours pop without further brightening the image.

I then removed imperfections from the image such as small specks of dirt, differences in the background and the edges of the tank.
I looked at the reflection in the bottom and did not want to remove it, but wanted it darker, so I burned the reflection slightly to make it blend better. This created the final image shown below.
Hue Experimentation
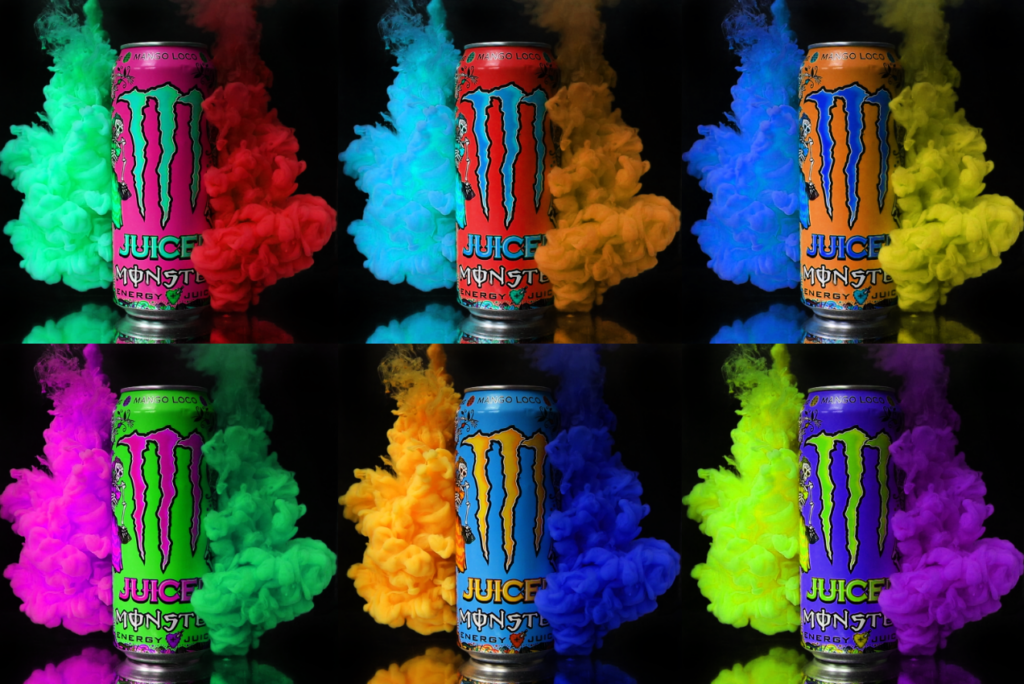
I decided to experiment with different colour combinations following this style. I did this on this image because the colours blue and orange go very well together, using a common form of colour theory known as complementary colours. By altering the hue, I am able to discover other shades that go well together with this complementary style.
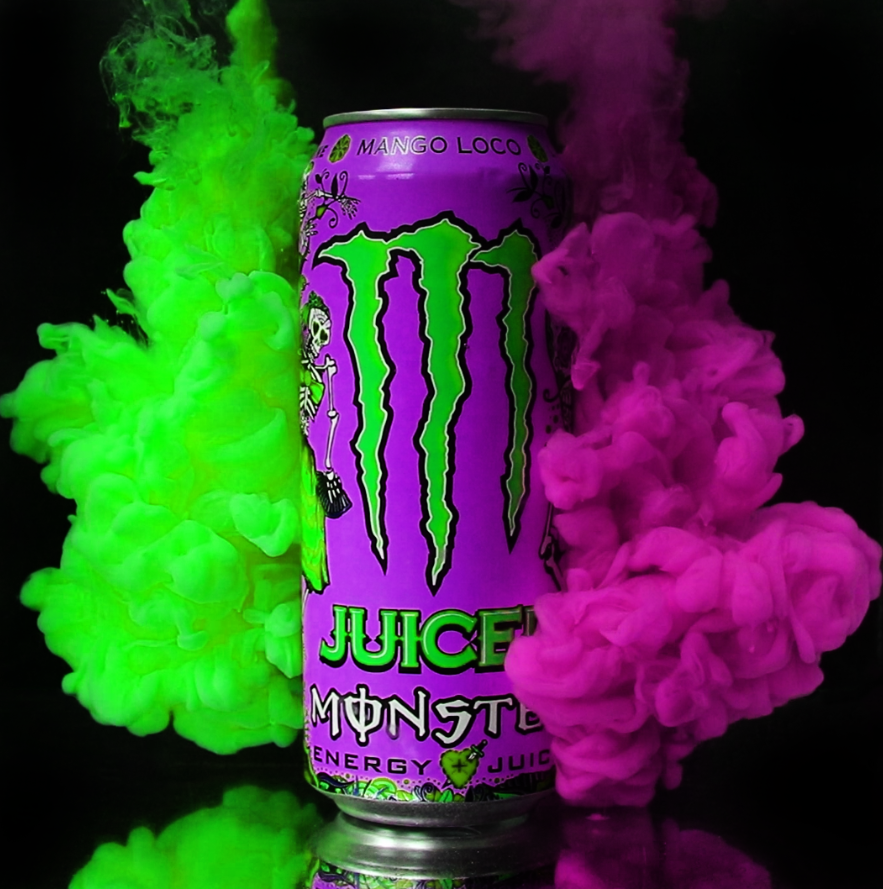
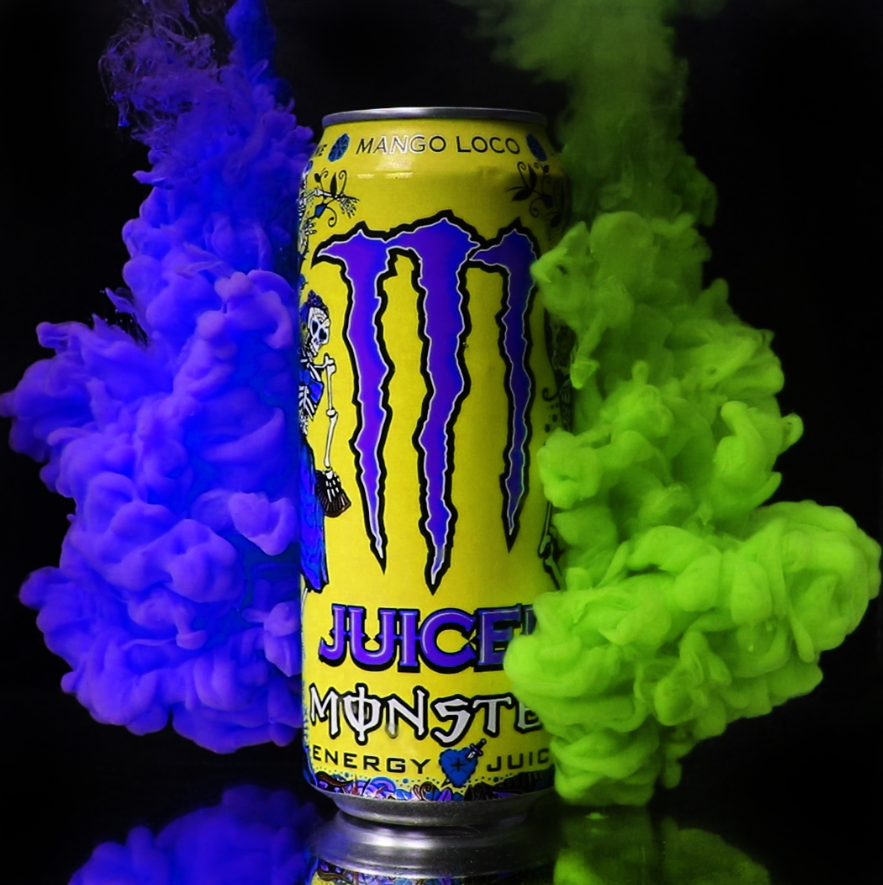
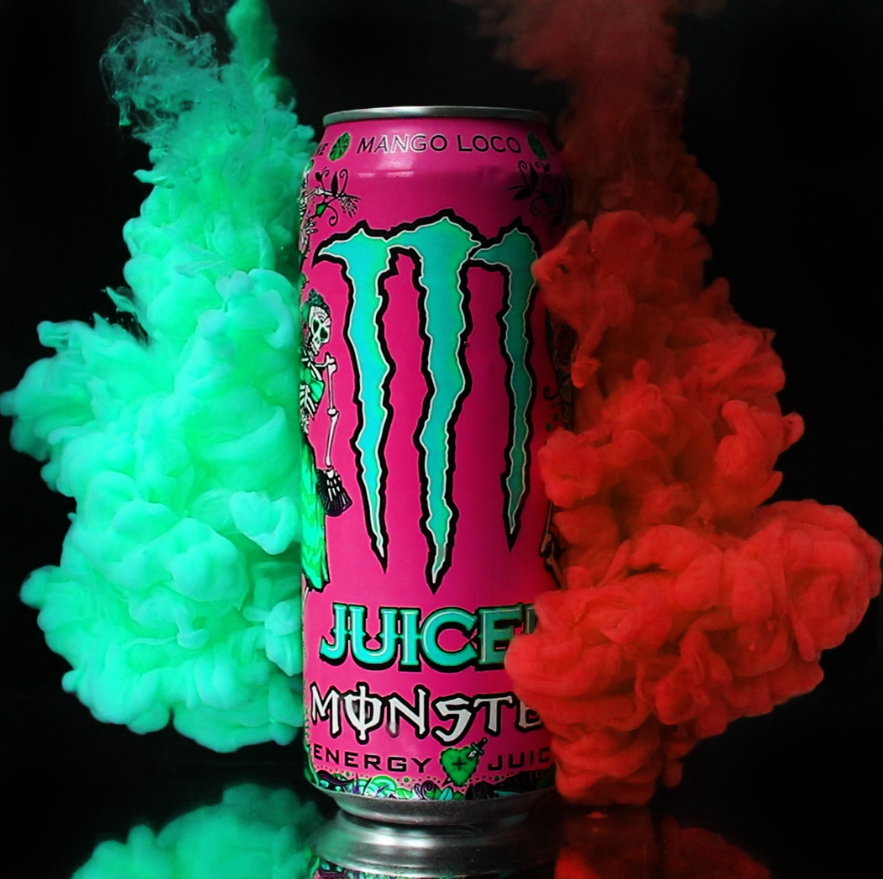

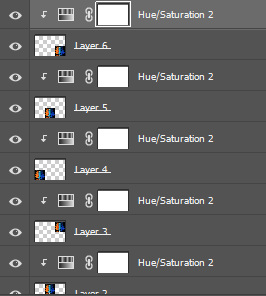
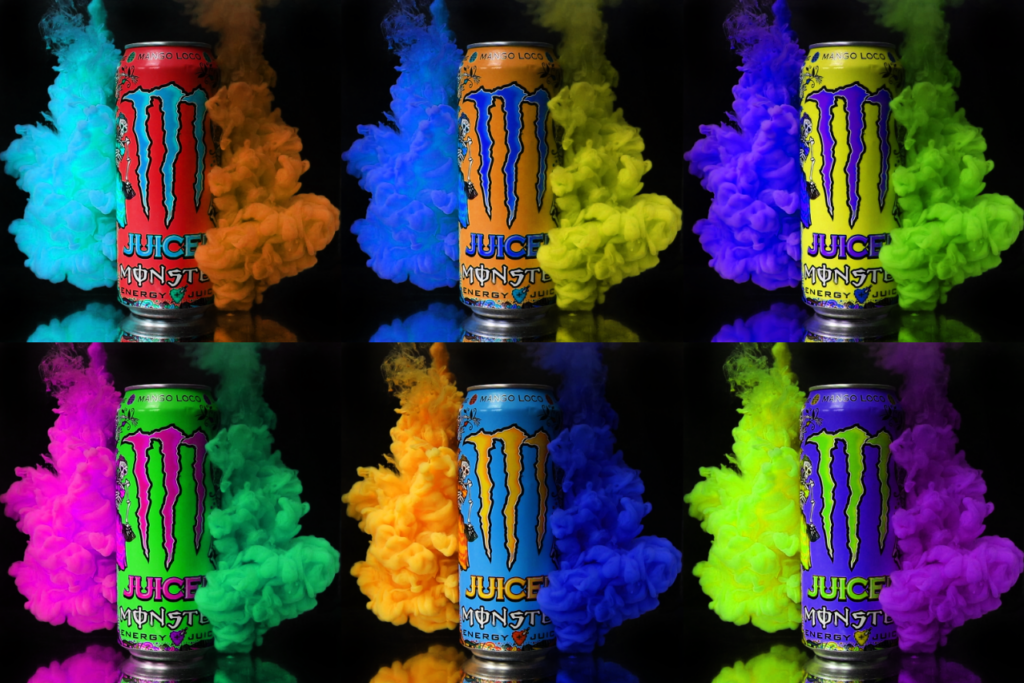
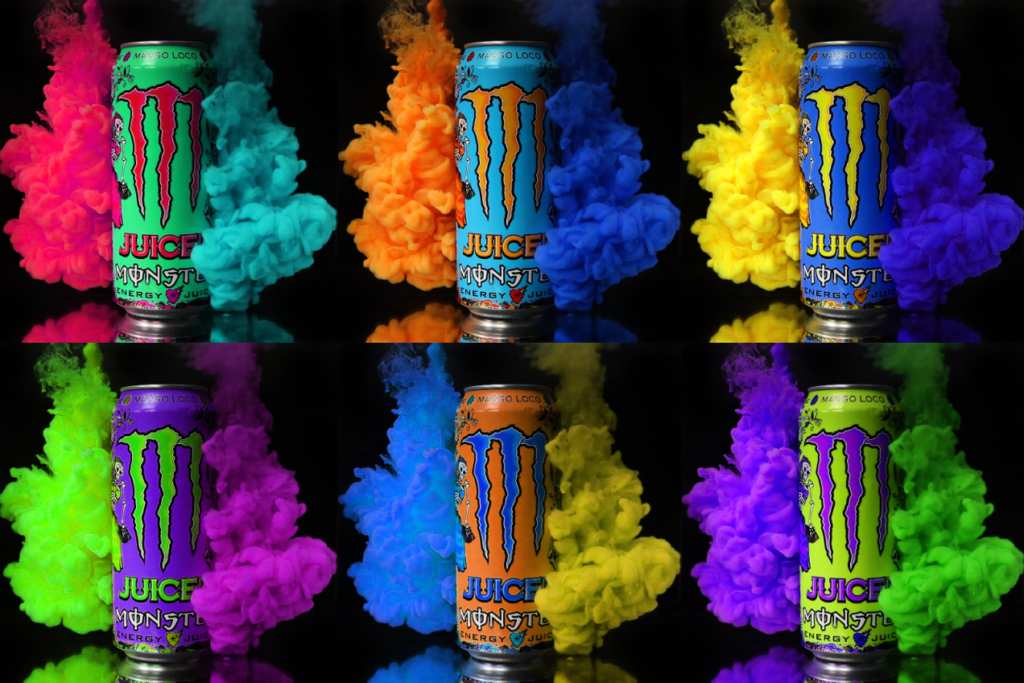
I liked this style quite a lot. It gives some new ideas of different colour combinations to use and also reminds me of the famous Andy Warhol piece of Marilyn Monroe, so I experimented with using multiple of this style on one canvas with different colours. I did this by putting 6 images on one canvas (one for each primary and secondary colour) and added a hue/saturation layer with a clipping mask to make sure it only affected that layer.
I first edited them with the cloud on the left being the primary and secondary colours in order from the top left to the bottom right going across the row.
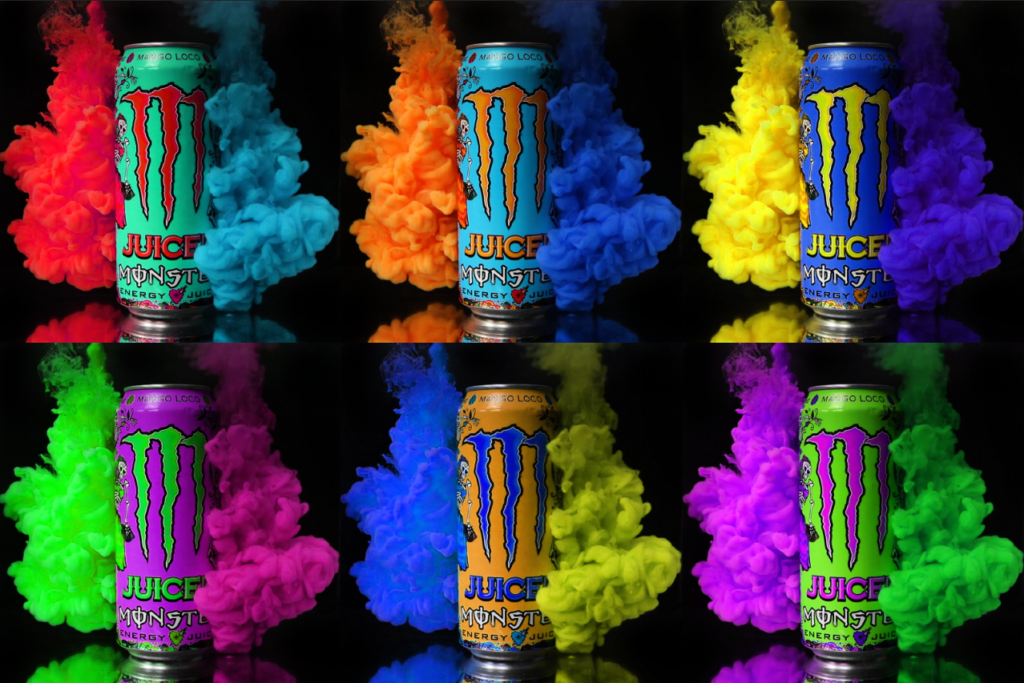
I then repeated this, instead having the cloud on the right being the primary and secondary colours in order.
I decided to also do this for the can, so I did one where the main part of the can had the primary and secondary colours in order.
To finish, I made it so the logo had primary and secondary colours in order.
Experimenting with Layering
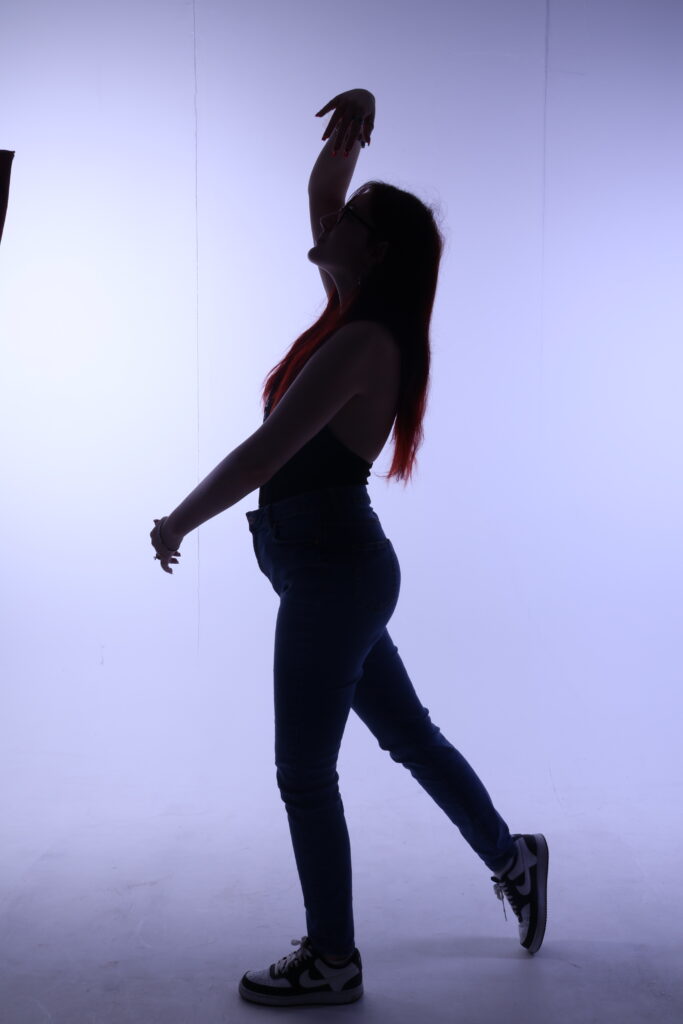
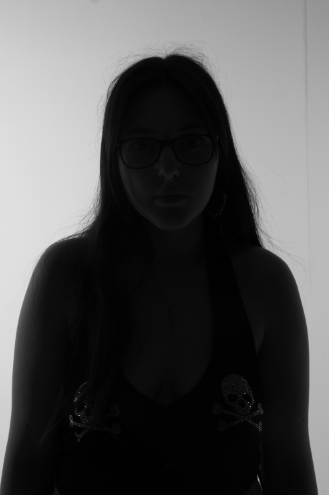
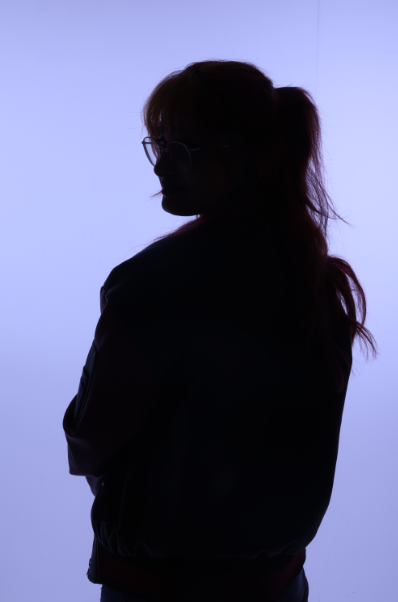
To experiment with layering, I had to get some pictures of some models. I directed these models into various poses and chose the ones that I thought were best. I used these poses because they provide an interesting element to the piece in more of an art-esque style. This is how that shoot went.
I experimented with 3 different models. I first grabbed a male model after getting my lighting right with a skeleton. I quickly found out that the male model would not be suited for this shoot and I would need more of a slender figure, so I switched to using a woman for the shoot. The reason for the more slender figure is because of the shape of the water. If I used a larger model, I would not be able to fill out the model with the cloud I was using. However, this would be a possibility if I decide to return to this in the future. After finding my second model, I did some shots of her with a bottle. However, I shot most of these pictures in landscape which was a mistake. Because of this, I went back and shot them with a slimmer model in landscape with more varied poses. After some review, I will be using these pictures for the editing:

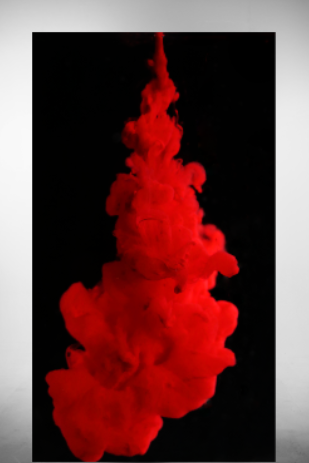
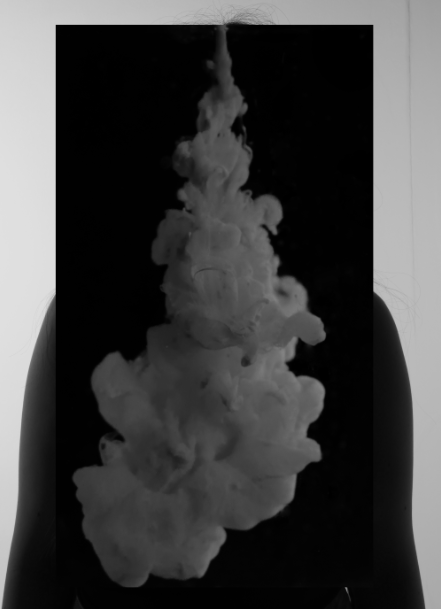
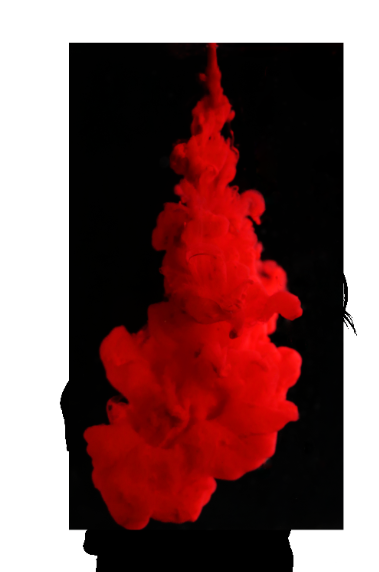
To start this, I decided to grab an image of the cloud to edit first so I had it ready to put on the model.
I cropped and straightened the image so it would fit.
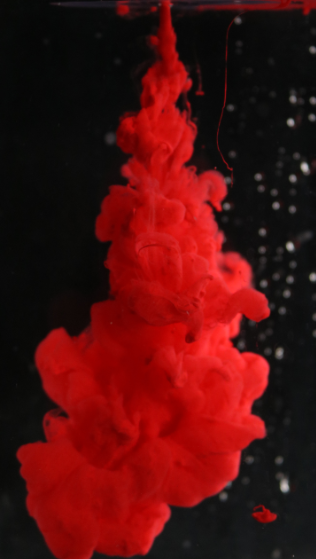
To add more depth, colour and help remove the background, I burned the shadows of the image.

I then removed all of the imperfections. This included the many water droplets, loose stringy bits of the cloud and other varied imperfections.
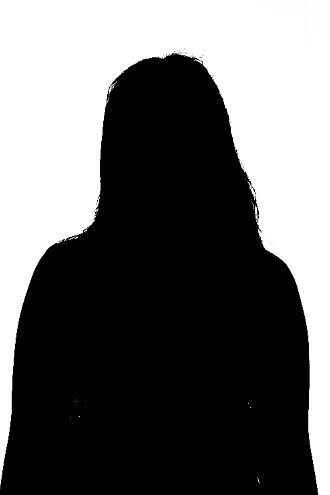
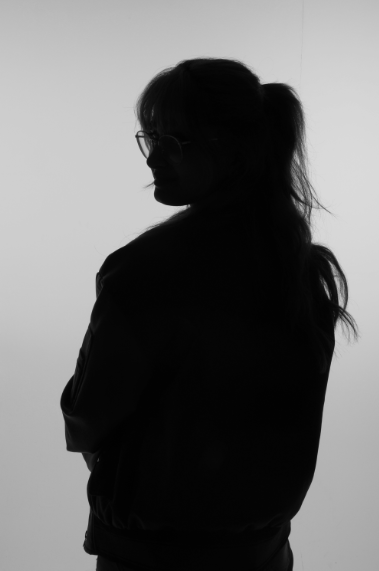
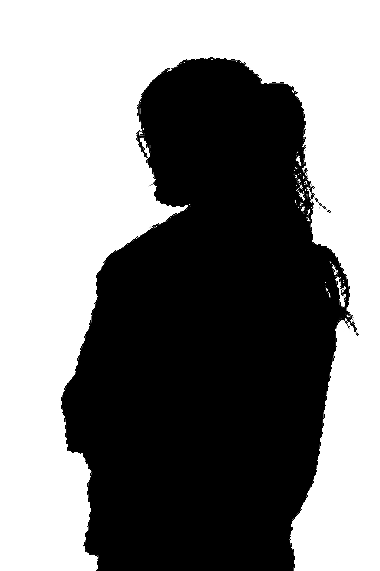
Now that the image was done, I started working on the image of my model.
I removed the lines that were on the infinity curve in the background as well as the corner of the light on the left.

After this, I inverted the image. I duplicated the uninverted version just before this step for later

To make the layers easily distinguishable, I stacked contrast layers in a group until the image was either black or white.
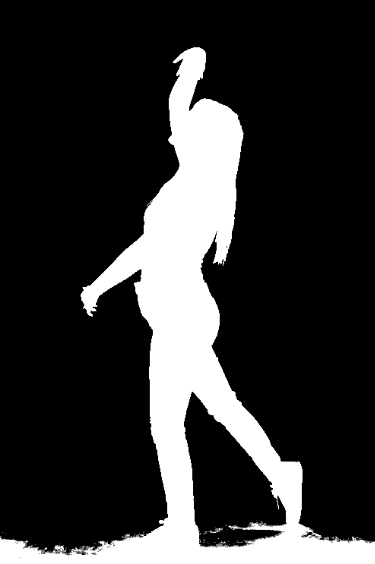
I then cleaned up the feet and ground.

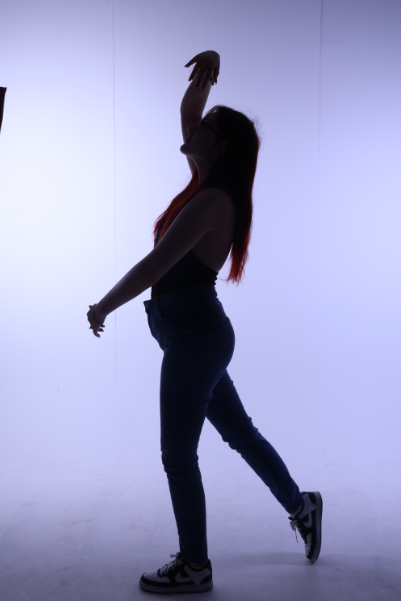
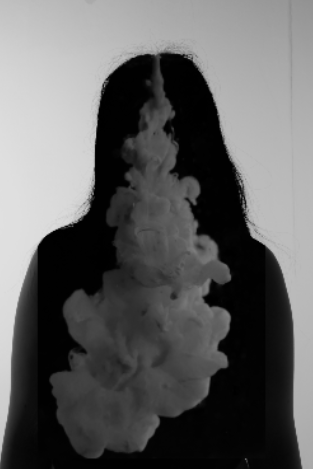
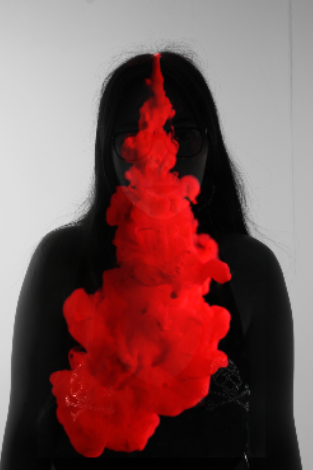
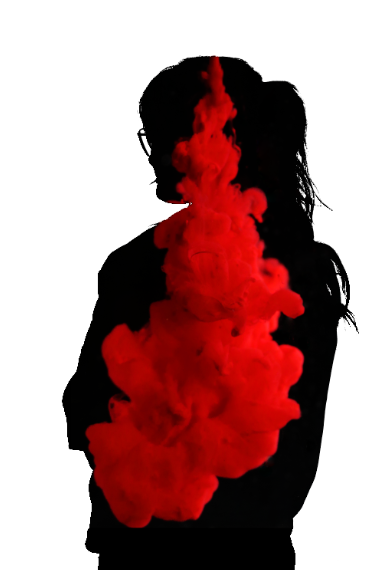
After this, I added the cloud to the image.
To blend, I used the Colour Range tool. This allowed me to just select the model so I could easily cut out the cloud.

To switch the selection to the cloud, I just selected the layer that the cloud was on and then inverted the selection to delete everything outside of the model.

I then removed the selection to create the final image.
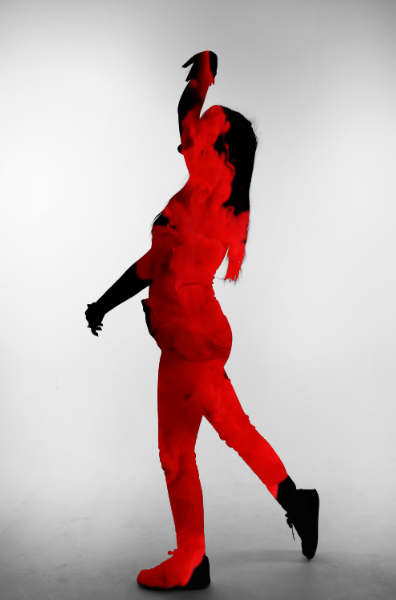
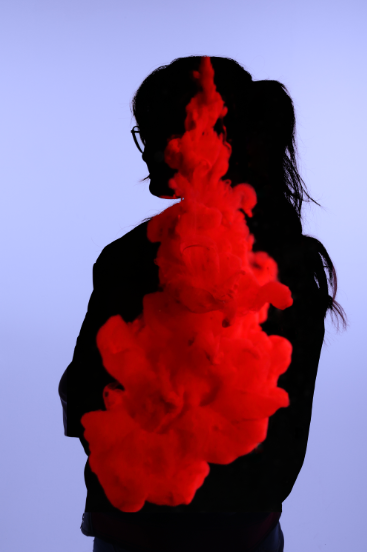
I then tried to blend the cloud using a similar method, but with some use of linear dodge, This is the image I used for the second attempt.
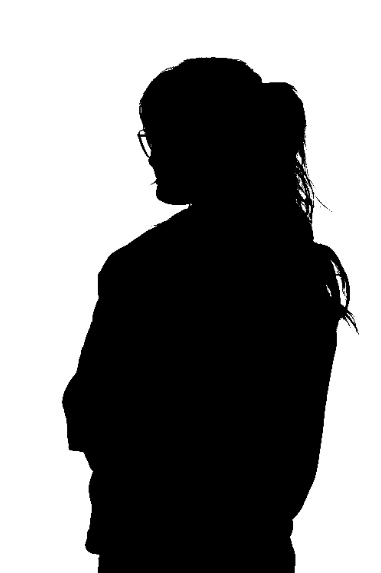
I first made the image black and white with a Black & White layer.
I then threw the image of the cloud in for later.
I hid the image of the cloud and did the same trick with contrast layers, this time not needing to invert the image as I realised that I could just colour range the black instead.
I then selected all of the black with use of colour range and cleaned up the selection with quick select.

I removed the contrast layers, inverted the selection and deleted the outside of the cloud layer.
To blend, I added linear dodge and placed the black and white layer below the cloud so it isn’t affected This created the final image below.
I then decided to give it a try with an even smaller model. I brought one in and decided to use a few different but simple poses.
original
original
Black and white
contrast
add paint cloud in
colour range select and inverse
delete the excess from the cloud

remove black and white layer and contrast layers
removed imperfections in background

added linear dodge to the cloud
This experimentation was interesting to do and created some decent outcomes. However I do not know if it has its place in the advertising style I would like to do. It can be quite particular to get a good shot for it, but, although I don’t think I will continue with it, it has some interesting applications.
Conclusion
Through this experimentation, I found that using models for these style of shoot can provide some interesting results. I like the style, but I don’t think there is many ways that I can apply it in an advertising setting in a way I would be as confident with as I was with the Monster shoot. I like the bottom two the most with the Monster shoot.. This is because it focuses more on the main subject of the picture: the can. This establishes brand identity while still giving a very cool visual to keep the viewer entertained and more likely to share. I want to do something like this as a way to show off multiple products from the same company. It is at this point where I stumbled across this picture that was taken of Heinz products. Because the products are all unified by that keystone, I was wondering if there is a company that I can use to create a collection of pictures showing off the multiple products under one logo that joins them all together. This is where I decided to use the company Monster for my idea.