synthesis – Since a substantial chunk of my final project will revolve around synthesis, I first need to know what the basics of synthesis is.
what is a synthesiser ?
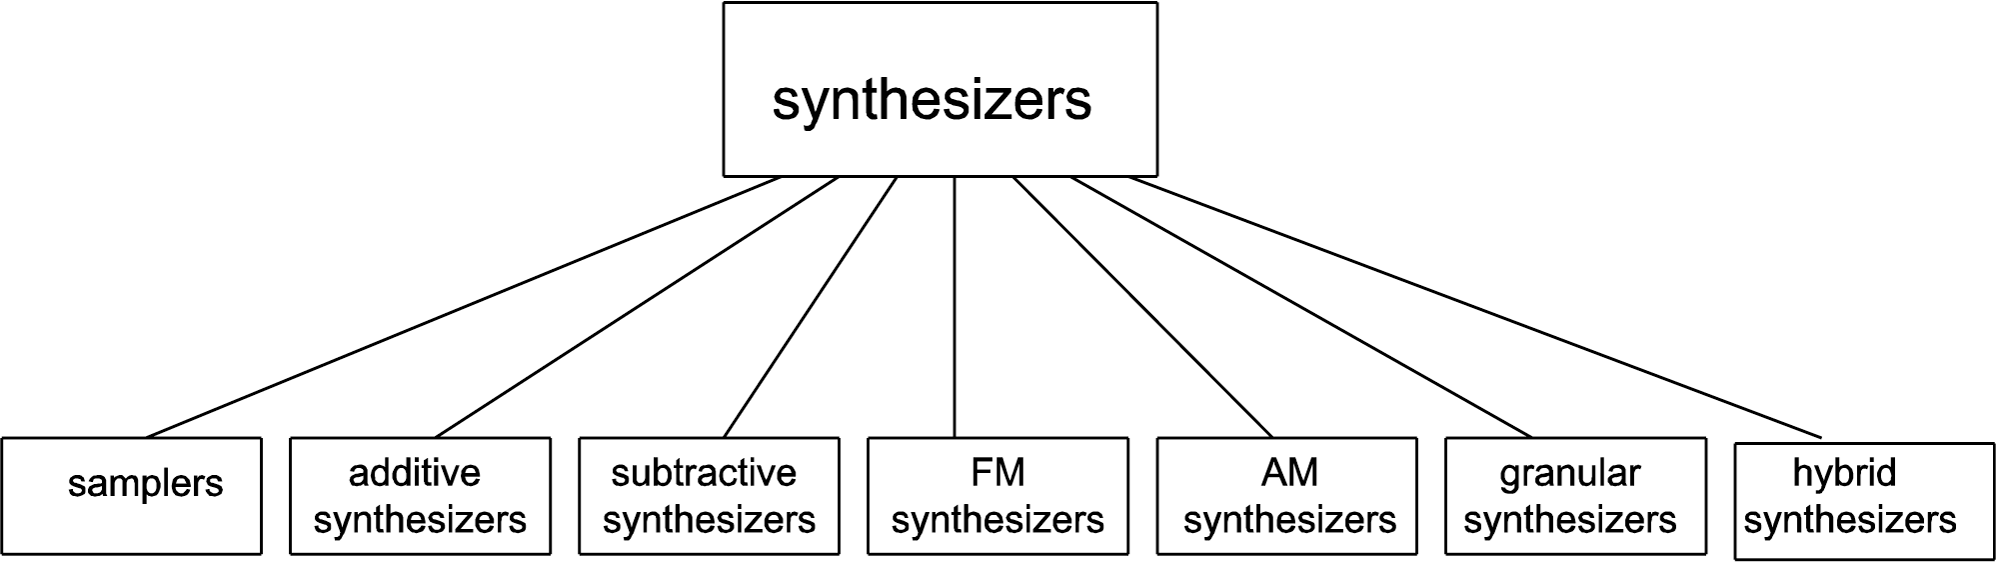
A synthesizer is an electronic musical instrument that generates audio signals. Synthesizers typically create sounds by generating waveforms through methods including subtractive synthesis, additive synthesis and frequency modulation synthesis.
they make producers lives much easier by emulating the sound of an acoustic instrument. They give artist and producers a lot of room to experiment and create new types of sounds. They allow you to mix existing sounds and add new sounds to produce something that is original and unique.
The most basic of synthesisers are analogue synths –
Analog synthesizers are some of the earliest synthesizers and date back to the 1930s.
Analog synths have special oscillators that create sound by sending waveforms via a circuit board which controls voltages to produce specific frequencies that produce waveforms in a multitude of unique shapes. They’re usually characterised by a thick, warm sound.
Oscillators are a fundamental element of synth sound. What they essentially do is produce waveforms. If you’re wondering what a waveform is, it is simply the shape that comes into form by different points to make a sound.
There are four different shapes: square, triangle, sine, and sawtooth
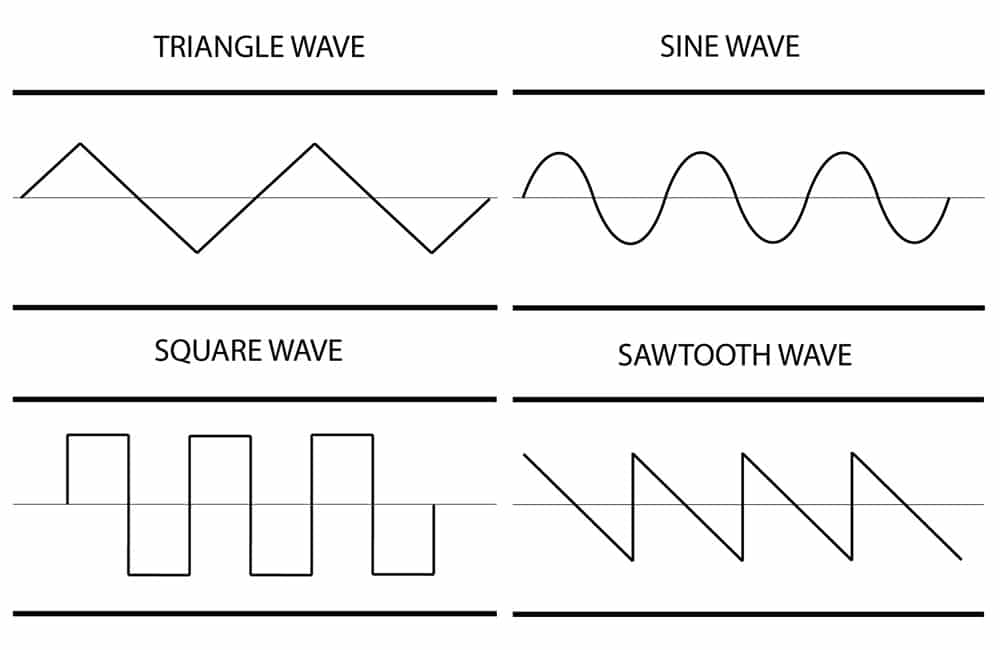
.
Sine wave – The sine wave can be considered as the prototype. It is the most basic shape, and it has no harmonics. The basic sine wave is used and modified to produce other shapes.
Triangle wave – The triangle wave contains harmonics that are soft and weak.
Square wave – The square wave has more powerful harmonics compared to the triangle wave and these stronger harmonics help produce its square shape.
Sawtooth wave – The sawtooth wave has the most harmonics which allows it to produce the most intense sound.
Frequency – This refers to the speed at which a waveform finishes one cycle. It determines the pitch of the sound which can range from low to high
Wave-shape – This is the shape of the waveform
Amplitude – This is how the sound leaves the oscillator
modular – the first modular synthesiser was created in the 1950’s in Germany. Modular synthesizers require you to connect or ‘patch together’ different modules. This allows for a lot of customisation, and allows you to create a synthesizer that fulfils your specific needs.
Some common modules that producers ‘patch’ together are oscillators, filters, amplifiers, and envelope generators. This helps create a standard modular synthesizer. Modular synthesizers had always been costly and bulky. They were also less popular as it becomes hard to recreate an exact ‘patch’.
Here’s a good video which describes additive and subtractive synthesis
Additive and subtractive synthesis are two common methods used for creating electronic sounds and music.
Additive synthesis is a technique where individual sine waves or harmonics are added together to create more complex sounds. In other words, it involves building a sound by combining simpler waveforms of different frequencies and amplitudes. The process typically involves using an oscillator to generate the individual sine waves, which are then combined and shaped using filters, envelopes, and other modulation techniques to create the desired sound. Additive synthesis is often used for creating bell-like, metallic, or other complex sounds that are difficult to achieve using other methods.
Subtractive synthesis, on the other hand, involves starting with a complex sound source, typically a waveform with a rich harmonic content, and then using filters to remove or “subtract” certain frequencies from the sound. The result is a simpler sound that is shaped by the filtering process. Subtractive synthesis is often used for creating sounds like basses, leads, and pads, and it is particularly popular in analogue synthesizers.
In summary, additive synthesis involves building a sound by combining simpler waveforms, while subtractive synthesis involves starting with a complex sound source and shaping it by removing certain frequencies through filtering.
granular synthesis –
Granular synthesis is a sound synthesis method that operates on the micro sound time scale. granular synthesis is similar to wavetable synthesis, but it works on a much finer scale. This method is ideal for creating constantly evolving sounds and truly unique tones. It is based on the same principle as sampling. However, the samples are split into small pieces of around 1 to 100 ms in duration. These small pieces are called grains.
Drum replacement
What is drum replacement ? – Drum replacement is a technique used in music production to replace or augment the sounds of live drum recordings with digitally generated drum sounds. This technique is often used to correct timing or performance issues in live drum recordings, or to achieve a specific sound or tone that is not possible with live drums alone. The process of drum replacement typically involves using specialized software to analyse the audio waveform of the live drum recording and identify the individual hits or “transients” of each drum sound. The software then replaces each transient with a corresponding digitally generated drum sound that has been pre-recorded or programmed. There are several different types of drum replacement software available, ranging from simple plugins that can be used within a digital audio workstation (DAW) to more advanced standalone programs that offer greater control and flexibility. Some of the most popular drum replacement software includes Slate Trigger, Drumagog, and Steven Slate Drums. One of the primary benefits of drum replacement is that it allows producers and engineers to achieve a consistent and polished sound across an entire drum track. It can also help to correct timing issues or mistakes in a live recording, allowing for a more precise and accurate performance. However, some musicians and engineers have criticized drum replacement as being overly reliant on technology and lacking the natural feel and dynamic range of live drum recordings. As with any technique in music production, the decision to use drum replacement should be based on the specific needs and goals of the project, and should be used in a way that enhances the overall quality and impact of the music.
when talking to Simon about what I want he gave some insight on how I should mic the drums up. since talking to him I’ve decided to only close mic the snare high hat and the kick. I want to do this so I can have the clearest recordings possible, I’m even going to forget the overheads because I feel I don’t actually need them.
Drum Kit Mic Setup
there are many factors to consider, such as the type of microphones used, their placement, and the overall sound you’re trying to achieve.
Use multiple microphones: For the best results, you should use at least three microphones to mic up a drum kit – one for the kick drum, one for the snare drum, and one for the overheads. Depending on the size of the drum kit and the sound you’re going for, you may also want to use additional microphones for the toms and cymbals.
Choose the right microphones: Different microphones have different frequency responses and polar patterns, which affect how they pick up sound. For the kick drum, you’ll want a microphone with a good low-frequency response, such as a dynamic microphone like the Shure SM57 or a large-diaphragm condenser microphone like the AKG D112. For the snare drum, you’ll want a microphone with a high sensitivity and good transient response, such as a dynamic microphone like the Shure SM57 or a condenser microphone like the AKG C214. For the overheads, you’ll want microphones with a wide frequency response and a cardioid or omnidirectional polar pattern, such as condenser microphones like the AKG C414 or the Neumann KM 184.
Place the microphones correctly: The placement of the microphones is crucial to achieving a good sound. For the kick drum, place the microphone inside the drum, near the beater, and point it towards the centre of the drum. For the snare drum, place the microphone above the drum, pointing down towards the centre of the drum. For the overheads, place them above the drum kit, pointing downwards at an angle of around 45 degrees towards the snare drum.
Experiment with different mic placements: The above guidelines are just starting points – you may find that different mic placements work better for your particular drum kit and the sound you’re trying to achieve. Experiment with different microphone positions and angles until you find the right sound.
Aphex Twin –
Richard D James was born in Ireland and moved to Cornwall at an early age, he began his music journey experimenting with the family piano, he was dissatisfied with the limited sonic range of a piano and began to manipulate the string by inserting object like screws and nails into them to distort the output. This is a technique called prepared piano, most associated with avant garde composer John Cage
“I bought a synth when I was 12 and thought is was a load of shit, took it apart and started pissing about with it. I got really into making things with electronics. I learned about it in school until I was quite competent and could build my own circuits from scratch. I started off modifying analogue synths and junk that I bought, and got addicted to making noise” Richard D James, Melody Maker (November 1993)
His early influences were much more hardware based. An early touchstone was the game loading sound of an early game computer, the Spectrum ZX81. heres an idea of the sound.
“People who had them must of spent hours listening to that. it’s more extreme than any extreme noise music. In time you got to know the sound really well: “oooh, good bit coming up here…” it was always the best, sonically, when it tried to load a picture. It would be “iryurrrrrrrrrrrrrghh!” I always wanted to make my music sound like a game. A danceable version of a spectrum game.” Richard D James, The Face (October 2001)
through listening to local pirate radio stations, he realised his music sounded like Chicago acid house, and the techno coming out of Detroit, but ultimately his music didn’t sound like anything else.
samples he’s used –
• Aphex Twin is known for his innovative and experimental approach to electronic music, and he has frequently used samples in his compositions to create unique and unexpected sounds. Some of the most notable samples used by Aphex Twin include:• • 1. Children’s toys and games: Aphex Twin has often used samples of children’s toys and games in his music, such as the sounds of toy pianos, xylophones, and other musical instruments designed for children.• • 2. Field recordings: Aphex Twin has also incorporated field recordings into his music, including samples of birdsong, environmental sounds, and other ambient noises.• • 3. Classical music: Aphex Twin has sampled classical music in several of his compositions, such as his use of a sample from Erik Satie’s “Gymnopédie No. 1” in his track “Avril 14th.”• • 4. Dialogue from films and television shows: Aphex Twin has sampled dialogue from films and television shows in several of his compositions, including a sample from the film “Poltergeist” in his track “Come To Daddy.”• • 5. Acoustic instruments: Aphex Twin has also used samples of acoustic instruments in his music, including the use of a distorted guitar sample in his track “Windowlicker.”• • In addition to these samples, Aphex Twin is also known for his use of unconventional and custom-made instruments and sound sources in his music. He has built his own synthesizers and drum machines, and has also used software and other digital tools to create unique and distinctive sounds. His innovative use of samples and other sound sources has helped to make him one of the most influential and respected figures in electronic music.
I used this video to get a better understanding of how to make IDM beats, I found the information to be quite helpful as I did successfully create a drum beat using his methods, however it’s a hard thing thing to follow up , since the beat being so weird sounding, I found it hard to put it to a melody as the drums sounded more like a bass part after the treatment,