Location:
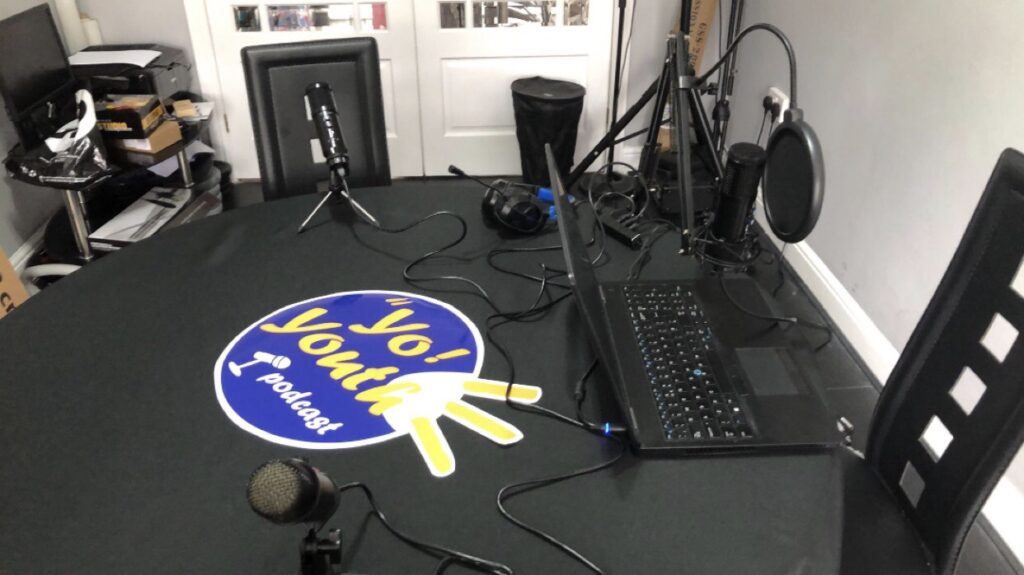
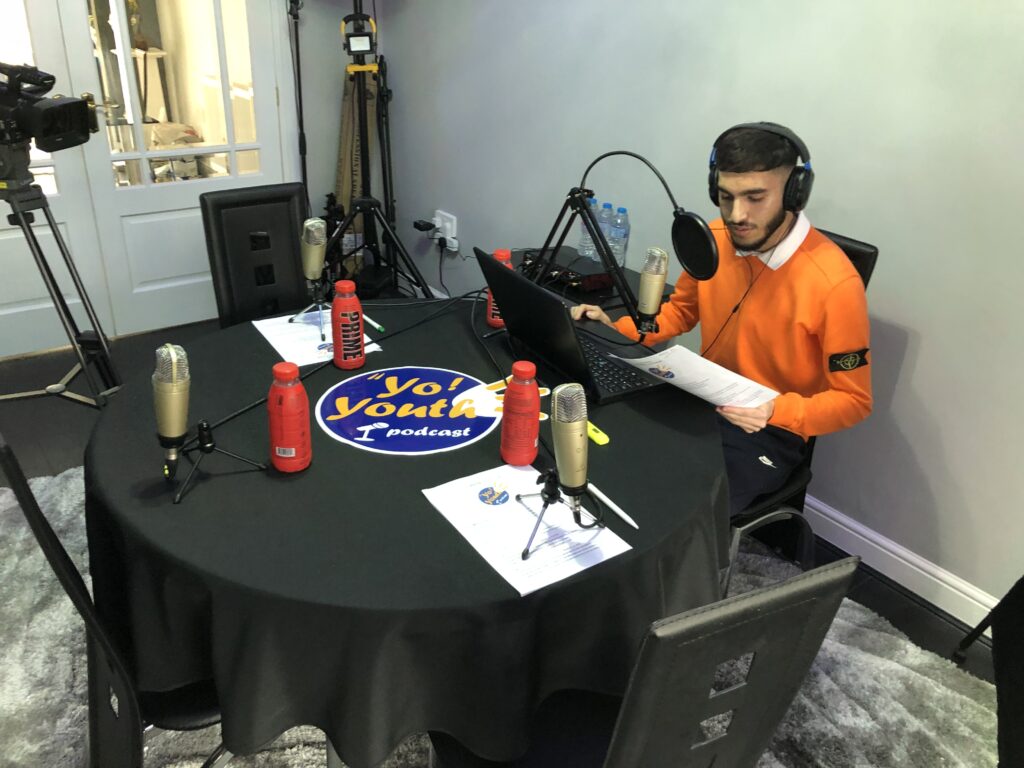
I am going to be recording my podcast at my house in a big room , it is going to be set up on a round table , like a round table talk.
The Reason why i chose to do it in my house was there is more space for me , I will be more comfortable with the set up and I will be flexible with moving the equipment and I will have enough days to prepare for that.
Microphone types:
Dynamic microphones:
Dynamic microphones work on a the principle of electromagnetics
Dynamic microphones are simple in design , which means they tend to be durable and cheap.
Due to the construction of these microphones , they do not respond with high frequencies well.
Due to the construction of these microphones , they do not respond with high frequencies well.
Condenser Microphone:
Condenser microphones work on the principle Capacitance.
Condensers are more complex and require 48 volts to work.
due to the construction of these microphones , they respond well with high frequencies.
Recording levels:
If the levels are too high , i will get clipping.
if levels are too low , i will pick up more noise.
An average level is what I want to achieve.
The mic i will be using is an condenser mic which will catch all my audio and speech. I will have 4 of these set up on the round table. These mics will be connected to my laptop through the usb cable and port. All the audio will be transferred onto the laptop then I will eventually have that audio moved into a software for me to edit which is adobe priemer pro.
Signal chain .
As in live sound the signal chain is an essential part of the recording process it helps us to find issues and ensure that the order is done correctly.
Stereo Recording
Sometimes it is important to capture a stereo image in recording , for example a stereo piano track or an orchestra or small ensemble.
There are a lot of stereo techniques but the most important are spaced pair (A – B) and coincidental (X-Y).
Spaced Pair (A-B) is spaced usually 3 – 10 feet apart.
Coincidental (X-Y) is where two mics are usually placed at 90 degrees ton each other.
I will have this in mind when recording my podcast.
I will also use the 3-1 rule when recording my podcast.
Editing
What to edit:
Noise Reduction
Noises , pops , crackles etc
Errors or mistakes
Long pauses
Equalisation
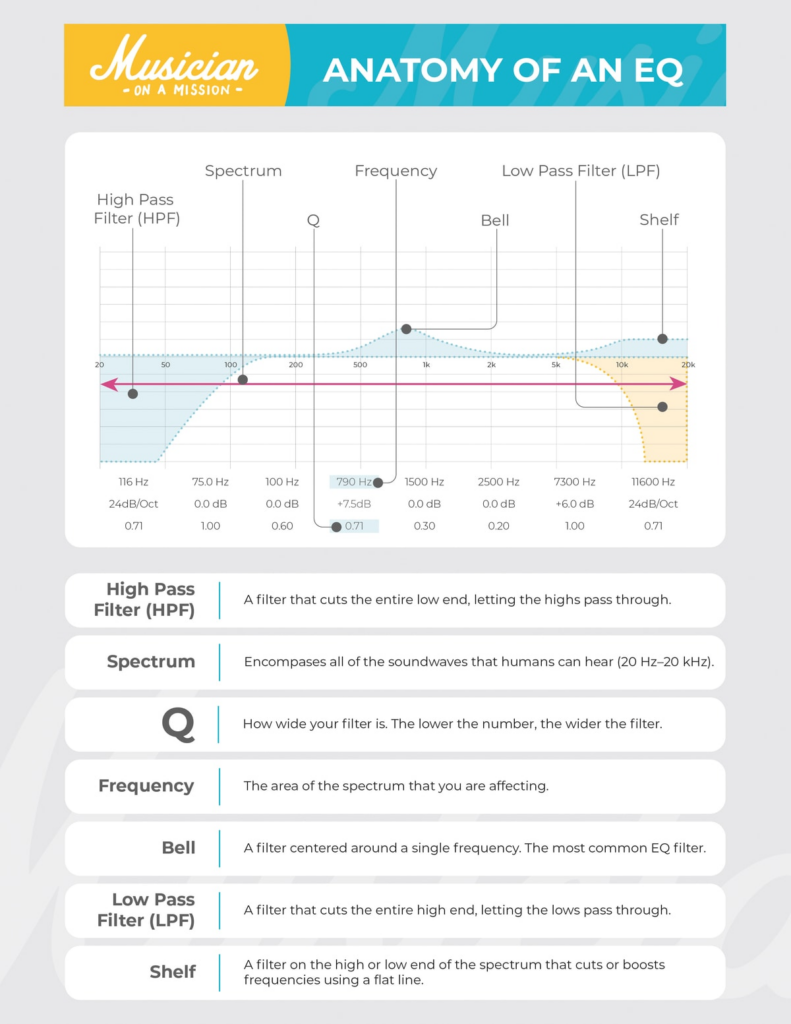
EQ enables us to change the frequency response of an audio signal. It can be used to reduce unwanted or enhance desired frequencies
Frequency set the frequency to adjust,
Gain Increases or decreases the volume of the chosen frequency
Q adjusts the amount of frequencies being adjusted.

We go from left to right, and we start with 20 hertz.
Then on the right we’ve got 20,000 hertz, or 20 kilohertz.
This is the range of human hearing.
Now, none of us will actually be able to hear 20 kilohertz. When you’re first born you can, but as you get older, your hearing lowly degrades.
But you will still hear the impact of 20 kilohertz – so don’t ignore it.
Bass is on the low end (left). You can feel 20 hertz if you’re on a really large sound system – but not necessarily hear it.

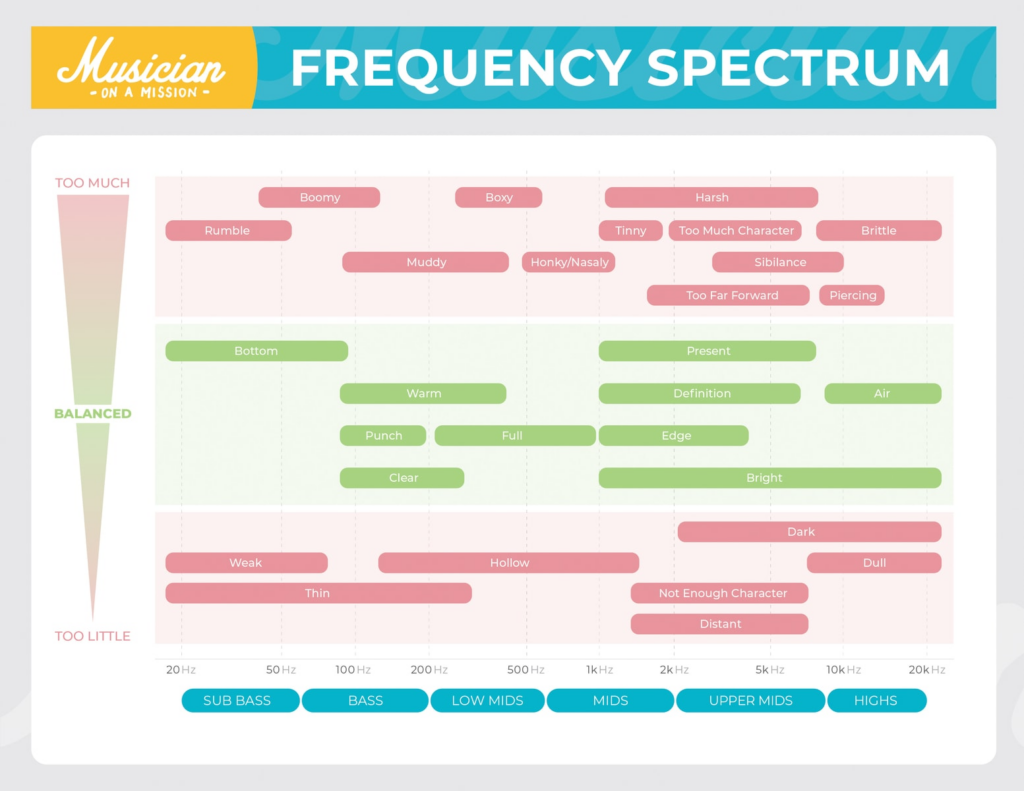
Sub-Bass (20-60Hz)
The first area we’re going to focus on is sub-bass.
Everything below 60Hz is sub-bass, so generally you need a subwoofer or a good pair of headphones (open-back headphones, for example) to hear that.
You should be able to hear it a little bit if you’re on monitors or headphones. But if you’re listening on a laptop or a phone, there’s no way you will hear that.
Bass (60-200Hz)
After that, we get into what I would call bass. For me, this is everything between 60 and 200 hertz.
In this area, we’ve got lots of bass guitar. Lots of the low-end vocals as well, because male vocals are going to have the fundamental below 200Hz in most cases.
Low Mids (200-600Hz)
Next up, if you go from 200 up to 600 hertz, this is what I would call low mids, and this is a really important area for mixing.
Now, this area is crucial for home recording, because this is where you get a lot of buildup with guitars, vocals, even the top end of the bass guitar especially.
This is an area that’s really guilty for adding mud to a mix.
Mids (600Hz-3kHz)
The human hearing focuses mostly on this frequency range…
So it’s crucial to get this range right. You want the main focus of the track (e.g. vocals) to have lots of room in this range.
Be aware that this is also where you can start to get into harshness and aggressive tones.
Upper Mids (3-8kHz)
Then we’ve got upper mids between 3 and 8 kilohertz, and this is where things really start to get harsh. This is where we have brittleness a lot of the time.
It’s also an important range for clarity and aggression, especially in vocals.
Highs (8kHz+)
After that we get to treble, or the highs. This is everything above 8 kilohertz. This is where we have air.
You could split this even further into 8-12kHz, and that’s what I would call treble, and then 12kHz+ is what I would call air.
But for now, we’re just going to leave this as the highs, and this is everything above 8kHz.
| Frequency Range | Description |
| 20Hz-60Hz | Sub-bass |
| 60Hz-200Hz | Bass |
| 200Hz-600Hz | Lower mids |
| 600Hz-3kHz | Mids |
| 3kHz-8kHz | Upper mids |
| 8kHz-20kHz | Highs |
Compression:
Compression is where we reduce the dynamic range of a sound.
It works by reducing the louder signals so they match the quieter signals, this provides a more consistent level.
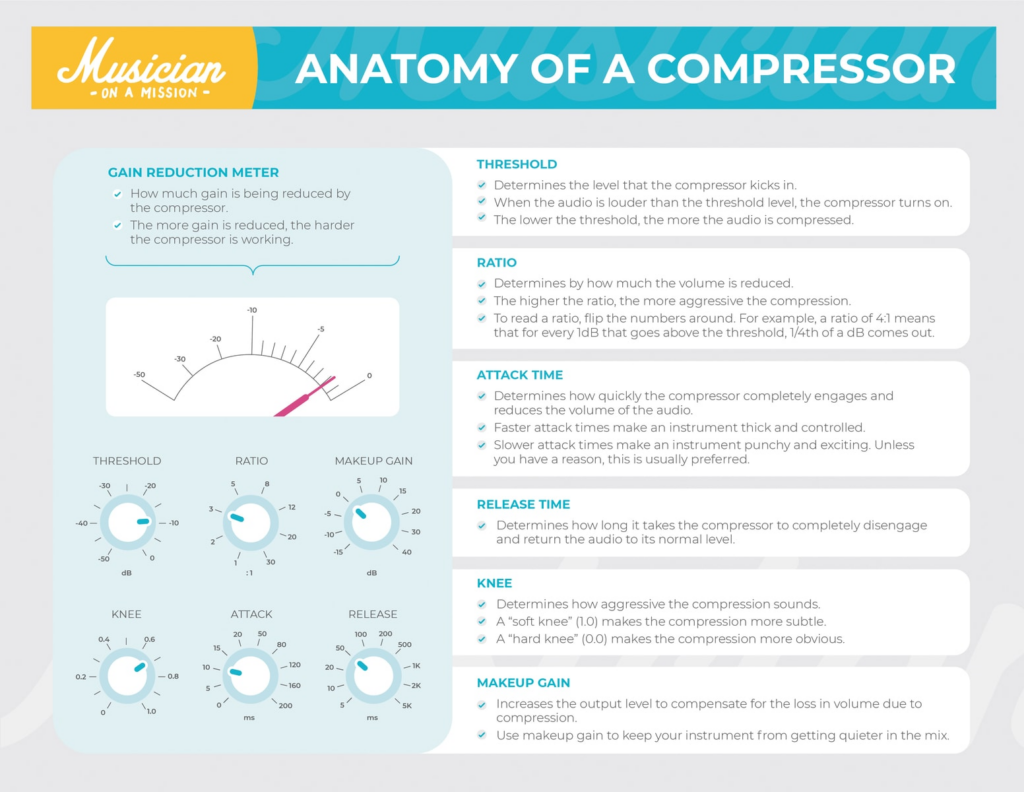
- Threshold sets the level at which the compressor starts working, the lower the level the more signal will be compressed.
- Ratio is the percent of compression applied to any signal that crosses the threshold
- Attack is how long it takes for the compressor to reduce the signal once the level has crossed the threshold. Slower attacks take longer for the compressor to work which helps keep transients retaining their impact.
- Make up gain increases the overall signal after
the level has been reduced.
I am going to use these skills on the software to make my podcast more clear and stand out.
How To Use the compressor
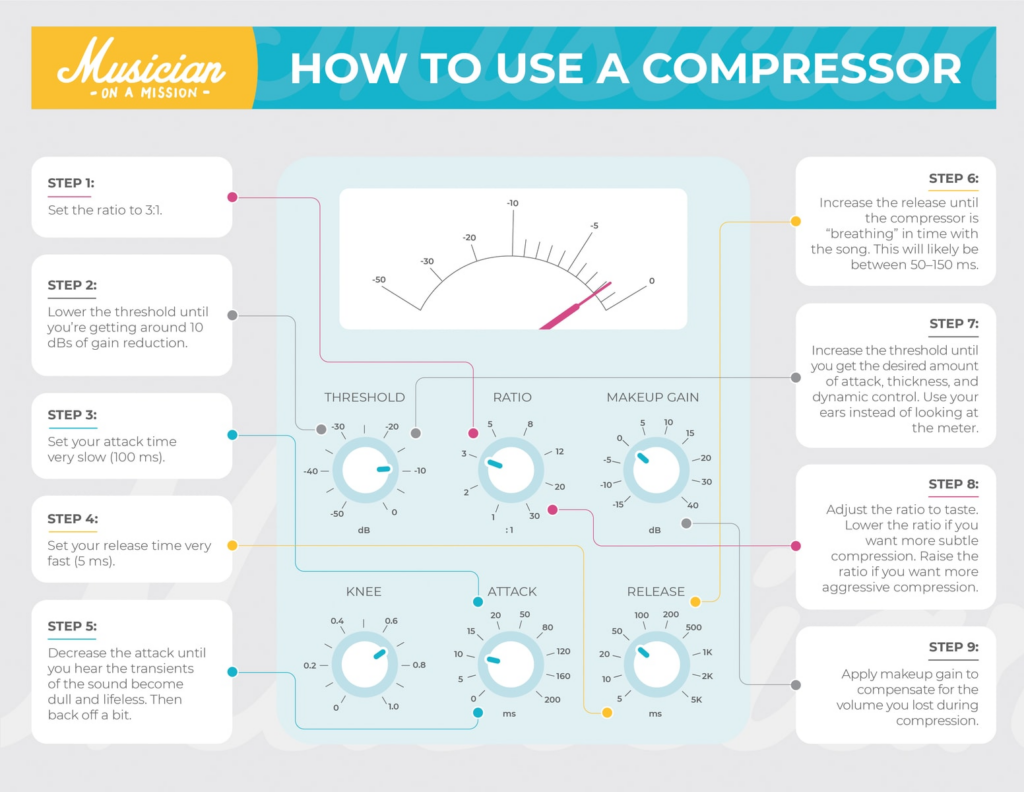
The ratio determines how much the volume is reduced by.
an example:
You load up a compressor on the vocal and it goes over the threshold by 10dB (more on the threshold in a second).
We have set the ratio to 2:1. This means that the sound will be reduced in volume by a factor of 2.
So, instead of getting 10dB louder, the vocal now gets 5dB louder. With me?
Here’s another one:
If we set the ratio to 4:1, the sound would be reduced in volume by a factor of 4.
10 divided by 4 is… 2.5. So our sound now only gets 2.5db louder.
A ratio of 10:1? Our sound now only gets 1dB louder!
Once again – the ratio determines how much the sound is compressed (reduced in volume).
But at which point is the volume of the sound reduced? Is the whole track reduced?
No. Only when the sound hits the compressor threshold…
The Threshold
This is the point that the compressor kicks in.
If we set the threshold to -24db, the compressor will not affect everything quieter than that.
BUT, as soon as the sound hits -24dB, the compressor will kick in and reduce the volume.
Here’s a graph that ties threshold and ratio all together:

You can clearly see how the threshold determines when the compressor kicks in, and the ratio determines how much the sound is compressed.
If you set the threshold too low, the audio will be compressed all of the time and sound unnatural. Sometimes this is desirable, but in most cases it isn’t.
We usually use a compressor to catch the louder peaks and make the track more consistent in volume. So we adjust the threshold until the compressor only kicks in when our recording hits those peaks.
On the other hand, if we set our threshold too high, the compressor won’t do anything at all!
Dial In The Attack Time
We have our audio and our threshold is set to catch the loudest peaks.
But what happens when those peaks hit the compressor? Is the volume just instantly reduced?
Attack time is how quickly the compressor engages and reduces the volume of the audio.
If our attack is set to 10ms, and the audio rises above our threshold of -24db, it will take 10 milliseconds for the compressor to fully kick in.
Different attack times can make a HUGE difference.
And it all depends on the instrument that you’re compressing, the pace of the song, and tons of other factors.
But in general, go with a slower attack time. You should be closer to 40ms than 4ms.
This means that the whole note is compressed, rather than the attack of the note (the plectrum hitting the string of a guitar, for example).
Because we are talking about milliseconds, everything is happening on a very small scale.
If your attack is set to 5ms, the compressor is going to kick in quickly and affect the initial attack of the note. But if we use a slow attack time, the transient (start) of the note will slip through and the sustain (the rest of the note) will be compressed.
Sometimes you might want a fast attack e.g. a guitarist that picks really hard. Use shorter attack times to when you want to compress the transient as well as the sustain.
But in most cases, a slow attack will sound a lot more natural and musical.
With vocals, it works slightly differently. Slow attack sometimes sounds unnatural and odd (as does a very fast attack time). Stay around 2-10ms for vocals and voice.
For an in-depth guide to getting the attack time right…
SET UP:
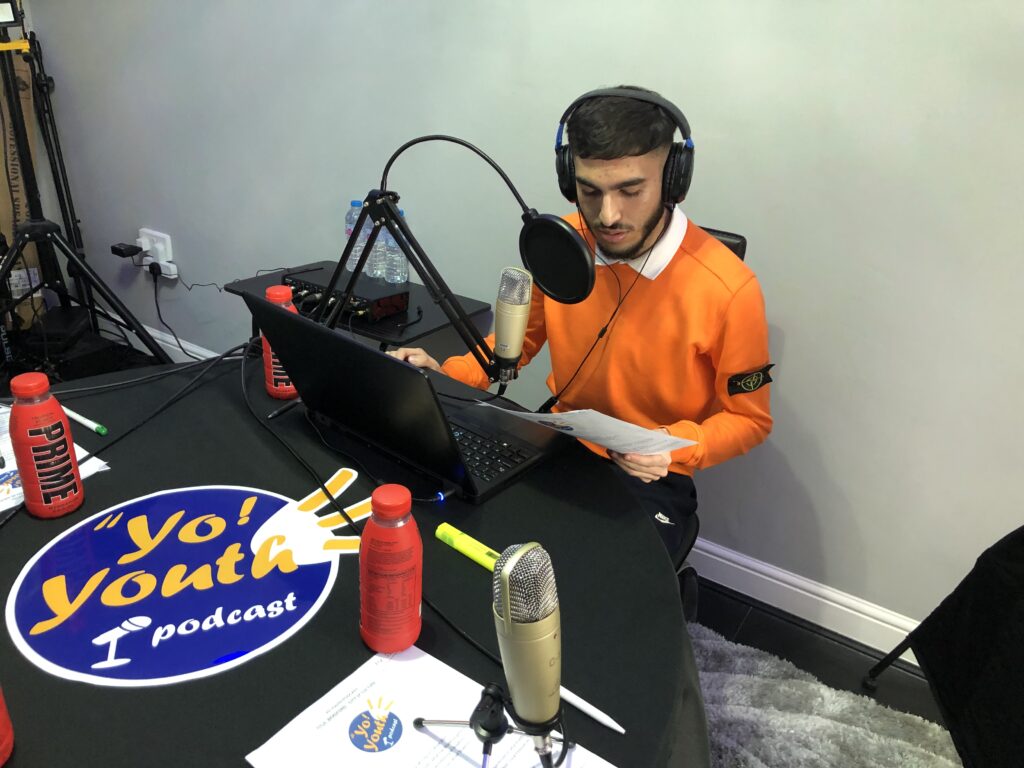
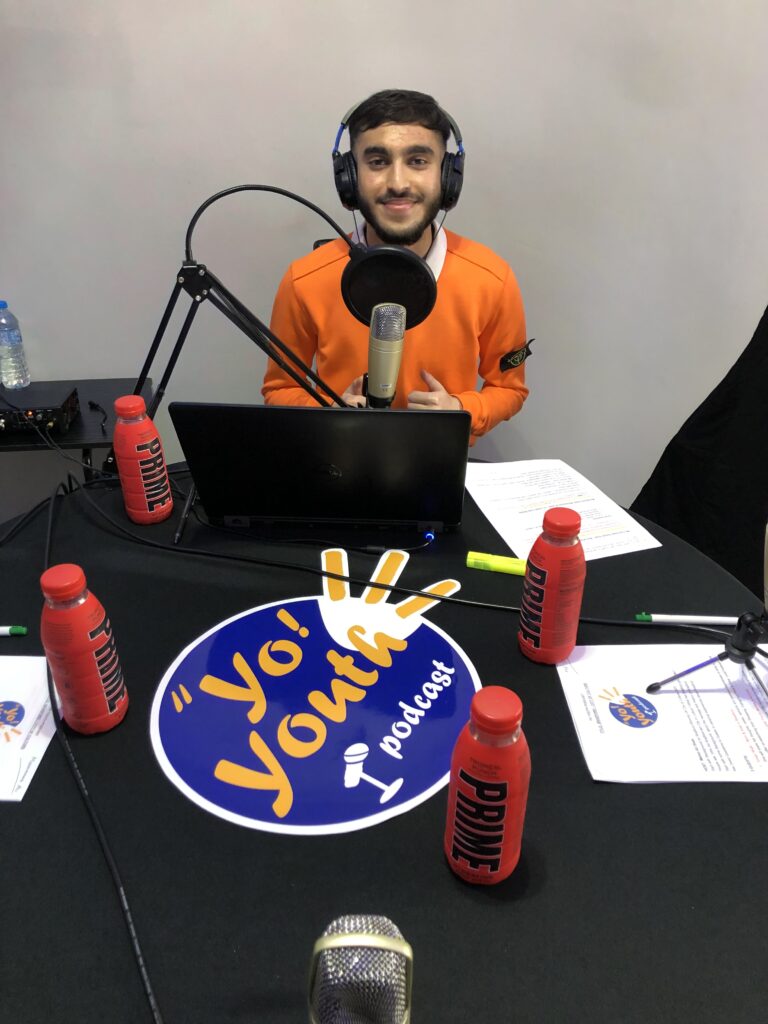
Over here you see my whole entire set up it took us a while to set it up because we had to get the round table out , then get the mics out the packages set it them up accordingly , set the mixer up with the mics plugged in there , furthermore we had to find a different software different to the first one we used and get that up and running with the output and inputs connected.
My teacher came to my house and helped with the technical side of things like the mics etc , because we struggled with that. He had set the volumes of the mics and the gain of the speakers and even set the software up and running with all mics connected.
It took us about 2 to 3 days to get everything set up and running.We had tested the volumes of the mics and the cameras. we placed the cameras in the correct position. It was trial and error withe positioning of the cameras but after about 20 mins we were comfortable with the positioning.
Behind the scenes of the podcast:
on the day of recording , it was very stressful we had to make sure that everything was up and running. My dad had gone to a shop and got some prime bottles to add to the set up , we had shouted out prime as a sponsor to the podcast. We needed a headphone jack adjuster to plug into the mixer so the day before shooting my dad had ordered one online for next day delivery. It had come so then we plugged it into the mixer then I could hear our voices through the mic.
It was coming closer to the time to shoot and my first guest arrived at around 7pm and then my second guest came at 7:30pm.We had done a few test runs before we actually got into the real thing.We tested the mics and volumes of each mic one more time.I wanted to see if each persons voice was going above the decimal. The 3rd mic that my dad had was louder than the ones so I had to put the mic a bit back. The other mics were completely right.
After we had check the mics we had started the podcast , during the podcast the first take did go wrong. So we had just carried on from there and started again.When doing the podcast my phone started going off which did distract the podcast but i turned it off. In general the whole podcast went really well , when we finished the podcast we were very happy with the result.