LEVEL 3 EXTENDED DIPLOMA CMPT:
FMP PROPOSAL
| CENTRE NAME | Bradford College |
| CENTRE NUMBER | 37122 |
| STUDENT NAME | Owen Collingwood-Stubbs |
| MEDIA MODE | VR Game |
| PROJECT TITLE | Puzzled (working title) |
| SECTION 1: RATIONALE: | |
| I will be taking part in creating a VR game which is an emerging market that few games have yet to take full advantage of. (Yuji Nakamura) Over the past few years I have developed skills in 2D and 3D; using programs such as Maya, Unity, and Photoshop; and want to expand into VR applications by creating a small game named Puzzled. The aim of Puzzled is to re-invent the traditional metapuzzle game and use the benefits of VR to do so by providing lots of interactivity and making the player think critically about how and what they will need to do to finish. The main gameplay will consist of the player(s) trying to escape a maze using a variety of objects and mechanics at their disposable to then find the exit and finish the level. As the game will be a small project with a small team, we acknowledge that it wont be shaking up the market by any means. However this game should be made as I believe it could give developers in this sector an example of how even the smallest of games can innovate and bring fresh ideas to the table by maximizing the benefits of VR, using both hardware and software. The VR market has a great opportunity for growth and I would love to be among the first to utilize VR and create a game for the masses to enjoy and maybe even contribute toward it becoming a saturated market if the game becomes popular enough which games like Beat Saber, PavlovVR and Half-Life: Alyx are already doing. (Aden Carter) References 1. Yuji Nakamura. (January 23, 2019). Peak Video Game? Top Analyst Sees Industry Slumping in 2019. Available: https://www.bloomberg.com/news/articles/2019-01-23/peak-video-game-top-analyst-sees-industry-slumping-in-2019 Accessed: 23rd Jan, 2021. 2. Aden Carter. (Oct 24, 2020). 10 Top-Selling VR Games (According To Steam). Available: https://gamerant.com/top-selling-vr-games-according-steam/. Accessed 26th Jan, 2021. | |
| SECTION 2: PROJECT CONCEPT: | |
| Project Aims This project will allow us to explore and experience what it is like to develop a VR game using libraries like SteamVR, UnityXR etc. while also implementing our own mechanics to enhance immersion and make it more enjoyable overall. Ideally, we would like Puzzled to have multiplayer aspects including voice chat, however this may not end up coming to life in the end product due to it being hard to implement in the context of VR. There are many VR games available right now that provide a great multiplayer experience, but not many include singleplayer too. This is why I thought a puzzle game would be a great way to combine both and target a wider audience. I aim for it to be genuinely enjoyable for the average player and will do so by researching into and take inspiration from past puzzle games to see what worked well so that I can implement and possibly put a twist on in our own game. Personal Aims For me, enhancing core aspects such as immersion, interactivity and replayability are key to creating something fun and since I have never dived deep into developing a Virtual Reality game, it seems like an obvious choice. Not only do I get to test the latest tech but I can use it to create a product of my own too, this will help toward my own personal development as VR is still pretty cutting-edge, so learning new skills in this area will widen my skill set further and could be valuable in future if I am tasked to develop a product that uses or relates to VR. An aim of mine is to avoid the previous mistake of being too ambitious within the time limitations by getting the basics down first, making sure it is playable, and then expanding on it with remaining contingency time. Research & Resources Research is critical to the success of any product and I plan on researching whenever possible to keep improving on every aspect of Puzzled. This will mainly consist of secondary research, I.e watching YouTube videos, searching forums and reading blogs/articles to see which method of implementation is effective and will suit the theme of the game. As we plan on creating everything mostly ourselves, we won’t need many 3rd party resources other than libraries/plugins and maybe textures. However to create our own assets and collaborate on the game, we will need to use the following: Version Control: GitHub Programs: Unity, Photoshop, Blender (Mark), Maya (Owen) Objectives (Project & Personal) – Create a functional small game with all main features that were proposed. – Try to make the game support most devices. – Add multiplayer functionality to challenge myself. – Create and utilize our own assets where possible. | |
| SECTION 3: EVALUATION | |
| When conceptualizing an idea, it is important to me that I make sure the proposed change is realistic and achievable within a certain time frame so I know the time is not being wasted or could be better spent on other things. When a change is made by a peer, I plan to provide feedback and solutions where necessary, however if the change is made by myself, I shall write up a changelog, play test thoroughly and search through changed files for any discrepancies before pushing it out. If any changes need to be reverted, I can easily do so as we are using GitHub to push and pull updates between us, it also allows us to document our changes and since we both have VR devices, it is easier to collaborate more effectively as we can jump in and test said changes for bugs or general gameplay features that could need tweaking in order to satisfy our own standards. How and when I will measure progress I will make sure I am adhering to the objectives I listed earlier as well as creating small experiments to determine the best method to use and that the thing being tested will suit our needs. For example, when creating an asset for Puzzled, I can create an experiment that would aim to find which 3D modelling software is most effective at creating said asset, this can be done by comparing the tools available, ease of use, compatibility and more. These experiments may also be beneficial both personally and for the project as once they are concluded, gaining knowledge not only in asset creation but other aspects such as scripting, animation, UI design etc. will allow me to be more flexible and save time in future, where I would otherwise have to do research and possibly make sacrifices in areas like quality, optimization and time. Player Feedback In most of my aims, player feedback can be utilized during alpha/beta versions and after release which can provide me with critical info on what the player would like to see changed/fixed to benefit their experience, but also what can be added down the line to keep the game fresh and up-to-date so it doesn’t become boring and/or repetitive. Peer Review Peer review should prove useful while the game is still in development as peers will understand what we are trying to achieve and where we haven’t quite hit the mark. Ideally we will play test numerous times after each build, we can then discuss and note how we can mitigate issues and keep expanding on various aspects of the game. After the game is published, we can reflect on the game by cross referencing our original GDD and seeing what we could have changed/removed/added or in some cases, gone beyond what was proposed. Self-Assessment This is something I like to do from time to time as it gives me an idea of where my skill-set is lacking, the way I can measure this is to look at past work and determine if the practices used were good enough and couldn’t be substantially improved, if not however, I would do more research and experimentation in that area until I feel confident enough to use them again with new found knowledge. This will result in improvement both personally and in future projects. An example of this would be in my aim to add multiplayer, where I can proactively take screenshots and create small video previews, linking them to a screenshot of the code and tools used to make each mechanic work such as syncing info between clients. If this is done proactively, the previews will be a good indicator of my success as they will show problems and/or improvements. I can then determine if the code/tools used are still appropriate to use or not and if need to use different methodology that will give me the result I am looking for. |
Realistic VR Hands Experiment
Research Objective: I am currently working on Puzzled, a game that requires objects to be picked up primarily to solve puzzles. As the built-in UnityXR package has very limited functionality, my aim is to find an alternative method that will provide somewhat realistic hand posing so the hands do not clip through the object being picked up.
Theory
Virtual Reality is becoming more and more popular, especially with recent developments in the hardware industry such as wireless headsets, controllers, body tracking etc. (Ying Lin)
It’s safe to say VR is becoming an attractive and trendy thing to buy, even people with disabilities are still able play with the help of tech like gloves and gestures. All of this contributes to an immersive and realistic gaming experience through just hardware alone, however game design is another key factor that developers must take seriously in order to not spoil the player’s experience. An example of this is in virtual hands where games like Lone Echo, Half-Life-Alyx and Boneworks hit the nail on the head. With puzzled, we want to achieve a similar result but aren’t too worried if it doesn’t look completely polished as we are only a team of 2 with a small budget.
My first idea is to implement an automated system whereby the hands will take the shape of the object in hand at runtime instead of being predetermined. I have found a technique called ‘Forward Kinematics’ which uses a set of predetermined values to rotate the the angle of joints in a skeleton.
(Unity Docs) “The position of a child joint changes according to the rotation of its parent and so the end point of a chain of joints can be determined from the angles and relative positions of the individual joints it contains.”
Inverse Kinematics or IK is essentially the opposite of Forward Kinematics as it tries to look backwards, orienting the joints so that they land in a valid way on a given target. For example, a torch could be the target and the finger joints would rotate and position themselves around it as if the player is holding it.
A developer of ‘Wulverblade’ says that IK is a useful tool, fun to experiment with and can achieve impressive results. (Evan Doody)
An example of IK can be seen below, where the joints in the chain move in accordance unlike FK that only moves a single joint.

I believe this method could be useful as it calculates values of the joints automatically which would save us time in the long run as we wouldn’t have to worry about manually animating joints for different objects.
When searching for alternatives, I found a YouTube video that uses a purpose-made Unity package to quickly create, edit and show a pose depending on the object in hand. While this isn’t as fancy as IK, it should be very consistent and pretty much guarantees no weird behaviours as seen with IK occasionally. (VR with Andrew)
Research Design
For my first method I will import a hand torch asset and create an empty child under it positioned at the handle, I will then apply an interactable component to the torch and find a way to eliminate the lag/judder that occurs when moving it. Finally, I will use the appropriate field(s) on the component to make sure the hand stays at the position of the handle.
For my second method I will import a hand poser package from GitHub responsible for creating poses and setting poses. Secondly, I will add and set-up the necessary components responsible for making poses and pose creation work following a YouTube tutorial by ‘VR with Andrew’. Next, I will create a pose for the torch that will hopefully be applied to the hand when it is picked up.
Finally, I will try find a way to provide the torch collisions with other objects.
Experimentation
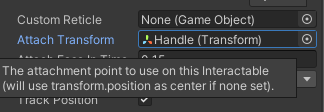
Firstly, I shall import a torch asset I found on the Unity asset store to test with. With this, I can add an interactable component provided by the UnityXR package on to it and changing the ‘Movement Type’ field to make sure it is on ‘Instantaneous’ which will instantly track, removing any lag or juddering.
I then noticed there was a another field called ‘Attach Transform’. At first, nothing was inputted in this field and so the center of the hand would be set to the position of the parent transform.
By creating an empty child named ‘Handle’ under the object with its position set to where the object is supposed to be grabbed, I can drag this into the Attach Transform field which instantly gives me a better result.
While this will work for most handheld objects, it still only sets the hand’s center to the inputted attach transform without doing any IK. This is where the hand poser package should help as it will manipulate the hands around the picked up object, however the poses are predefined unlike IK.
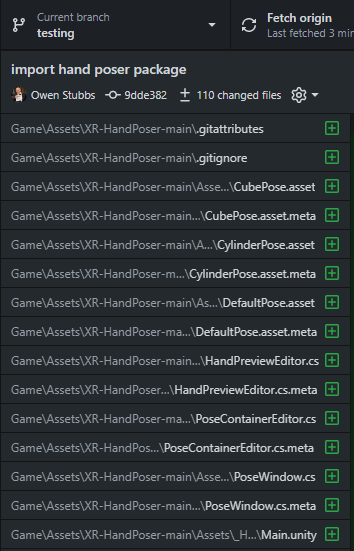
To begin, I will download the ‘XR-HandPoser’ package (C-Through).
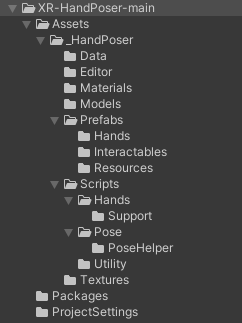
To make sure I am not making these changes to the main game (for now), I will select our ‘testing’ branch in GitHub Desktop, after clicking ‘reload’ in the Unity project, I can now drag the package in to begin importing it’s assets.
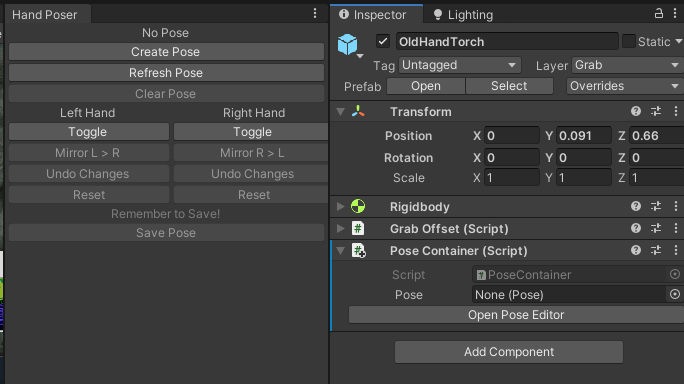
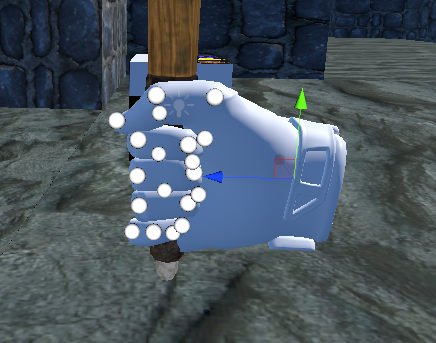
With everything imported, I can select the torch and press ‘Add Component’ to then search for and add the ‘Pose Container’ component which will hold the pose that the hands will use when the torch is picked up. This component also allows me to easily create poses using a GUI that opens after clicking ‘Open Pose Editor’ button. I can now manipulate each joint’s rotation by clicking it’s respective white dot, after all the joints and position of the hand are positioned around the torch correctly, I can mirror it to the other hand and hit ‘Save Pose’.
Since this is only a ‘preview hand’ used for creating the pose in the editor, I will need to create a script which I will call ‘GameplayHand’ which will handle applying the saved pose to the hand and the offset of the object in hand.
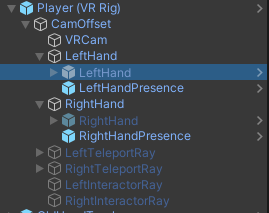
After the script is complete, I can attach it to both the left and right hand prefabs and place them under their respective controller objects in the hierarchy.
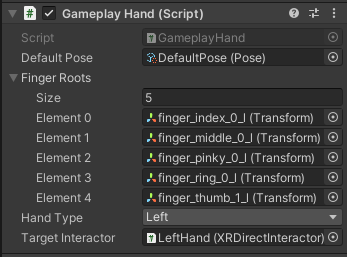
Now I will set up the gameplay hand by setting the type and locate the roots of the fingers. Since I am now using different hand models, I have to replace the old ones that were being instantiated in my hand presence script.
Finally, I need to provide the object in hand with collisions so that it does not clip through objects and ruin the immersion, for this I found that the ‘Velocity Tracking’ movement type under the interactable component did the trick but would introduce some slight judder although it isn’t too concerning.
With everything done, I can hit play to test it out. (Seen below)
Reflection
In my theory, I ruled out the possibility of IK due to it being too complex to implement within the time frame of the project. This left me with the hand poser package which I then compared to the UnityXR solution using an interactable component in my experimentation. The hand poser package was purpose-made to quickly create hand poses and seemed like a good solution as it speeds up the development process so we can focus on other aspects of the game.
Overall I think the I achieved a good result, although it isn’t as fancy and complex as IK, the hand poser package is still much more realistic compared to the original method.
Journal Entry: Version 1
Here I am showing the process of going through the menu and into a test map where I showcase the hand posing (0:32-0:45) that was achieved in my previous experiment.
One thing to note however, is that when I click the “Online” button (at 0:14) in the menu, nothing currently happens as there is no networking solution implemented yet. This button will be the basis of my next experiment where I hope to create a sufficient multiplayer experience which can be provided by certain networking solutions. Upon clicking the button, there will be an option to host a room, or search through a list of rooms to join.
VR Multiplayer Experiment
Research Objective: Since Puzzled (the game I am currently working on) is only singleplayer at the moment, my aim is to research into different methods of implementing multiplayer/networking into it to enhance the player experience.
Theory
VR is a growing market, with games as the primary focus, most developers choose to implement multiplayer as it increases replay value and sales, allows players to make friends and improves teamworking skills. (Hypolite Petovan)
(Josh Bycer) “What multiplayer does is provide a foundation for the player base to essentially “create” more content and ways to play.” This is especially true because players will naturally socialize, combined with the fact that they can interact with objects and other virtual aspects it allows them to play in their own way. If multiplayer was implemented in Puzzled, we could add aspects like synced objects, voice chat, a lobby browser and more. These are all features that can possibly be provided depending on the chosen networking solution and some of them allow clients to contribute to gameplay, therefore creating the multiplayer experience we are familiar with.
There are many different networking solutions, each of which come with their own pros and cons, which are usually with their feature set. For example, Photon Unity Networking 2 or PUN 2 does not have features like Peer-to-Peer, LAN support, lag compensation etc. whereas some other solutions have them built-in or at least support them. (Excel – Networking Comparison)
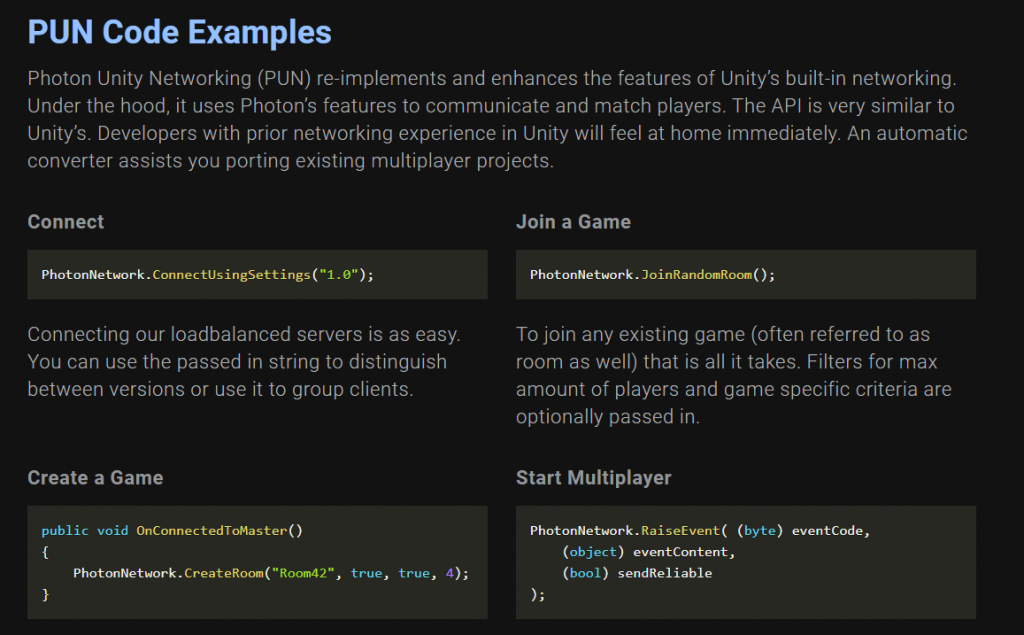
PUN 2 is likely the most popular due to amount of documentation and tutorials that are available, it has tight integration with Unity meaning that it is easy to setup and add things like rooms, networked objects, synchronised animations and plenty more. (PUN Features Site)
The code examples below show the simplicity of the PUN framework which makes frameworks of certain other solutions seem quite futile.
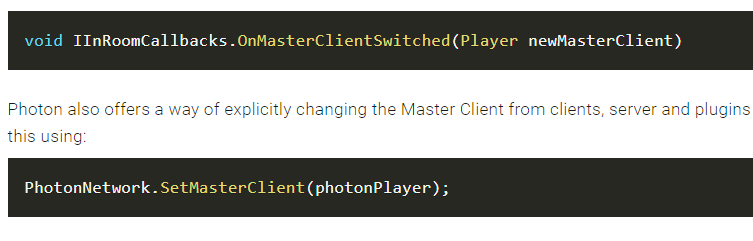
In addition to all of this, PUN 2 comes with optional extensions such as Photon Server, Voice and Chat and they can be easily installed by importing them from the Unity asset store. For Puzzled however, we will only be utilising Photon Voice as we wont need regular chat in a VR game and since we will be using co-op style lobbies, we won’t need Photon Server as the regular Client/Client model should be fine. With a Master Client, one client will host the lobby and others will connect to them and the good thing about PUN 2 is that it’s the only one that has ‘Host Migration’ built-in, which means when the host leaves, the lobby will migrate host to another client in the lobby so they can continue playing. This can be done by using the following callback to detect when a master client has disconnected and method to set a new master client, usually the client with the best connection or next client in the room list will be used.
There are a couple downsides to a Master Client however, one of which is PUN only offers 20 concurrent users (or 5 rooms of 4), much less than the 100 offered by using a Photon Server. The other problem is that client-hacking is always possible unless a Photon Server is used.
(Photon Site – Gameplay) “PUN is a pure client-side implementation without server logic, so it’s economic but of course it’s not cheat proof. For some games that’s OK, for competitive games, it may be not.” This sounds entirely fine for what we are trying to do with Puzzled, there isn’t any competitive aspects so nothing is lost and even if the occasional hacker was to gain access, there would be no benefits they could gain as there are no systems or variables in the game that could be modified in the hackers favour, only at others dismay, in which they could just find a new lobby. I would like to minimise this where possible though, that’s why there are few measures I can take if these issues do crop up; even without using a Photon Server such as using IL2CPP, an anti-cheat toolkit and report/banning system.
Normcore is another solution and it was launched in 2019 after being worked on for 3 years. A lot of developers decide not to implement Multiplayer as it involves a lot of work, this is where Normcore aims to save developers time and encourage more multiplayer titles with hopes to create the best multiplayer networking plugin available. (Max Weisel)
(Normcore – Solutions) “Normcore comes with tools to make it easy to create amazing Virtual Reality and Augmented Reality applications and games. Drag a single prefab into the scene and get avatars, voice chat, and networked physics on every VR headset and mobile AR device.” Given the pricing, this seems very enticing and would speed up development massively, allowing me to focus on important parts of the game which would be especially handy given the time frame I have for Puzzled. However Normcore is a fairly new solution so while their documentation may be good, it is not very extensive and lacks basic guides for things like teleportation and locomotion.
Another good choice is Mirror which is a fork of HLAPI, built on the foundation of Unity’s deprecated UNET. It’s free, open source and also compatible with low level transports such as Epic Online Services and Steam Network which can provide Matchmaking and P2P respectively. (Unity – Mirror Forum)
(Unity – Mirror Forum) “Mirror is optimized for ease of use & probability of success. We needed a networking library that allows us to launch our games and survive the next decade.” It’s easy to be re-assured with Mirror as it has plenty of games that use its library that have seamless multiplayer experiences including ‘The Wall’, ‘Population: ONE’ and they even provide a stress test with 480 concurrent users in a game together, in addition they offer a reward if anyone is able to find a ‘critical exploit’ in within their code showing that they are very confident in the security of their product, all of this combined with a discord with nearly 10,000 members means if you choose Mirror, there is relatively nothing stopping you from making a great multiplayer game.
There are a couple downsides to Mirror however, one of which is that some native UNET features like multiple clients per connection and lobby support have been stripped out. (Unity – Multiplayer Forum)
Another downside is that while Mirror does have Player Lobbies and the ability to communicate built-in, there are quite a few features for example room lists, where players can look through a list of client-hosted rooms to join, custom room options which provide things like a player count, room visibility etc. or slot reservation that will reserve slots in a room for certain players which are all provided as a separate service, usually with a price tag whereas PUN 2 which has them built-in and they come free of charge. The main reason I most likely wont be using Mirror though, is that unlike Normcore or PUN, it’s documentation and framework seems pretty convoluted requiring slightly more dev time than some other solutions, especially if I ever need implement features that aren’t built-in already.
Lastly, there is Photon Bolt which got it’s inspiration from the likes of Halo Reach and Source Engine’s networking. Bolt is also feature rich with authorative movement, mecanim replication and more that I could take advantage of, like if I wanted to implement IK. (Google Doc – Networking Guide) Photon Bolt also has great architecture support including Dedicated Servers, Client Hosting, Local LAN / WiFi and Peer-to-Peer. In addition, it is a stable and mature product with many games under it’s belt e.g. ‘The Forest’, ‘Life of Rome’, ‘The Colony’ proving that it has great scalability and chance of success and I expect a multitude more games to be developed with Bolt as a result (Photon Bolt Showcase)
– Bit more Bolt stuff?
(Robert – Photon Blog) “Developing a multiplayer game with authoritative server logic requires profound coding knowledge, meaning Bolt is rather not suited for beginners.” Since I am a beginner, this sounds pretty off-putting and it is evidenced in that it is much popular than most other solutions, there are not many tutorials available online and a quick read through their documentation will show that there needs to be a deep level of expected knowledge to use Bolt efficiently, something a networking novice like me would be pretty incapable of.
Ultimately, I am going to use PUN 2 due to it being the most mature solution with the most support but it also has many built-in features, few of which I will realistically need for a small co-op game. A couple other solutions like Bolt and Mirror looked enticing at first glance, with a lot more upsides in some cases. However a common theme with them is there is not much documentation or other means of guidance, meaning I would be trying to either cut corners or spend too much time researching to even the simplest things work. This wouldn’t make sense given the fact I could take advantage of PUN’s free features and easy-to-use framework saving both money, time and potential quality of the game.
Research Design
– Import PUN 2 and go through the process of setting it up.
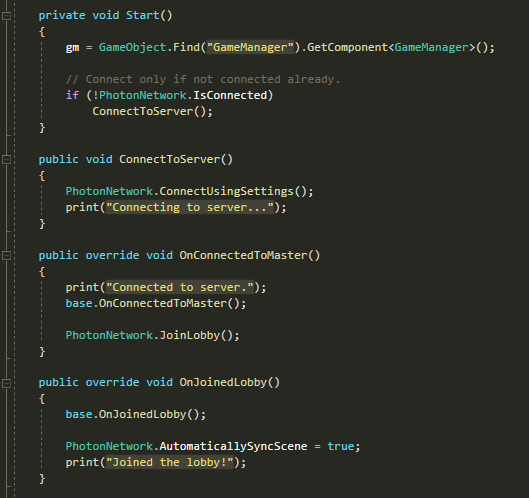
– Create a ‘NetworkManager’ script that will handle connecting to Photon and joining a lobby upon starting the game using callbacks like OnConnectedToMaster and OnJoinedLobby.
– Sync position & rotation of objects across clients using a photon rigidbody/transform view and the state/rendering side using RPC calls.
– Create Network Player which has a head and hands, then also a Network Spawner script which will spawn said Network Player when we join a room.
– Design a UI that will let the player host and look through a list of rooms.
– Utilize the GameManager + NetworkManager and extend StartMenu so the UI will work and clients are able to load the same level as the master client.
Experimentation
To begin, I will navigate to Unity’s Asset Store, search for ‘Photon PUN 2’ download and import it. Now I can go ahead and make an empty game object with a ‘NetworkManager’ script attached which will handle; on it’s own or in conjunction with; anything network related.
Following PUN 2’s documentation, I will open up the script and begin coding the functions that will connect to Photon upon starting the game, in addition I will make the player a join a ‘Lobby’ which will allow them to get updates to the room list and then I can use the OnJoinedLobby callback to make sure whatever scene the master client loads it is synced with all other clients.
The next thing I will try to achieve is to sync the position and rotation of interactable objects like the cube and the torch, for this I will add a regular ‘Photon View’ component and set the ownership field to ‘Takeover’ which will make whichever client is holding the object become the owner.

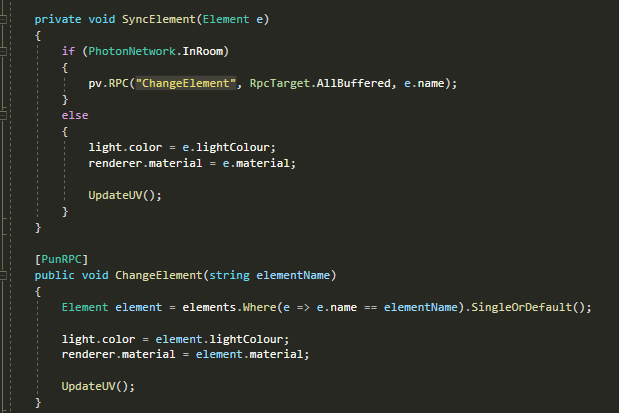
There are some issues with the cube though as the roll number, element and state of the cube will not be the same across clients. I found that I need to some extra work involving Remote Procedure Calls or RPCs which essentially let you can tag a function with ‘[PunRPC]’ and the code inside it will be run an all clients. The problem I came across however is that it is not possible to pass custom data into an RPC call without doing any serialization/deserialization, it’s also much more performant to use a supported data type as they contain less data and RPCs can be called very frequently so it’s possible to hit the msg/second limit set by Photon.
To overcome this, I will create a new function called ‘SyncElement’ which takes in an Element as it would usually, if we are in a room however, it will call another function named ‘ChangeElement’ as an RPC call, passing in the elements name as a parameter. This will then find the element in the array of elements on the client side, change the light colour, material and update the UV accordingly.
The state still isn’t synced though, so I will repeat the same process but tag the ‘SetState’ with PunRPC again then whenever the state of the cube is updated, I can call ‘SyncState’ passing in the constant e.g. ‘Dead’ or ‘Rolling’.
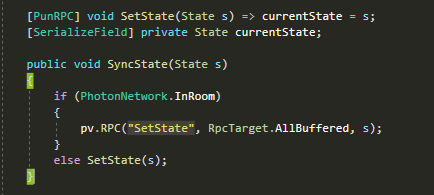
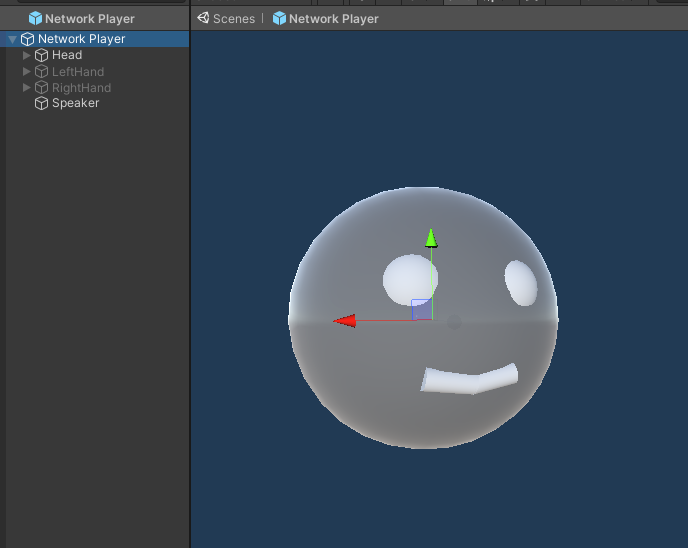
Now that the player can interact with networked objects and they automatically join a lobby, I can begin creating a ‘Network Player’ prefab that will act as the clients networked player that others will see. I will create 3 child objects similar to the local rig, a head, left hand and right hand each with a ‘Photon Transform View’ attached, including the hands’ joints
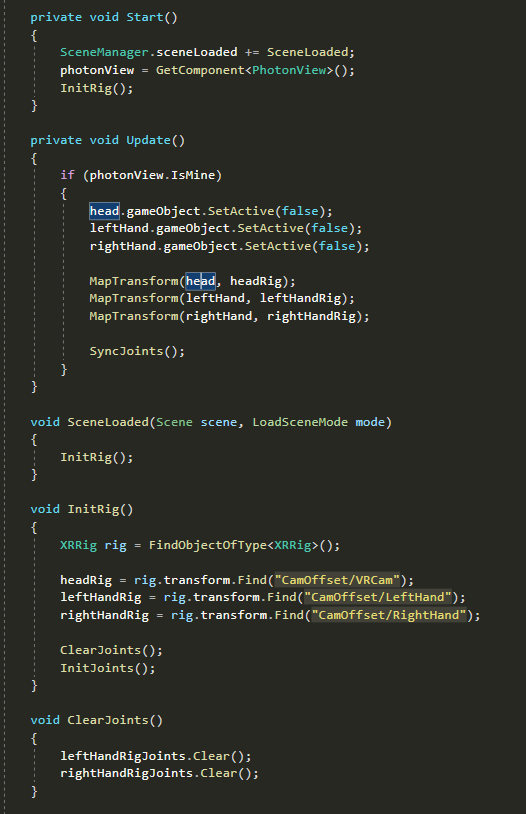
Next I can go ahead and make a script that will handle mapping the position and rotation of these child objects respective to their local rig object every frame so they will sync smoothly. I will also create an ‘InitRig’ function that will try to find the local rig and assign the head and hands. Since this will be called when the game starts as well as when a scene loads, we can prevent errors by clearing the joints array and then initializing them.
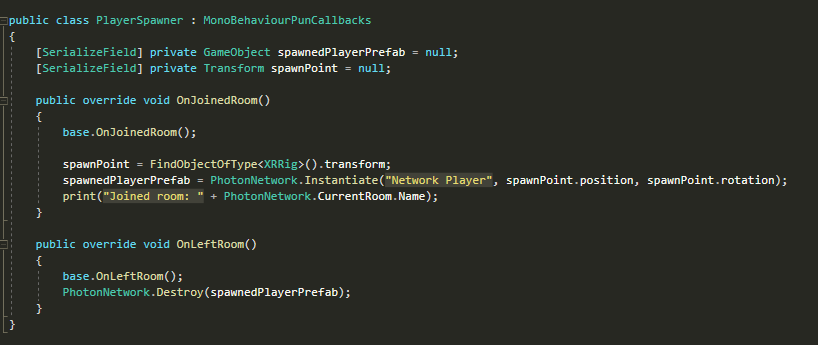
To spawn the player, I will attach a new script to the GameManager object called ‘PlayerSpawner’, inside it I can set the spawn point to where the local rig is located and instantiate (or spawn) the network player we created earlier using the position and rotation of said spawn point. Once a player leaves a room, I destroy the player as they are no longer needed.
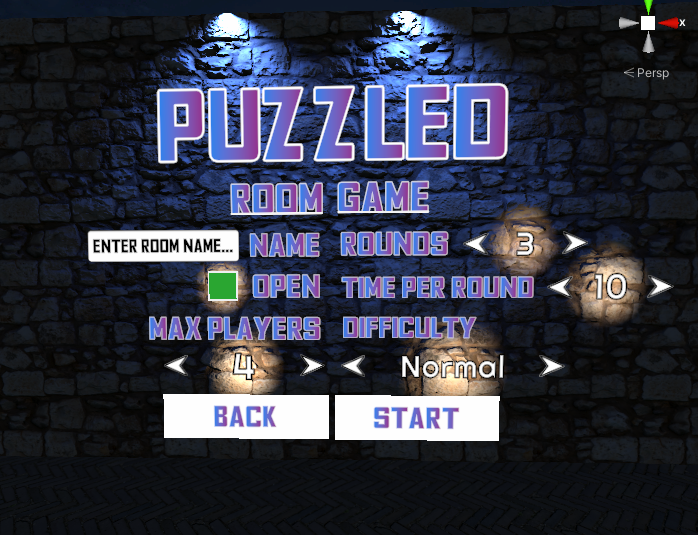
With most of the simple code out of the way, I want to create a system where players can either host a room (with custom settings) themselves, or join a particular room from a list of rooms. I will make two new GUIs and make edits to the ‘StartMenu’ script so they can be displayed properly upon clicking the correct button. For the host GUI, I will just duplicate the existing GUI for starting a solo game, scale it accordingly and add some room related fields.
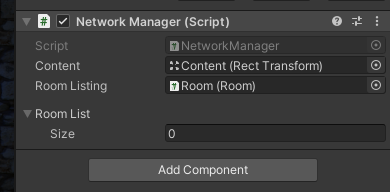
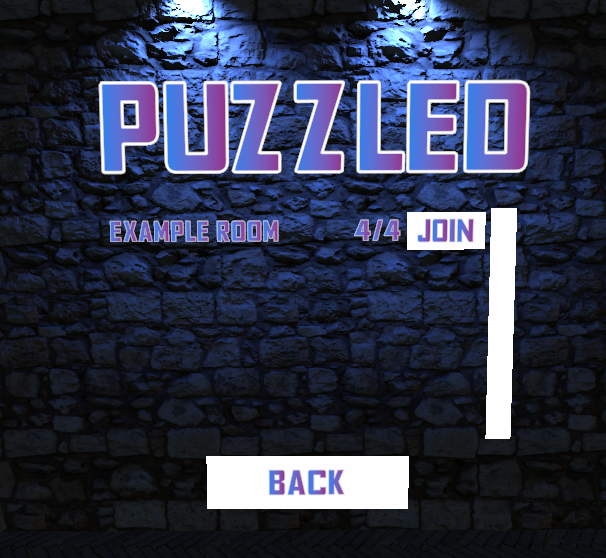
The room list GUI is a little different to make as I want the player to be able to scroll through rooms vertically where each room has a name, join button and player count. Firstly I can add a ‘Scroll View’ component then disable the horizontal bar and add a content size fitter to the ‘Content’ child object of the scroll view so that rooms are correctly spaced.
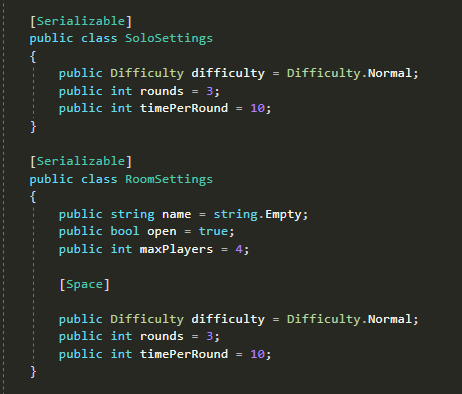
These are only cosmetic at the moment and I need to begin hooking everything up through script to actually give them a purpose. Since I already have a class to handle solo game settings, I will need to create another to handle both room and game settings when the player chooses to host a lobby. In my ‘GameManager’ script, I will duplicate ‘SoloSettings’ and rename the new one to ‘RoomSettings’ which will hold the same info but with some extra room related fields.
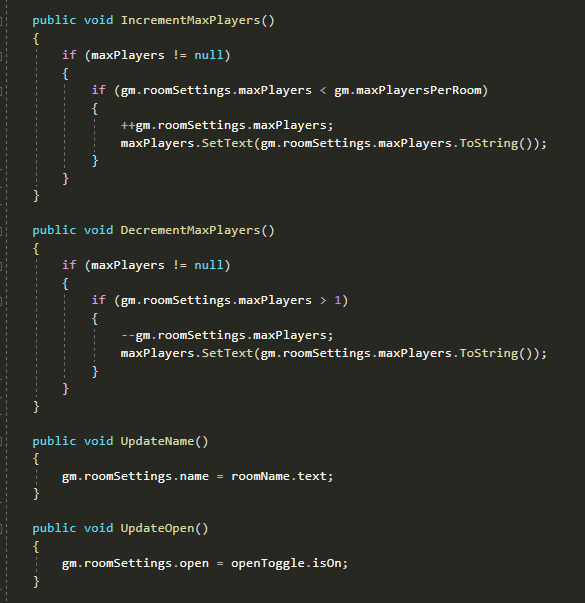
Then I shall extend the StartMenu to accommodate new functions that will increment and decrement the max players, update the room name and whether or not the room is open, all according to what the player has set on the menu.
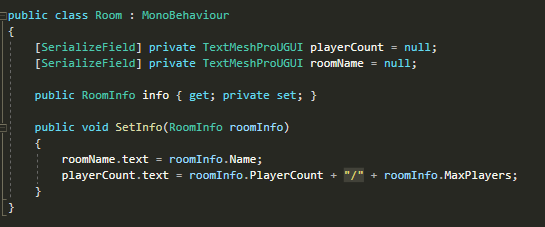
Now I will make a new ‘Room’ script that will be attached to the room prefab we made earlier which will be instantiated through the network manager and shall hold room info.
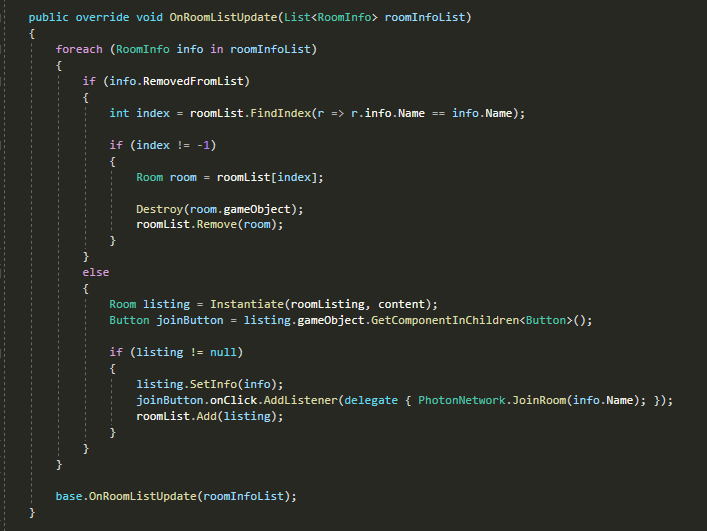
All that is left to do now is write code inside ‘NetworkManager’ for updating the room list where we can determine whether to instantiate or remove a room from the GUI.
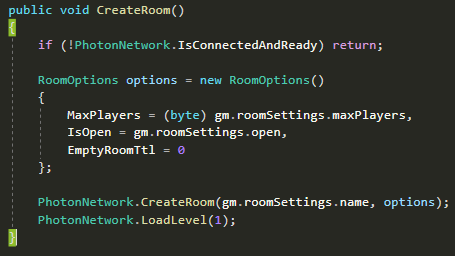
A very important last thing I want to achieve is making the ‘Start’ button (within the host menu) functional so that it will load the main map. I can initialize a new ‘RoomOptions’ variable that will use the new room settings we made in the game manager, call ‘CreateRoom’ passing in the options and finally load a specific level by it’s index, in this case the main map who’s index is 1.
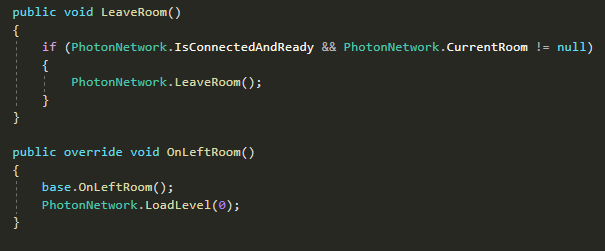
I also made a 2 small functions that will work together, the first will simply check if we are connected and in a room, go ahead and leave it which will send us back to the master server. The second will then place us back in the lobby level with it’s index of 0 when we have fully left the room. ‘LeaveRoom’ is not called from anywhere yet but it will hopefully be used in future when the game ends and also from a ‘Leave’ button within the player’s settings menu.
With every core mechanic and GUI done, everything should work in harmony and players should be able join or host a room and objects should be synced.
The video below shows what was achieved.
Reflection
I learned quite a bit about networking during this experiment, like that there are many different networking solutions and each have their own use cases. I think I made the right decision going with PUN 2 although I still had to learn basic game networking concepts like Client/Server, Rooms and Remote Procedure Calls (RPCs) which don’t behave nicely when trying to send custom data.
Maybe I should’ve spent less time on my theory section and narrowed the solutions down in order to get multiplayer implemented quicker, saving me time which may of allowed me to add more features like leaving a room, proximity chat and a ready-up system instead of instantly loading the main map. There is a lot of room for improvement which is evident in the video e.g. the state/element of the cube will sometimes get mixed up between clients, element boxes are not synced so they are different on all clients, there is no way to leave a room and many other small issues. Overall though, it turned out well and I am pleased with what was accomplished and that my research objective was achieved and in some ways exceeded.